Secure authentication and authorization for Kubernetes apps 👮♀
📌 Introduction:
Authenticating applications on Kubernetes can be a complex process, but integrating Okta, Istio, and OAuth2-Proxy provides a powerful solution.
This guide will walk you through the steps to establish a robust and secure authentication framework for your Kubernetes-based applications.
From using Istio for OpenID Connect (OIDC) authentication to leveragibg OAuth2-Proxy for seamless interaction with identity providers like Okta, this integration allows you to enforce user authentication and authorization with confidence.
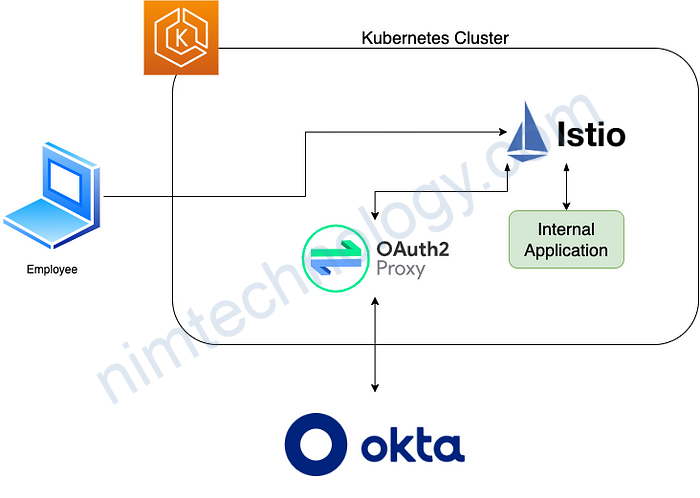
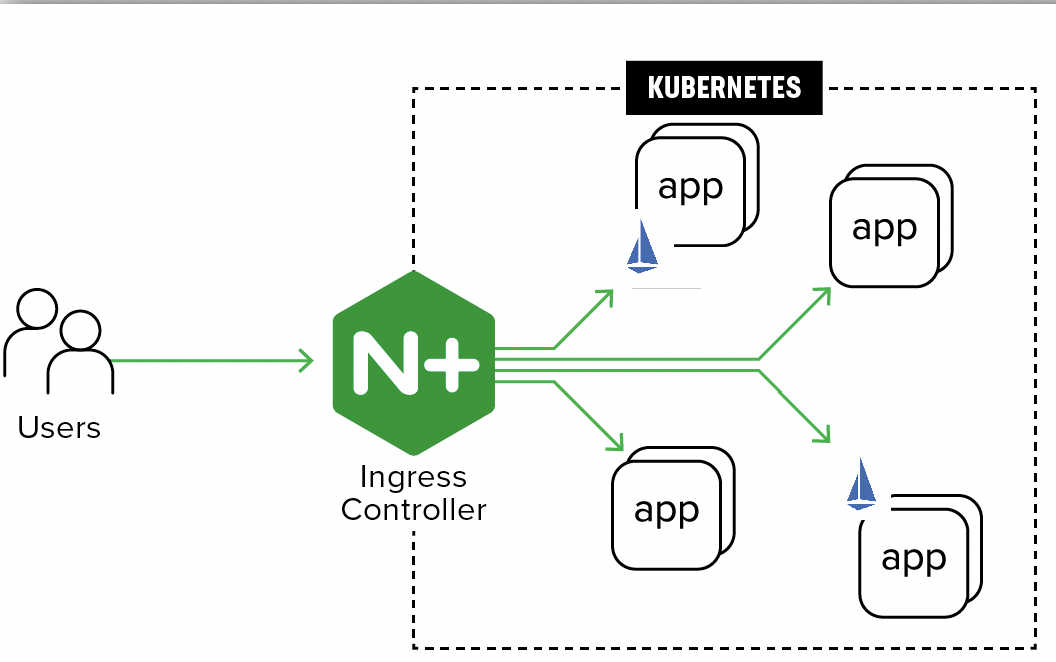
Workflow and Architecture Diagram:
- An employee tries to access an internal application (i.e. admin-service).
- The employee connects to the application URL and the request is sent to the Istio service mesh inside our Kubernetes cluster.
- The request arrives via the Istio Ingress Gateway
- We have an Istio authorization policy that limits access to the admin service.
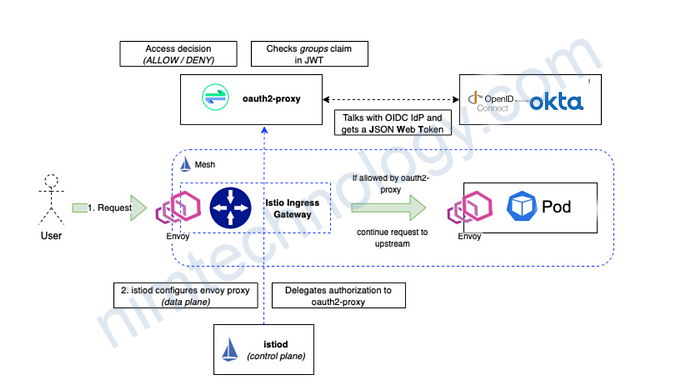
- The authorization policy points use the custom extension provider, Oauth2-Proxy. Oauth2-Proxy is setup to connect with our identity provider which is Okta.
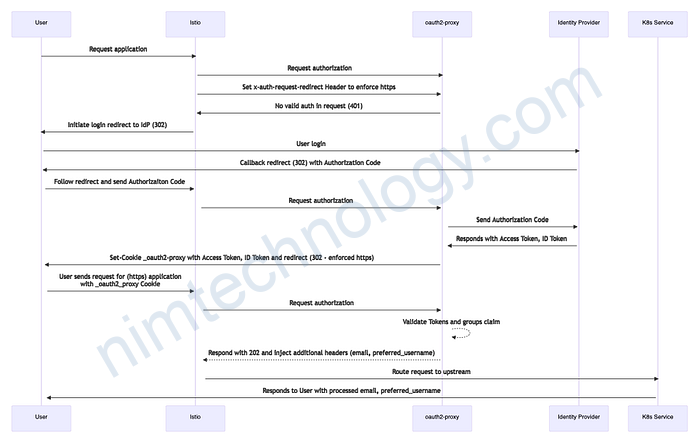
- When the User is authenticated successfully with our IdP, oauth2-proxy gets a JWT back and looks into the “groups” claim. This will be evaluated against any groups we have configured, let’s say “admins”. If the “admins” group is found in the JWT groups claim, oauth2-proxy puts the Token into a Cookie and sends it back to the requesting client — our User.
- The employee’s request is redirected to Okta for login. On successful authentication, it passes through the Istio authorization policy and connects with the admin service.
- The User will now be forwarded to the actual application. If the application supports it (e.g. Grafana) we can configure the application to look into the headers we inject with oauth2-proxy. This allows us to set for example the
prefered_usernameoremailattributes in the application – info we get from the ID token claims.
Technologies Used:
Setup Okta Application for OAuth2-Proxy:
This Okta application will allow for access management to your application.
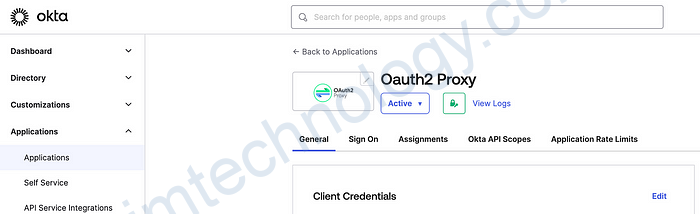
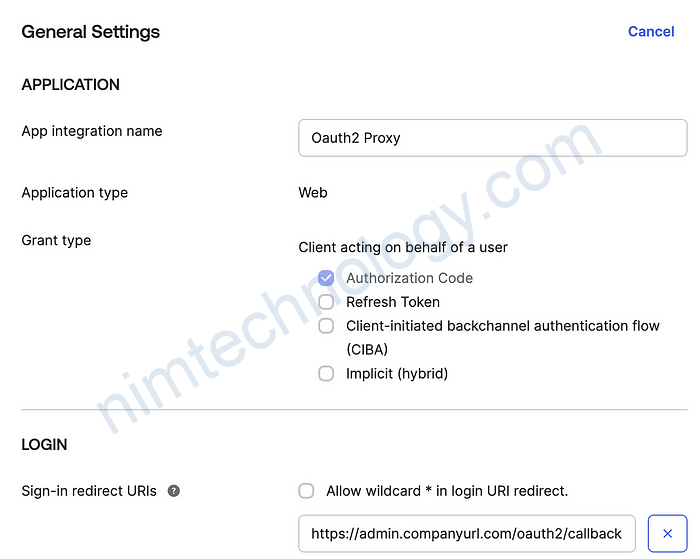
Be sure to include the URL of your internal application as the sign-in redirect URI in Okta. This allows Okta to redirect to your internal app after authenticating an employee.
You can also add other internal app URLs to this application. However, be aware that any Okta users or groups added to this Okta application will be able to access every internal application URL listed.
If you need to control access to an application for specific groups, such as allowing only the finance team to access an application, you will need to create a separate OAuth2-Proxy app in Okta for each application you want to customize access to.
Deploy OAuth2-Proxy to Kubernetes:
Oauth2-proxy is an open-source software handling the authentication flow needed for OAuth2 or in this case OIDC.
This will handle the Authentication flow and pass the needed token back to the application.
Install by replacing oauth2-proxy-values.yaml with your value then apply with:
helm repo add oauth2-proxy https://oauth2-proxy.github.io/manifests
helm repo update
helm install \
  --values oauth2-proxy-values.yaml oauth2-proxy oauth2-proxy/oauth2-proxy
Where oauth2-proxy-values.yaml:
config:
  clientID: xx
  clientSecret: xx
  cookieSecret: xx
  configFile: false

extraArgs:
 provider: oidc
 cookie-secure: true
 cookie-samesite: lax
 cookie-refresh: 1h
 cookie-expire: 4h
 cookie-name: _oauth2_proxy_istio_ingressgateway
 set-authorization-header: true
 email-domain: "*"
 http-address: 0.0.0.0:4180
 upstream: static://200
 skip-provider-button: true
 oidc-issuer-url: {{ .Values | get "charts.oauth2-proxy.issuer" "https://your-okta.com" }}
service:
  portNumber: 4180

serviceAccount:
  enabled: false

resources:
   limits:
     cpu: 100m
     memory: 300Mi
   requests:
     cpu: 100m
     memory: 300Mi

livenessProbe:
  enabled: true
  initialDelaySeconds: 0
  timeoutSeconds: 1

readinessProbe:
  enabled: true
  initialDelaySeconds: 0
  timeoutSeconds: 1
  periodSeconds: 10
  successThreshold: 1

metrics:
  # Enable Prometheus metrics endpoint
  enabled: false

replicaCount: 2

podDisruptionBudget:
  enabled: true
  minAvailable: 1

topologySpreadConstraints:
  - maxSkew: 1
    topologyKey: topology.kubernetes.io/zone
    whenUnsatisfiable: ScheduleAnyway
    labelSelector:
      matchLabels:
        app.kubernetes.io/instance: {{ .Release.Name }}
Add OAuth2-Proxy as an extension provider in Istio:
Inside your Istio mesh config, you will need to add an extension provider. This will reference the OAuth2-Proxy deployment and will allow us to use OAuth2-Proxy as a CUSTOM action in our Istio Authorization Policy.
meshConfig:
  extensionProviders:
  - name: oauth2-proxy
    envoyExtAuthzHttp:
      service: oauth2-proxy.oauth2-proxy.svc.cluster.local
      port: 4180
      headersToDownstreamOnDeny:
      - content-type
      - set-cookie
      headersToUpstreamOnAllow:
      - authorization
      - path
      - x-auth-request-user
      - x-auth-request-email
      - x-auth-request-access-token
      includeHeadersInCheck:
      - authorization
      - cookie
  defaultConfig:
    terminationDrainDuration: 310s
This config is creating a new provider with the name oauth2-proxy. This can later be used in the authorization-policy to route requests through the oauth2-proxy. The rest of this config is basically what headers to include to make sure the correct tokens are passed along.
Add Istio Authorization policy:
Finally, apply the authorization-policy to tell Istio what requests should be routed through the oauth2-proxy.
This CUSTOM authorization policy allows us to restrict access to the host specified and authenticate via Okta and the OAuth2-Proxy. See the Istio reference document for more info.
apiVersion: security.istio.io/v1beta1
kind: AuthorizationPolicy
metadata:
  name: oauth-policy
  namespace: istio-system
spec:
  selector:
    matchLabels:
      istio: ingressgateway
  action: CUSTOM
  provider:
    name: "oauth2-proxy"
  rules:
  - to:
    - operation:
        hosts:
          - <INTERNAL APPLICATION HOST>
The most important part of this config is the provider name which has to match the provider created in the meshConfig part of the istio-controlplane.yaml and the hosts list which is the host names that the policy applies to.
Apply by replacing <INTERNAL GRAFANA HOST> with your app URL in authorization-policy.yaml then run:
kubectl apply -f authorization-policy.yamlAuthentication and Authorization:
If you have made it this far you have probably heard of authentication vs authorization before. I just want to make it clear that this use case of Istio is only used for Authentication. Istio will route to the authentication service and if a valid token is presented it will pass you on to the application. This provides some security for all the applications but the application will still have to be responsible for Authorization and any form of RBAC.
🖋 Final notes:
This blog post aims to provide a clear understanding of how to use Istio and OAuth2-Proxy for authentication in Kubernetes applications. By following the steps outlined in the guide, you can ensure that your applications are secure and that user authentication and authorization are enforced with confidence.
The integration of Okta, Istio, and OAuth2-Proxy allows you to leverage the power of these tools to create a robust and secure authentication framework for your Kubernetes-based applications.
Reference:
- Istio: External Authorization
- Welcome to OAuth2 Proxy | OAuth2 Proxy
- https://events.istio.io/istiocon-2021/slides/d8p-DeepDiveAuthPolicies-LawrenceGadban.pdf
- Alpha Configuration | OAuth2 Proxy
- OpenId Connect Scopes
- SaaS Identity and Routing with Istio Service Mesh and Amazon EKS | Amazon Web Services
- Istio OIDC Authentication | Jetstack Blog
- Istio and OAuth2-Proxy in Kubernetes for microservice authentication
- Alternative to oauth2-proxy: https://github.com/istio-ecosystem/authservice
- Alternative to oauth2-proxy: http://openpolicyagent.org