Phần này thì mình sẽ hướng dẫn cách setup một hệ thống VPN tại gia.
1) Install OpenVPN Server
Hiện tại mình cài đặt trên ubuntu.
curl -O https://raw.githubusercontent.com/angristan/openvpn-install/master/openvpn-install.sh
chmod +x openvpn-install.sh

./openvpn-install.sh
Chạy script Setup OpenVPN server.
root@ip-10-195-48-68:~# ./openvpn-install.sh interactive

=== OpenVPN Installer ===

The git repository is available at: https://github.com/angristan/openvpn-install
I need to ask you a few questions before starting the setup.
You can leave the default options and just press enter if you are okay with them.

Detecting server IP addresses...
  IPv4 address detected: 10.195.48.68
  No IPv6 address detected

What IP version should clients use to connect to this server?
   1) IPv4
   2) IPv6
Endpoint type [1-2]: 1

Server listening IPv4 address:
IPv4 address: 10.195.48.68

It seems this server is behind NAT. What is its public IPv4 address or hostname?
We need it for the clients to connect to the server.
Public IPv4 address or hostname: dr-strange.nimtechnology.com

What IP versions should VPN clients use?
This determines both their VPN addresses and internet access through the tunnel.
   1) IPv4 only
   2) IPv6 only
   3) Dual-stack (IPv4 + IPv6)
Client IP versions [1-3]: 1

IPv4 VPN subnet:
   1) Default: 10.8.0.0/24
   2) Custom
IPv4 subnet choice [1-2]: 1

What port do you want OpenVPN to listen to?
   1) Default: 1194
   2) Custom
   3) Random [49152-65535]
Port choice [1-3]: 443
Port choice [1-3]: 12
Port choice [1-3]: 2
Custom port [1-65535]: 443

What protocol do you want OpenVPN to use?
UDP is faster. Unless it is not available, you shouldn't use TCP.
   1) UDP
   2) TCP
Protocol [1-2]: 2

What DNS resolvers do you want to use with the VPN?
   1) Current system resolvers (from /etc/resolv.conf)
   2) Self-hosted DNS Resolver (Unbound)
   3) Cloudflare (Anycast: worldwide)
   4) Quad9 (Anycast: worldwide)
   5) Quad9 uncensored (Anycast: worldwide)
   6) FDN (France)
   7) DNS.WATCH (Germany)
   8) OpenDNS (Anycast: worldwide)
   9) Google (Anycast: worldwide)
   10) Yandex Basic (Russia)
   11) AdGuard DNS (Anycast: worldwide)
   12) NextDNS (Anycast: worldwide)
   13) Custom
DNS [1-13]: 9

Do you want to allow a single .ovpn profile to be used on multiple devices simultaneously?
Note: Enabling this disables persistent IP addresses for clients.
Allow multiple devices per client? [y/n]: n

Do you want to customize the tunnel MTU?
   MTU controls the maximum packet size. Lower values can help
   with connectivity issues on some networks (e.g., PPPoE, mobile).
   1) Default (1500) - works for most networks
   2) Custom
MTU choice [1-2]: 1

Choose the authentication mode:
   1) PKI (Certificate Authority) - Traditional CA-based authentication (recommended for larger setups)
   2) Peer Fingerprint - Simplified WireGuard-like authentication using certificate fingerprints
      Note: Fingerprint mode requires OpenVPN 2.6+ and is ideal for small/home setups
Authentication mode [1-2]: 1

Do you want to customize encryption settings?
Unless you know what you're doing, you should stick with the default parameters provided by the script.
Note that whatever you choose, all the choices presented in the script are safe (unlike OpenVPN's defaults).
See https://github.com/angristan/openvpn-install#security-and-encryption to learn more.

Customize encryption settings? [y/n]: n

Okay, that was all I needed. We are ready to setup your OpenVPN server now.
You will be able to generate a client at the end of the installation.
Đoạn này cũng có tạo user mà mình quên chụp òi.
Không sao đi xuống bược tiếp theo
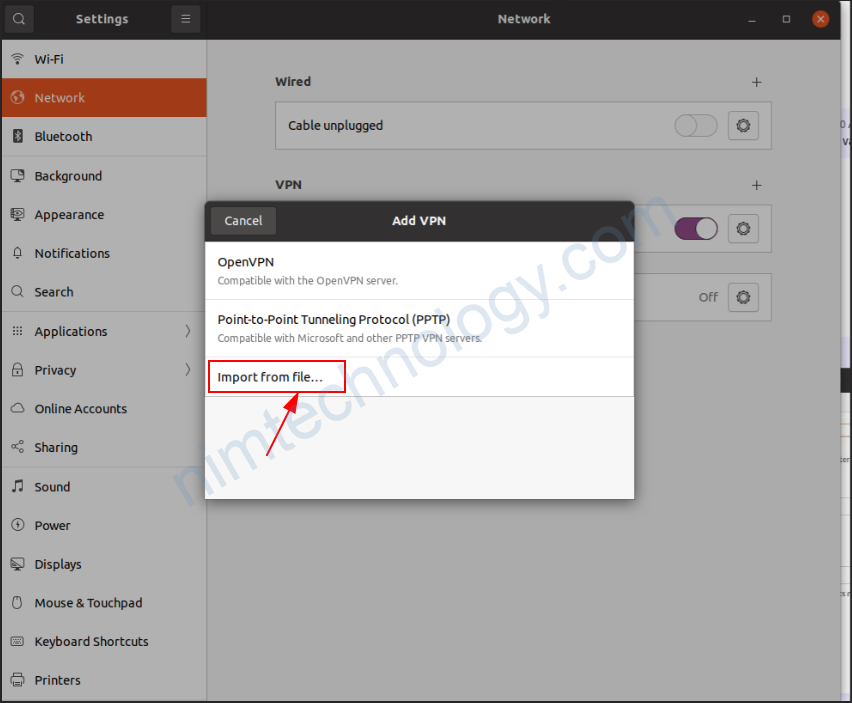
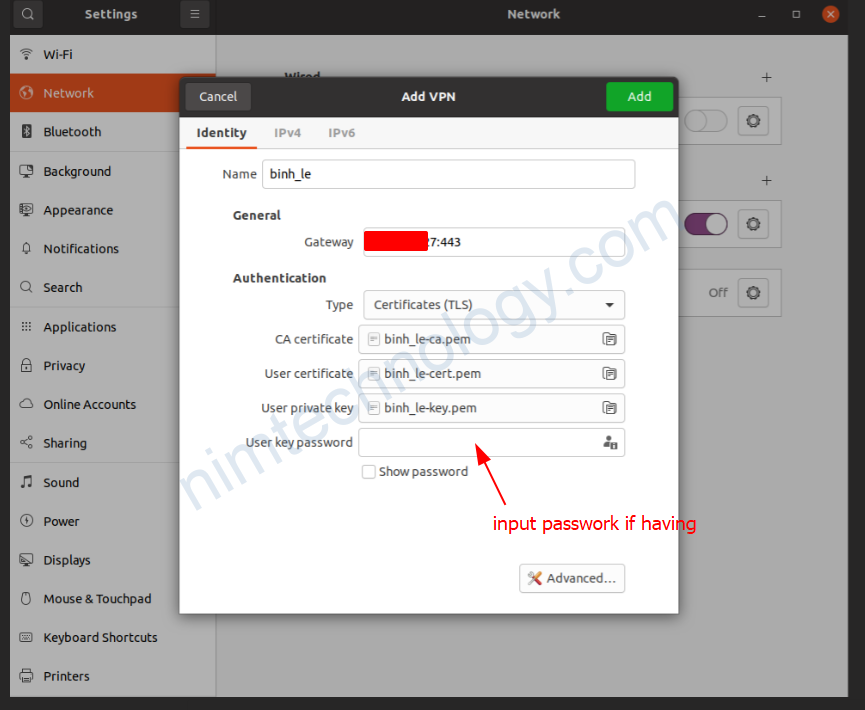
2) OpenVPN Client
2.1) Create OpenVPN Client.
Giờ bạn cần Gen a file cho client.
root@ip-10-195-92-26:~/openvpn# ./openvpn-install.sh
Welcome to OpenVPN-install!
The git repository is available at: https://github.com/angristan/openvpn-install

It looks like OpenVPN is already installed.

What do you want to do?
   1) Add a new user
   2) Revoke existing user
   3) Remove OpenVPN
   4) Exit
Select an option [1-4]: 1

Tell me a name for the client.
The name must consist of alphanumeric character. It may also include an underscore or a dash.
Client name: lac_phan

Do you want to protect the configuration file with a password?
(e.g. encrypt the private key with a password)
   1) Add a passwordless client
   2) Use a password for the client
Select an option [1-2]: 2
⚠️ You will be asked for the client password below ⚠️

Note: using Easy-RSA configuration from: /etc/openvpn/easy-rsa/vars
Using SSL: openssl OpenSSL 1.1.1  11 Sep 2018
Generating an EC private key
writing new private key to '/etc/openvpn/easy-rsa/pki/easy-rsa-26953.24JWu6/tmp.2aH2ez'
Enter PEM pass phrase:
Verifying - Enter PEM pass phrase:
-----
Using configuration from /etc/openvpn/easy-rsa/pki/easy-rsa-26953.24JWu6/tmp.hxugDk
Check that the request matches the signature
Signature ok
The Subject's Distinguished Name is as follows
commonName            :ASN.1 12:'lac_phan'
Certificate is to be certified until Feb 17 11:48:19 2025 GMT (825 days)

Write out database with 1 new entries
Data Base Updated

Client lac_phan added.

The configuration file has been written to /home/ubuntu/lac_phan.ovpn.
Download the .ovpn file and import it in your OpenVPN client.
2.2) Configure OpenVPN on Ubuntu desktop

Làm sao để tắt được default route về tun0.
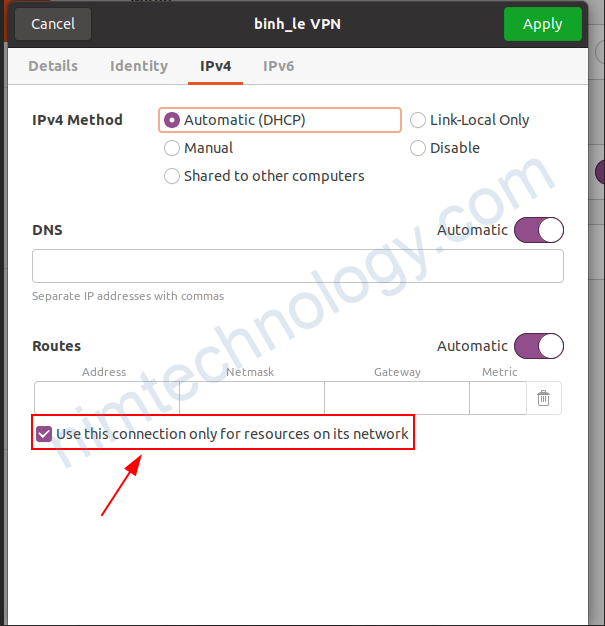
Edit the VPN connection -> IPv4 Settings -> Click “Routes”, and finally check “Use this connection only for resources on its network“.
Giờ show route table lại.

2.4) Configure OpenVPN on Ubuntu server (only command not UI)
Mở terminal và chạy lệnh cài đặt:
sudo apt update
sudo apt install openvpn -yTạo file Private Key Password
# Replace 'YOUR_KEY_PASSWORD_HERE' with your actual private key password
echo "YOUR_KEY_PASSWORD_HERE" > /root/private-key/key-pass.txt

# Set permissions so only root can read it (security best practice)
chmod 600 /root/private-key/key-pass.txt
Sau đó bạn update OpenVPN configuration file để sử dụng với file key-pass.txt
mở file:
nano thang_tran_dev.openvpnTiếp theo bạn add line bên dưới ở bất cứ chỗ nào:
askpass /root/private-key/key-pass.txtGiờ bạn gõ lệnh sau để kết nối:
openvpn --config thang_tran_dev.openvpnHoặc bạn có thể gõ password trực tiếp:
openvpn --config client.ovpn --askpass3) Configure OpenVPN
3.1) Not Allowing all traffic of clients to go through the OpenVPN Server
Nhu cầu sẽ là như sau:
Khi bạn truy cập vào server trong internal network của công ty thì các gói tin sẽ gửi qua VPN.
khi bạn truy cập youtube hay facebook thì không đi qua VPN
Bước 1 bạn cần ignored line dưới bằng dấu ";"
;####command dong ben duoi de all traffic of client ko dia qua openvpn-server####
;push "redirect-gateway def1 bypass-dhcp"
Tiếp theo là cấu hinhg routing và gán DNS cho client
;##########cau hinh route local nhu ben duoi###########
push "dhcp-option DNS 8.8.8.8"
push "route 8.8.8.8 255.255.255.255"
push "route 192.168.1.0 255.255.255.0"
Bạn cần chú ý chỗ này.
OpenVPN server sẽ gán dns cho client là 8.8.8.8: push "dhcp-option DNS 8.8.8.8"
Nếu client phần giả tên miến nimtechnology.com gửi một gói tin đến 8.8.8.8 port 53 và không đi qua VPN sẽ bị chặn.
Vì thế ta phải đi tạo route cho 8.8.8.8 đi qua vpn: push “route 8.8.8.8 255.255.255.255”
with Ubuntu
Với ubuntu desktop thì bạn cần làm điều này nữa:
Edit the VPN connection -> IPv4 Settings -> Click “Routes”, and finally check “Use this connection only for resources on its network“.
Để xóa default của openvpn
3.2) Use Oauthen to log in via OpenVPN
https://medium.com/@jkroepke/openvpn-sso-via-oauth2-ab2583ee8477
https://github.com/jkroepke/openvpn-auth-oauth2
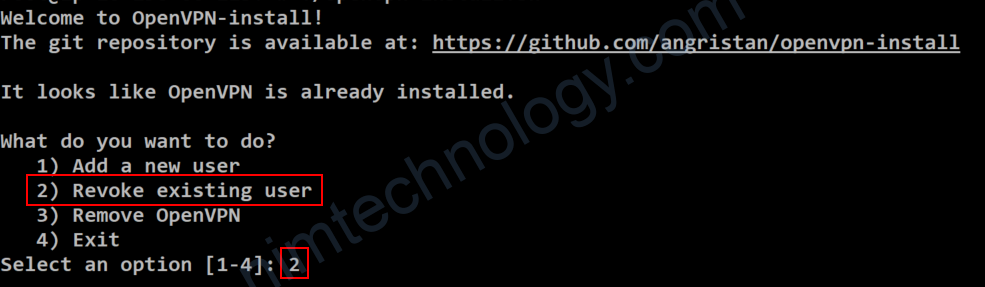
4) Remove the user on OpenVPN.
Run open-install.sh script

Choose to revoke user
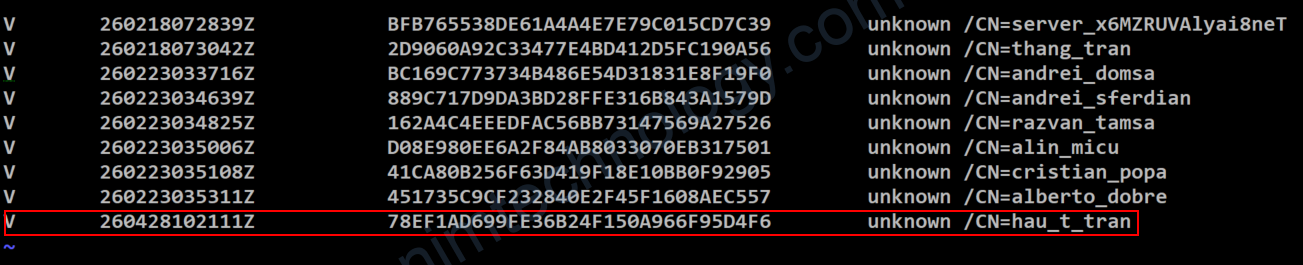
Remove user in /etc/openvpn/easy-rsa/pki/index.txt.

For example, I will remove hau_t_tran user by deleting the below line.
Automatically connect OpenVPN client on WSL startup.
I have configured WSL to run your OpenVPN command automatically on startup.
I created the file /etc/wsl.conf and added a [boot] command that includes the –daemon flag to ensure OpenVPN runs
in the background without blocking the startup process:
[boot]
command = openvpn --config /root/private-key/s22-ultra.ovpn --daemonHow to apply this change:
For the new boot command to take effect, you must restart your WSL virtual machine. To do this, open a command
prompt or PowerShell on your Windows host (not inside WSL) and run:
wsl --shutdownThe next time you open your WSL terminal, it will automatically start back up, and the OpenVPN connection will be
established in the background.