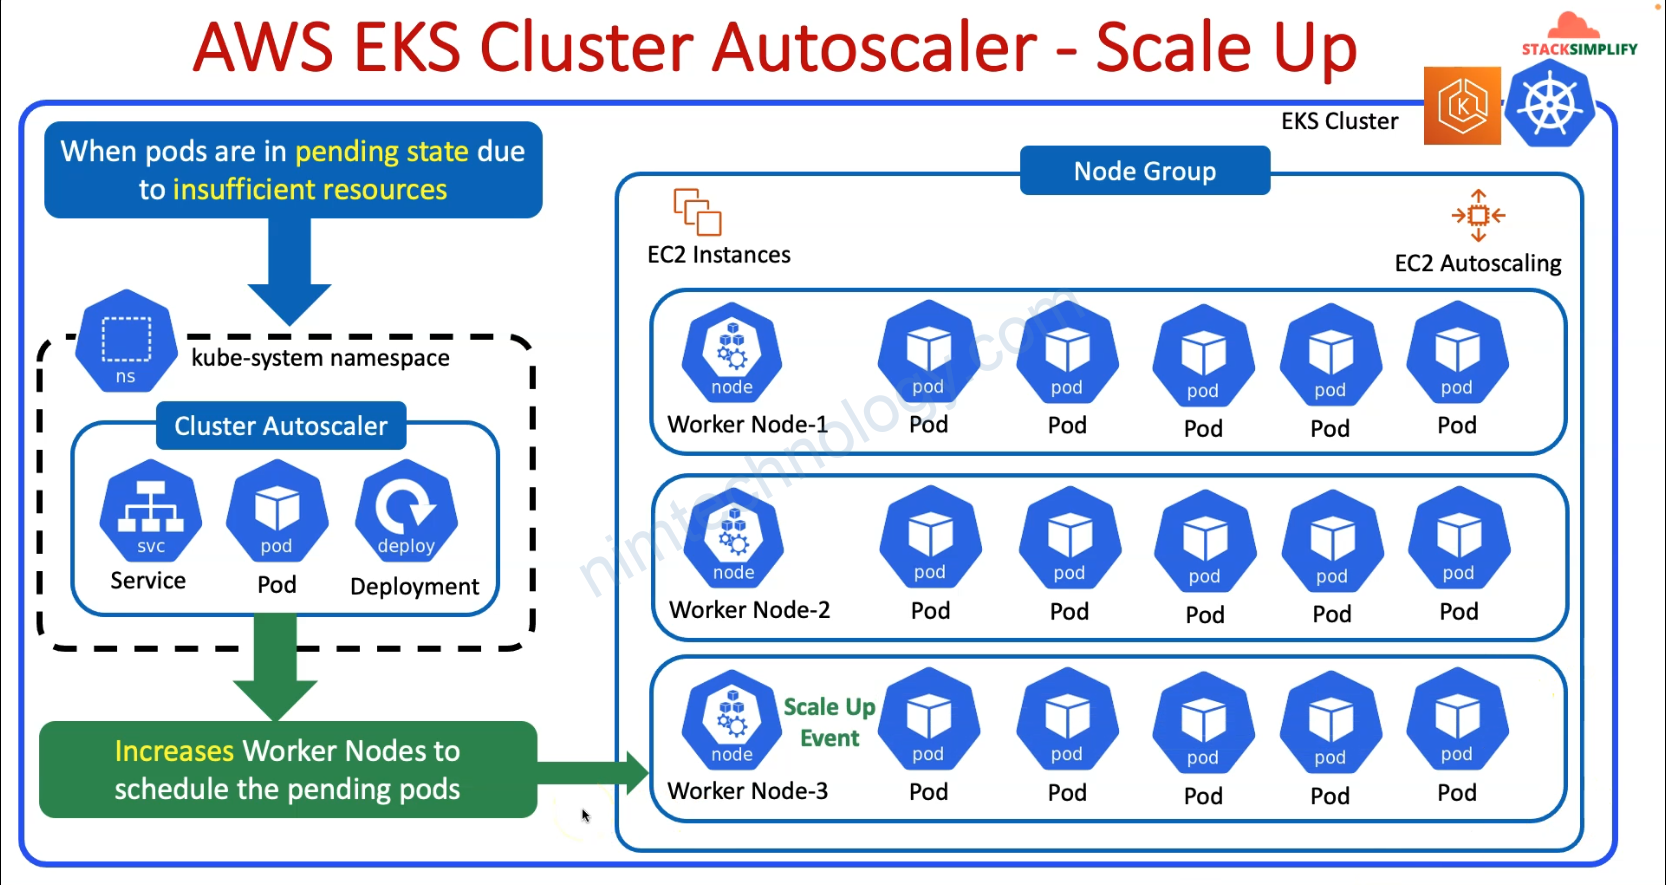
Một ngày đẹp trời bạn nhận thấy cluster eks nó tự động tăng số lượng node rồi lại tự giảm.
Nếu bạn chưa biết tạo sao thì tìm hiểu Cluster Autoscaler trên EKS
1) Look into Cluster Autoscaler on EKS


2) Install Cluster Autoscale on EKS
Để làm được bài này thì mình nghĩ các bạn nên đọc bài viết bên dưới trước.
# Resource: IAM Policy for Cluster Autoscaler
resource "aws_iam_policy" "cluster_autoscaler_iam_policy" {
  name        = "${local.name}-AmazonEKSClusterAutoscalerPolicy"
  path        = "/"
  description = "EKS Cluster Autoscaler Policy"

  # Terraform's "jsonencode" function converts a
  # Terraform expression result to valid JSON syntax.
  policy = jsonencode({
    "Version": "2012-10-17",
    "Statement": [
        {
            "Action": [
                "autoscaling:DescribeAutoScalingGroups",
                "autoscaling:DescribeAutoScalingInstances",
                "autoscaling:DescribeInstances",
                "autoscaling:DescribeLaunchConfigurations",
                "autoscaling:DescribeTags",
                "autoscaling:SetDesiredCapacity",
                "autoscaling:TerminateInstanceInAutoScalingGroup",
                "ec2:DescribeLaunchTemplateVersions",
                "ec2:DescribeInstanceTypes"
            ],
            "Resource": "*",
            "Effect": "Allow"
        }
    ]
})
}

# Resource: IAM Role for Cluster Autoscaler
## Create IAM Role and associate it with Cluster Autoscaler IAM Policy
resource "aws_iam_role" "cluster_autoscaler_iam_role" {
  name = "${local.name}-cluster-autoscaler"

  # Terraform's "jsonencode" function converts a Terraform expression result to valid JSON syntax.
  assume_role_policy = jsonencode({
    Version = "2012-10-17"
    Statement = [
      {
        Action = "sts:AssumeRoleWithWebIdentity"
        Effect = "Allow"
        Sid    = ""
        Principal = {
          Federated = "${data.terraform_remote_state.eks.outputs.aws_iam_openid_connect_provider_arn}"
        }
        Condition = {
          StringEquals = {
            "${data.terraform_remote_state.eks.outputs.aws_iam_openid_connect_provider_extract_from_arn}:sub": "system:serviceaccount:kube-system:cluster-autoscaler"
          }
        }
      },
    ]
  })

  tags = {
    tag-key = "cluster-autoscaler"
  }
}


# Associate IAM Policy to IAM Role
resource "aws_iam_role_policy_attachment" "cluster_autoscaler_iam_role_policy_attach" {
  policy_arn = aws_iam_policy.cluster_autoscaler_iam_policy.arn
  role       = aws_iam_role.cluster_autoscaler_iam_role.name
}

output "cluster_autoscaler_iam_role_arn" {
  description = "Cluster Autoscaler IAM Role ARN"
  value = aws_iam_role.cluster_autoscaler_iam_role.arn
}
resource “aws_iam_policy” “cluster_autoscaler_iam_policy” {}
==> Tạo policy cho phép access và acction trên AutoScaling

resource “aws_iam_role” “cluster_autoscaler_iam_role” {}
==> tạo Assume Role cho phép sử dụng service account để access AutoScaling


Giờ bạn tiền hay lấy các credentials để helm Install.
# Datasource: EKS Cluster Auth
data "aws_eks_cluster_auth" "cluster" {
  name = data.terraform_remote_state.eks.outputs.cluster_id
}

# HELM Provider
provider "helm" {
  kubernetes {
    host                   = data.terraform_remote_state.eks.outputs.cluster_endpoint
    cluster_ca_certificate = base64decode(data.terraform_remote_state.eks.outputs.cluster_certificate_authority_data)
    token                  = data.aws_eks_cluster_auth.cluster.token
  }
}
# Install Cluster Autoscaler using HELM

# Resource: Helm Release
resource "helm_release" "cluster_autoscaler_release" {
  depends_on = [aws_iam_role.cluster_autoscaler_iam_role ]
  name       = "${local.name}-ca"

  repository = "https://kubernetes.github.io/autoscaler"
  chart      = "cluster-autoscaler"

  namespace = "kube-system"

  set {
    name  = "cloudProvider"
    value = "aws"
  }

  set {
    name  = "autoDiscovery.clusterName"
    value = data.terraform_remote_state.eks.outputs.cluster_id
  }

  set {
    name  = "awsRegion"
    value = var.aws_region
  }

  set {
    name  = "rbac.serviceAccount.create"
    value = "true"
  }

  set {
    name  = "rbac.serviceAccount.name"
    value = "cluster-autoscaler"
  }

  set {
    name  = "rbac.serviceAccount.annotations.eks\\.amazonaws\\.com/role-arn"
    value = "${aws_iam_role.cluster_autoscaler_iam_role.arn}"
  }
  # Additional Arguments (Optional) - To Test How to pass Extra Args for Cluster Autoscaler
  #set {
  #  name = "extraArgs.scan-interval"
  #  value = "20s"
  #}

}
Giờ bạn đó có helm chart của cluster-autoscaler để apply vào k8s
Outputs:

cluster_autoscaler_helm_metadata = tolist([
  {
    "app_version" = "1.23.0"
    "chart" = "cluster-autoscaler"
    "name" = "sap-dev-ca"
    "namespace" = "kube-system"
    "revision" = 1
    "values" = "{\"autoDiscovery\":{\"clusterName\":\"SAP-dev-eksdemo\"},\"awsRegion\":\"us-east-1\",\"cloudProvider\":\"aws\",\"rbac\":{\"serviceAccount\":{\"annotations\":{\"eks.amazonaws.com/role-arn\":\"arn:aws:iam::250887682577:role/SAP-dev-cluster-autoscaler\"},\"create\":true,\"name\":\"cluster-autoscaler\"}}}"
    "version" = "9.21.0"
  },
])
cluster_autoscaler_iam_role_arn = "arn:aws:iam::250887682577:role/SAP-dev-cluster-autoscaler"
Giờ recheck 1 số thứ
kubectl -n kube-system get pods
Bạn có thể coi logs của pod cluster autoscaler
kubectl -n kube-system logs -f $(kubectl -n kube-system get pods | egrep -o 'hr-dev-ca-aws-cluster-autoscaler-[A-Za-z0-9-]+')Kiểm tra SA
root@work-space-u20:~# kubectl -n kube-system describe sa cluster-autoscaler
Name:                cluster-autoscaler
Namespace:           kube-system
Labels:              app.kubernetes.io/instance=sap-dev-ca
                     app.kubernetes.io/managed-by=Helm
                     app.kubernetes.io/name=aws-cluster-autoscaler
                     helm.sh/chart=cluster-autoscaler-9.21.0
Annotations:         eks.amazonaws.com/role-arn: arn:aws:iam::250887682577:role/SAP-dev-cluster-autoscaler
                     meta.helm.sh/release-name: sap-dev-ca
                     meta.helm.sh/release-namespace: kube-system
Image pull secrets:  <none>
Mountable secrets:   cluster-autoscaler-token-bzdgg
Tokens:              cluster-autoscaler-token-bzdgg
Events:              <none>
3) Cluster Autoscaler Testing
cluster-autoscaler-sample-app.yaml
>>>>>>>>>>>>>>>>
>>>>>>>>>>>


https://github.com/mrnim94/terraform-aws/tree/master/elk-cluster-autoscaler
bạn có thể thao khảo các file trong repo này.
Issues
Prevent the Cluster Autoscaler from evicting the pods when scaling down nodes
Cluster Autoscaler will Evaluation of Nodes for Scale Down:
- Underutilization Check: The CA periodically checks if nodes are underutilized (i.e., the resources are not being fully utilized by the pods running on them). This involves evaluating the resource requests of all pods on each node against the node’s total capacity.
- Candidate Nodes: Nodes that have been underutilized for a configurable period (default is 10 minutes) are marked as candidates for scale down.
NExt Step, Cluster AutoScaler make Simulation of Pod Eviction.
- Eviction Simulation: For each candidate node, the CA simulates the eviction of all pods on that node. It then tries to reschedule these pods onto other nodes in the cluster, taking into account the resource requests, affinity/anti-affinity rules, taints, and tolerations.
- Safety Checks: During simulation, the CA checks several conditions to ensure that scaling down is safe, including:
- Ensuring pod disruption budgets (PDBs) are respected.
- Verifying that no critical system pods are evicted, or if they are, that they can be successfully rescheduled.
- Checking if pods are marked with
cluster-autoscaler.kubernetes.io/safe-to-evict: "false", indicating they should not be evicted.
Vậy là nếu bạn không muốn scale node mà đang chưa 1 important pod của bạn thì bạn có thể sử dụng cluster-autoscaler.kubernetes.io/safe-to-evict: "false"
Refer to:
https://github.com/kubernetes/autoscaler/issues/3183
Pods announce ” X Insufficient cpu, 1 Insufficient memory”.

Mặc dù

How does the cluster-autoscaler delete nodes efficiently?
Bạn thấy Cluster Auto Scaler đang scaling up quá nhiều node.
và bạn thấy log bên dưới.
I0920 08:15:36.290137 1 eligibility.go:162] Node ip-10-195-95-231.us-west-2.compute.internal unremovable: memory requested (56.8488% of allocatable) is above the scale-down utilization thresholdVới log trên thì bạn có thể thấy là Cluster Auto-Scaler gét được tổng số memory requested của các pods trên 1 node sau đó nó làm phép tính

mặc định thì trong cluster autoscaler sẽ set là:scale-down-utilization-threshold: 0.5
Điều này đồng nghĩa con số này phải dưới 50% thì nó mới remove node đó.
Với môi trường developer thì bạn sẽ nên chỉnh lên 0.8 thì saving cost hơn.
