1) Oauth2-proxy integrates with Cognito
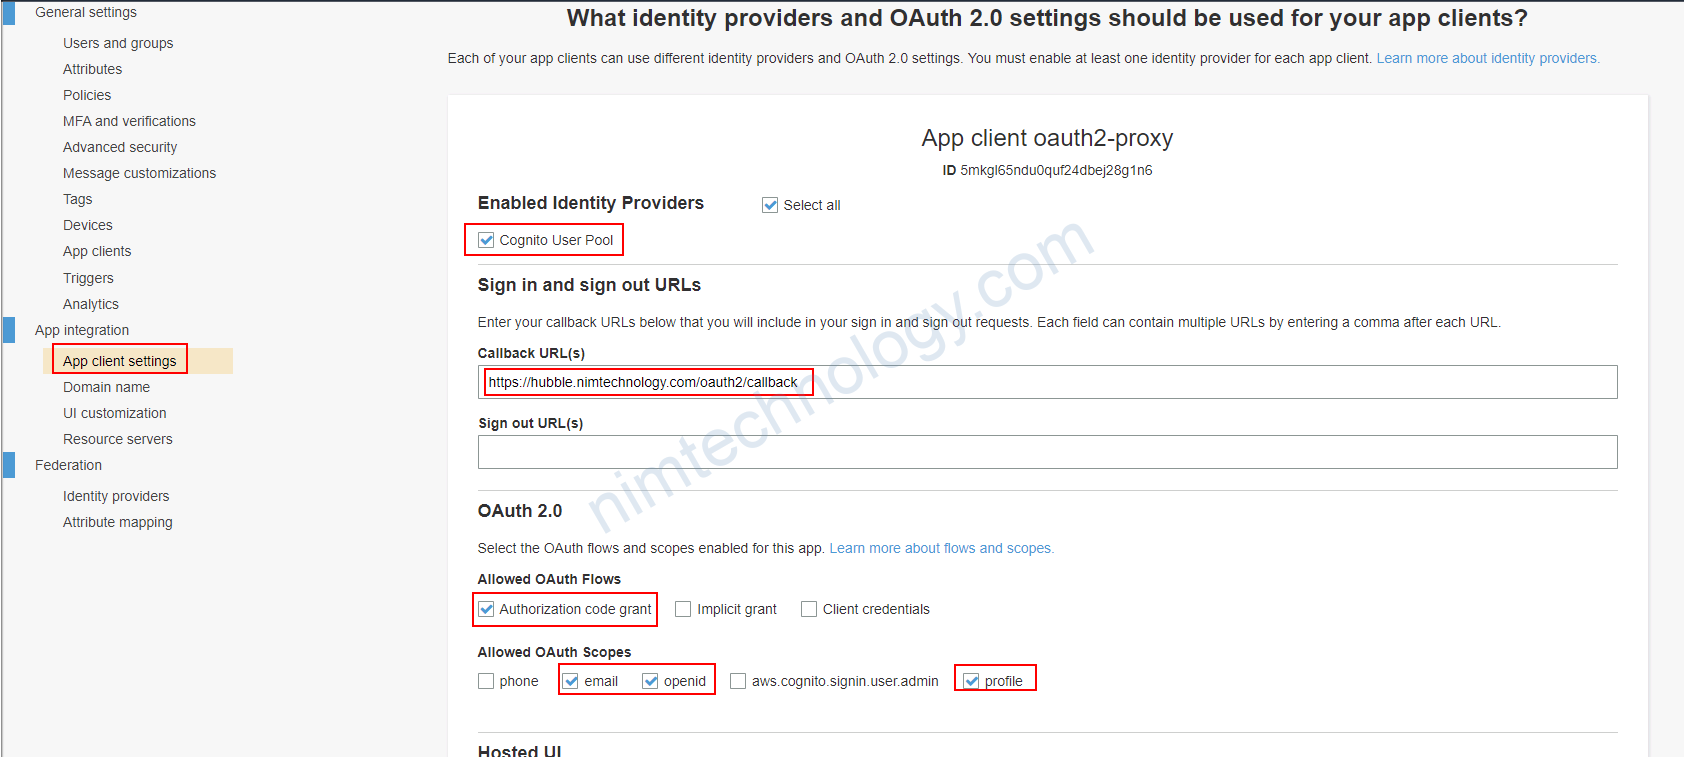
1.1) Configure Cognitor on AWS

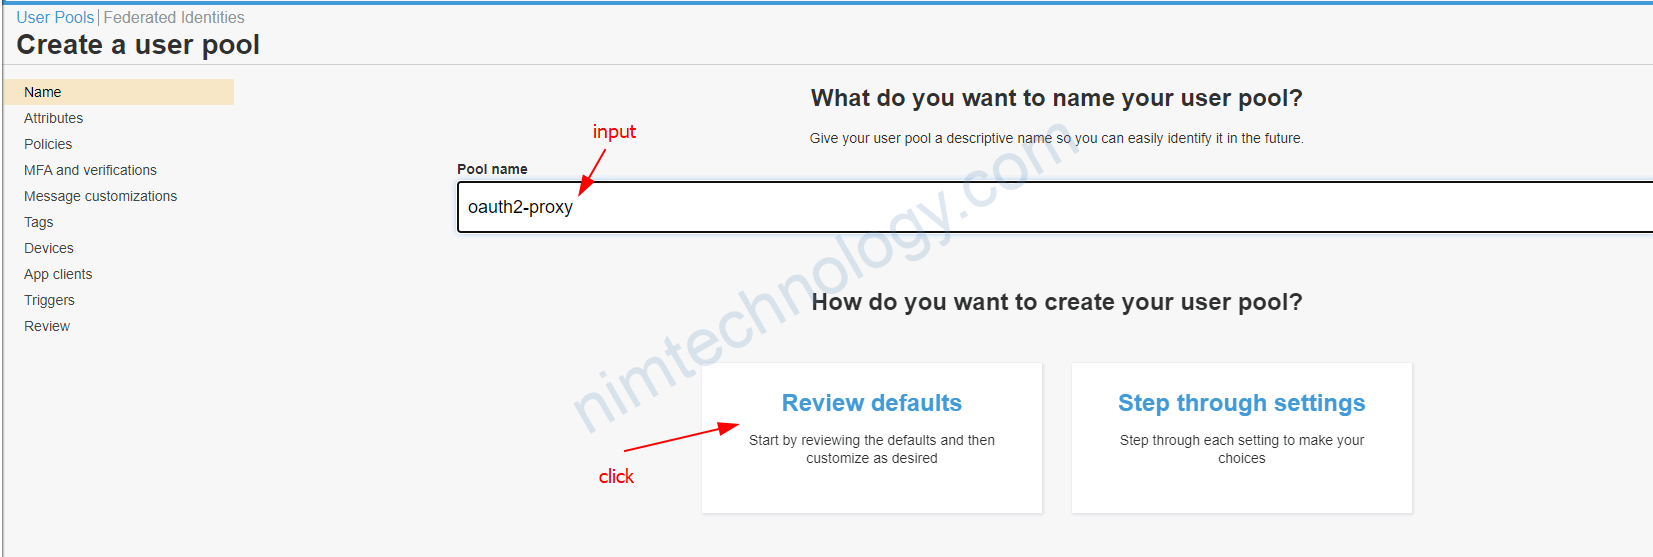

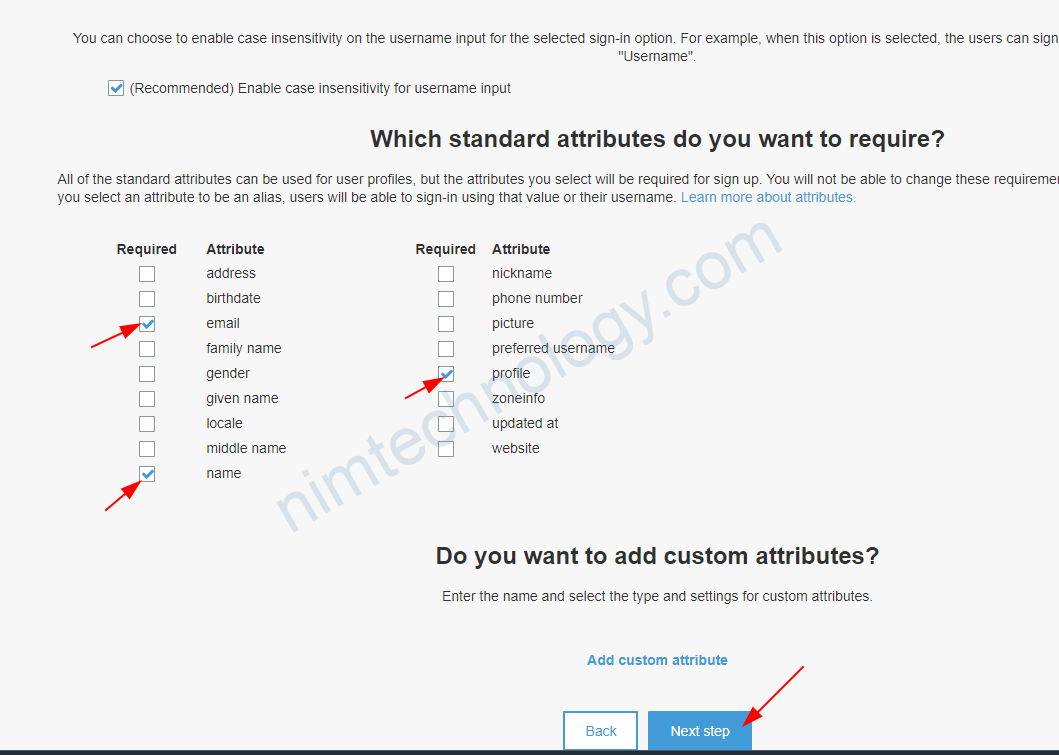
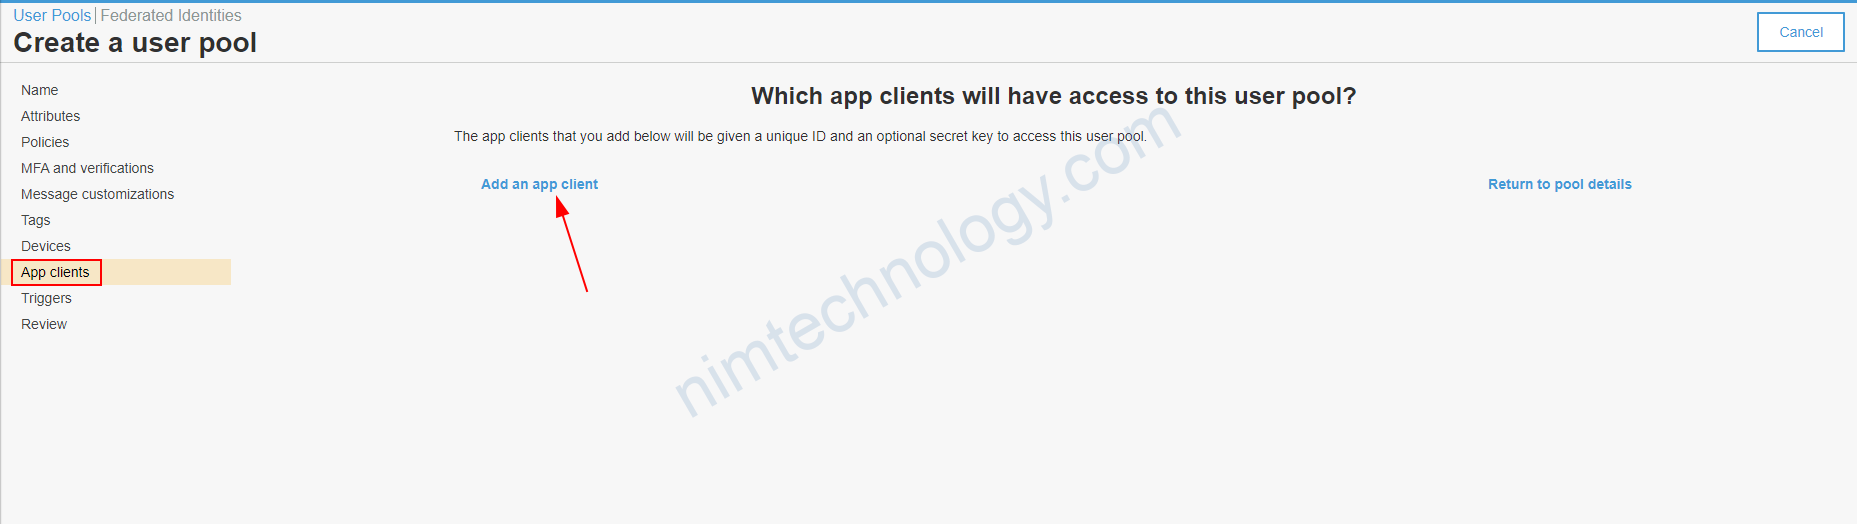
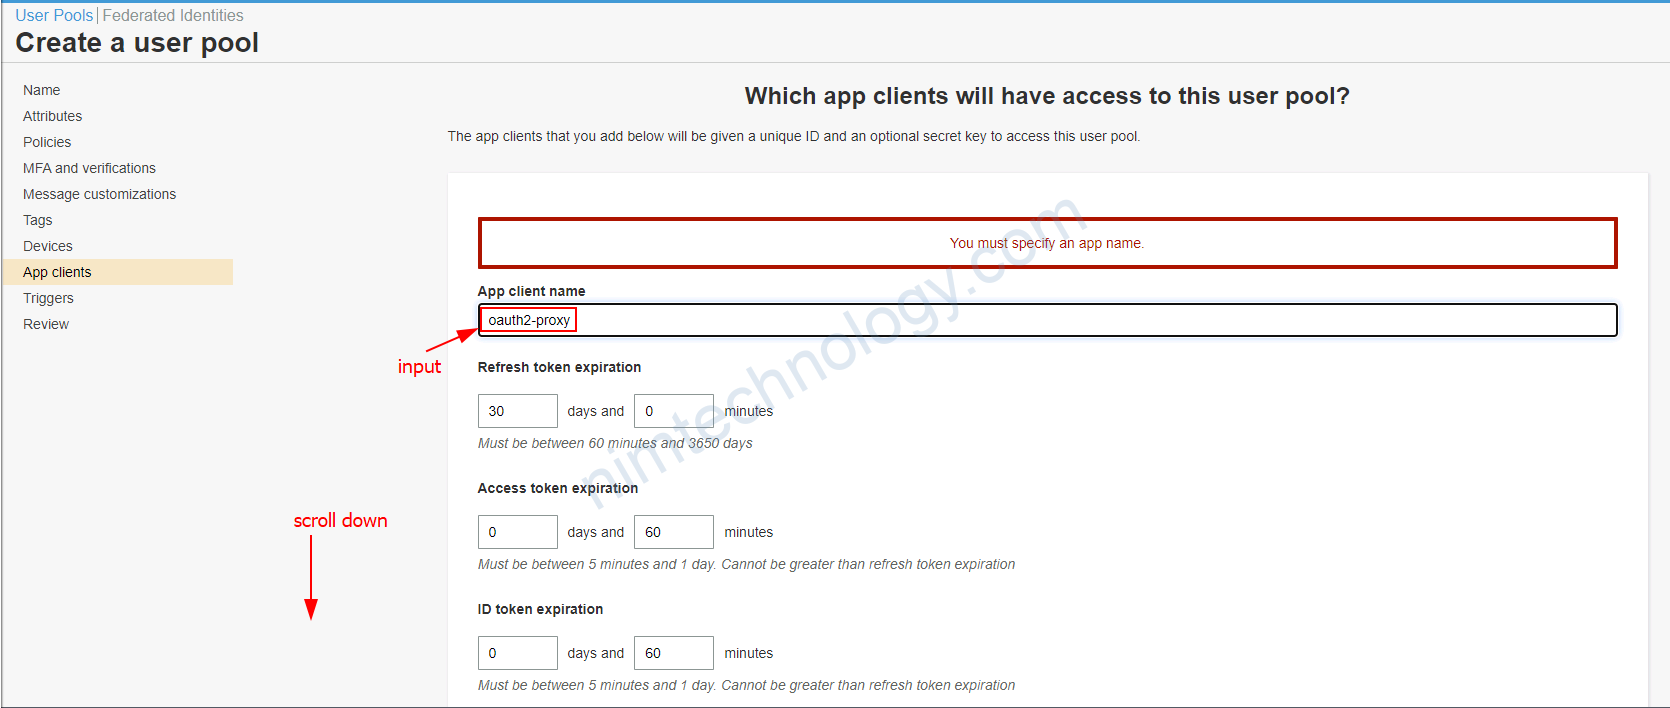
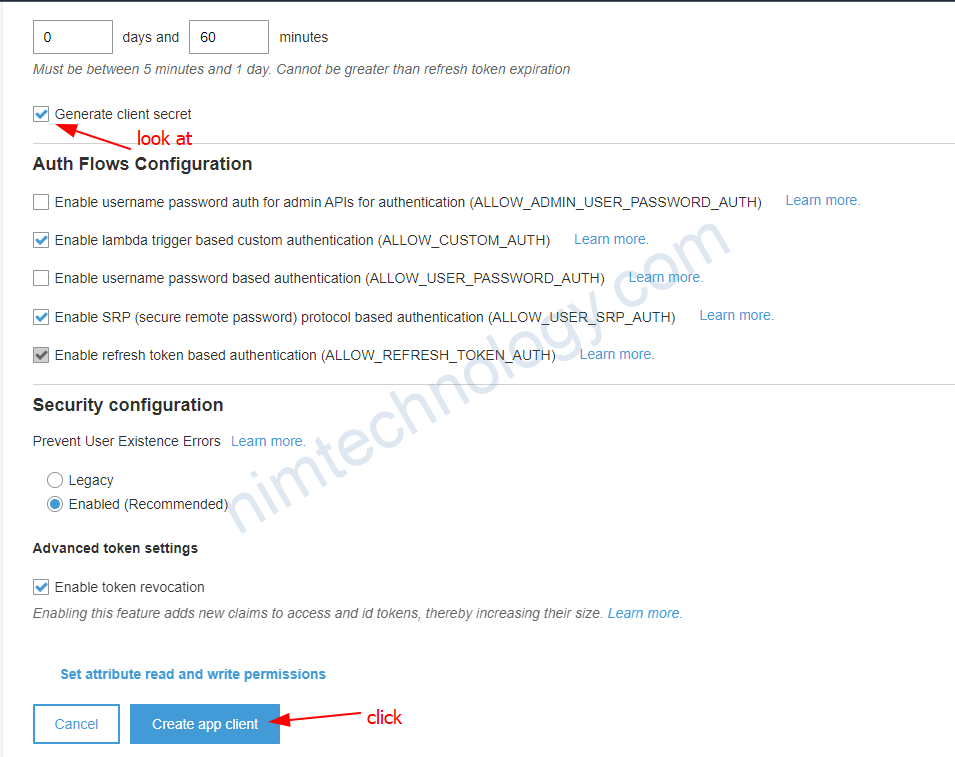
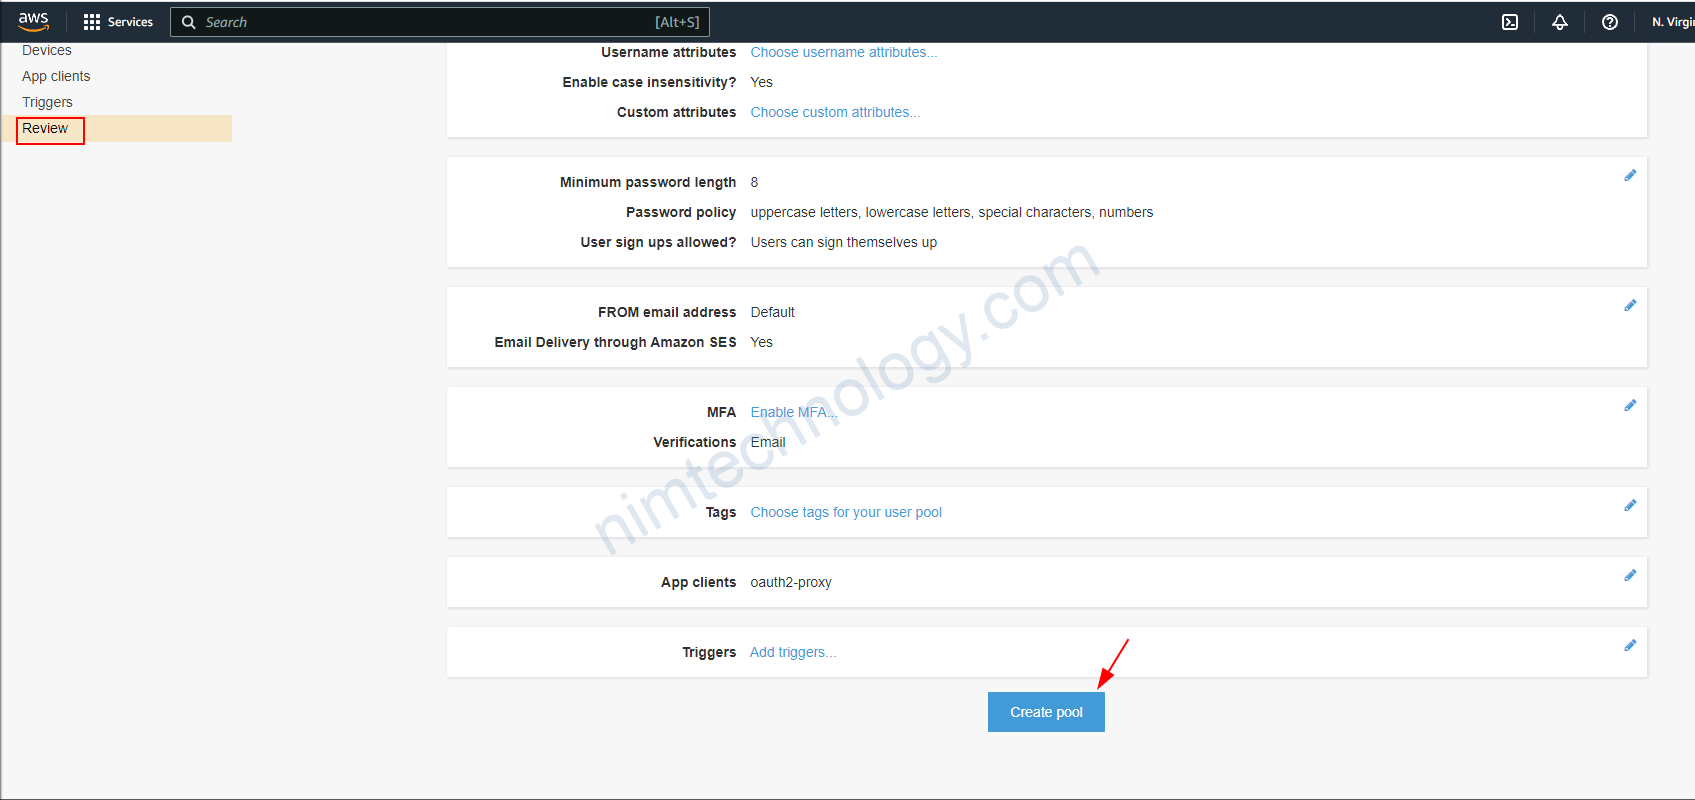
Sau khi tạo xong thì bạn cần chỉnh 1 số thứ.
1.1.update) New UI of cognitor.
Hiện tại thì cognitor đang switch sang UI mới hoàn toàn thì chúng ta sẽ cần team ra các chỗ để edit
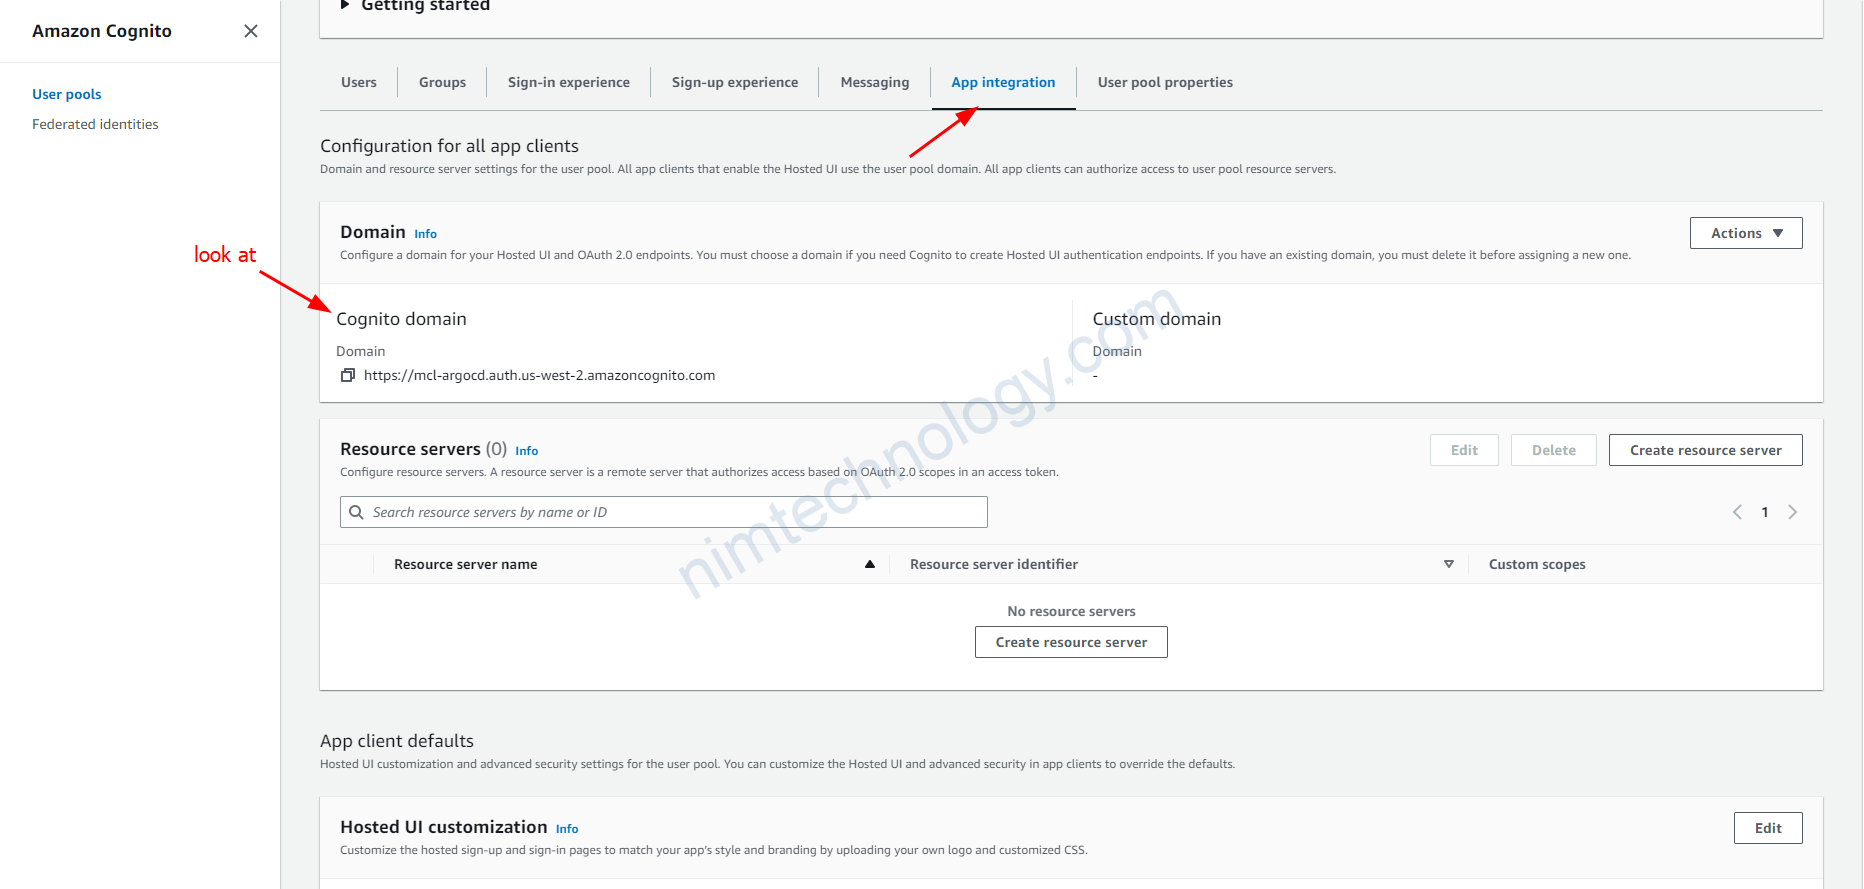
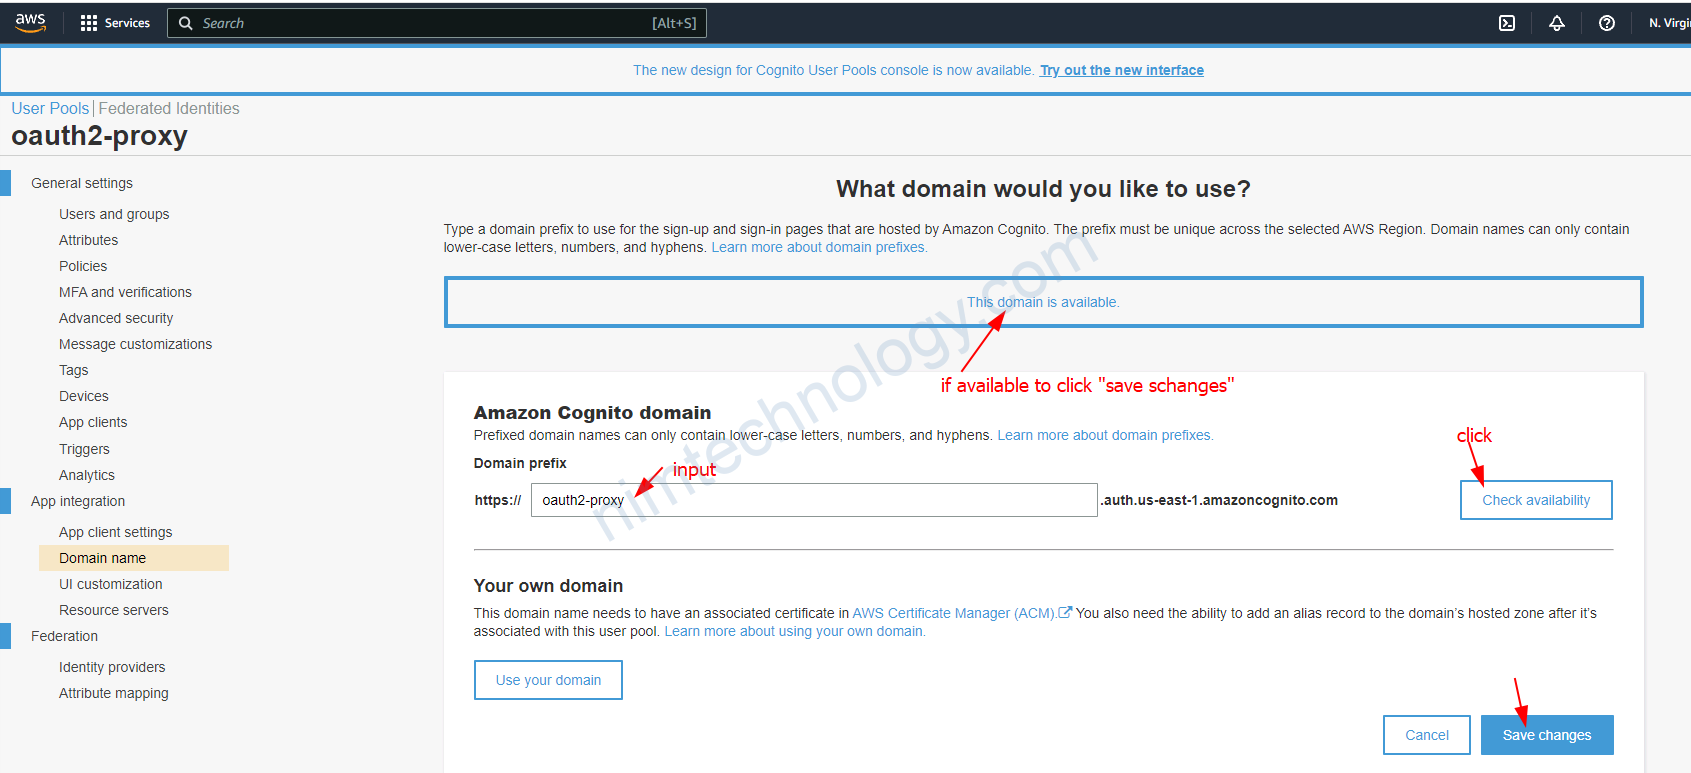
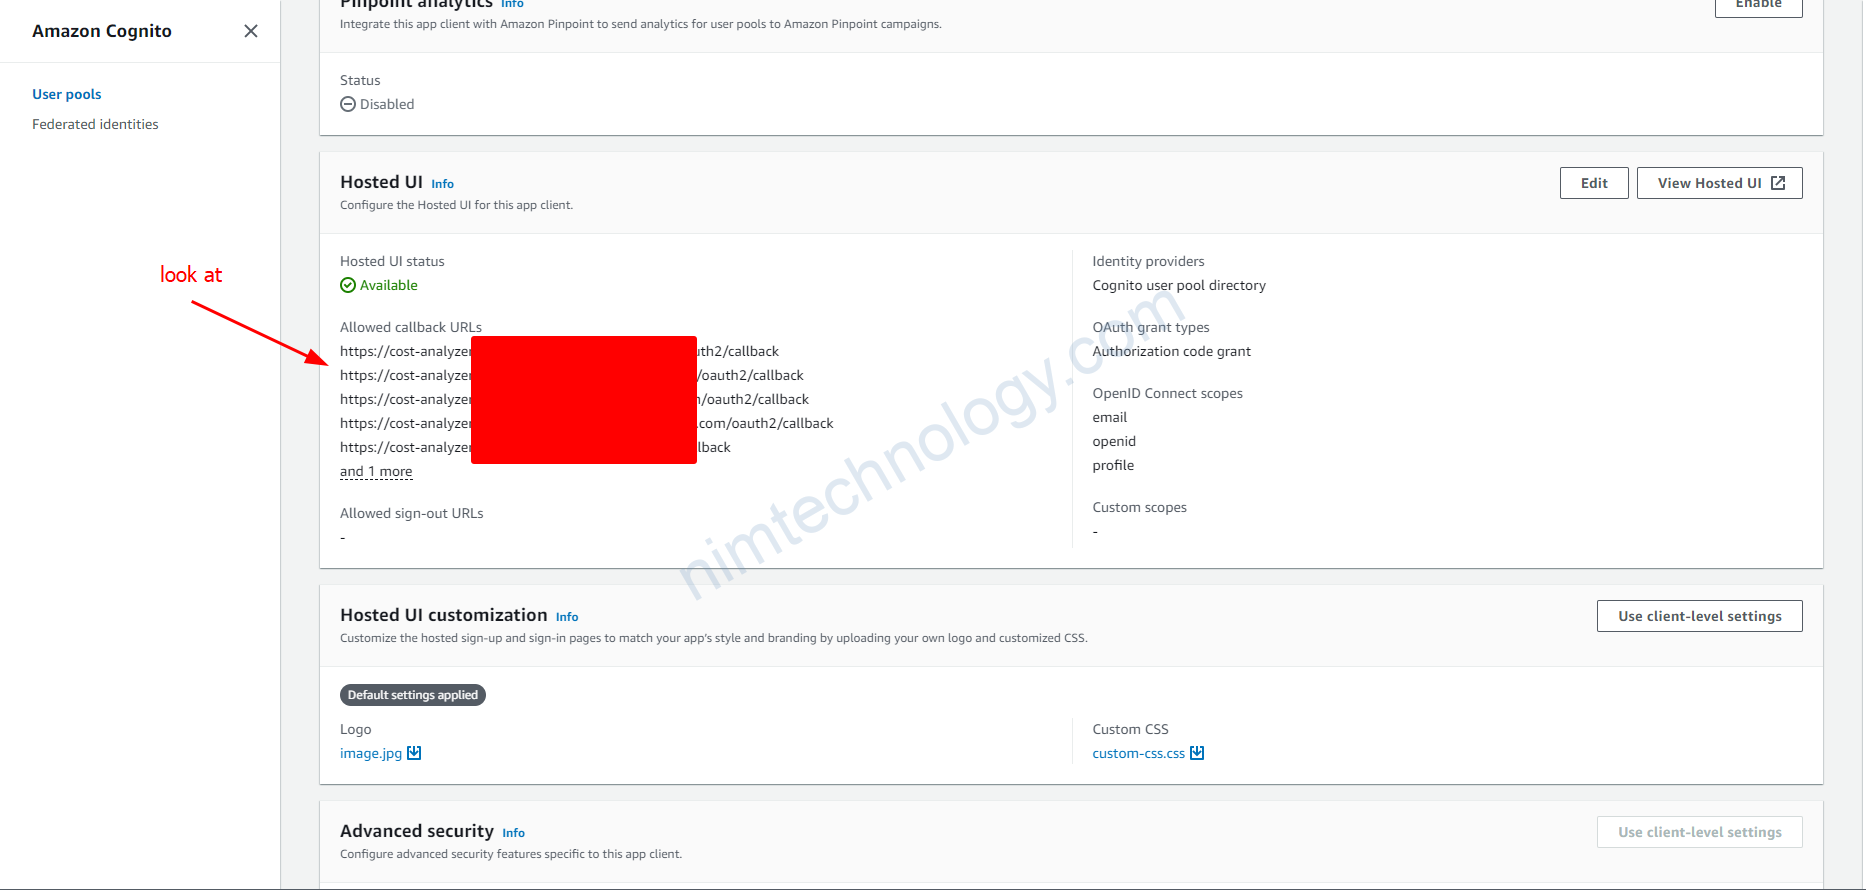
Đây là chỗ domain mà để xác thực với cognitor.
Chỗ này là nơi bạn khái báo callback của các web
1.2) Install Oauth2-Proxy
1.2.1) Look into the workflow.
Đầu tiền chúng ta cần hiểu cách thức hoạt động.
Mình có 1 trang web hubble:
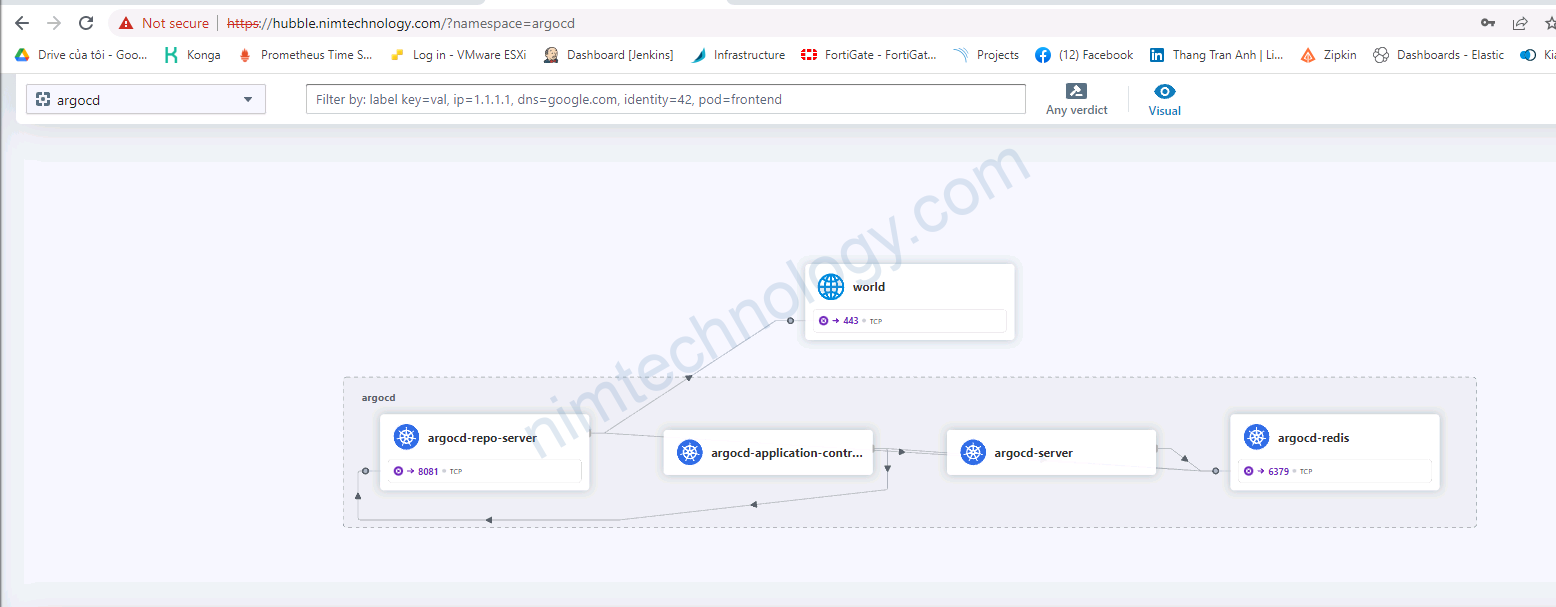
Nếu bạn public ra thì bạn cũng muốn là chỉ có người trong company có thể truy cập vào.
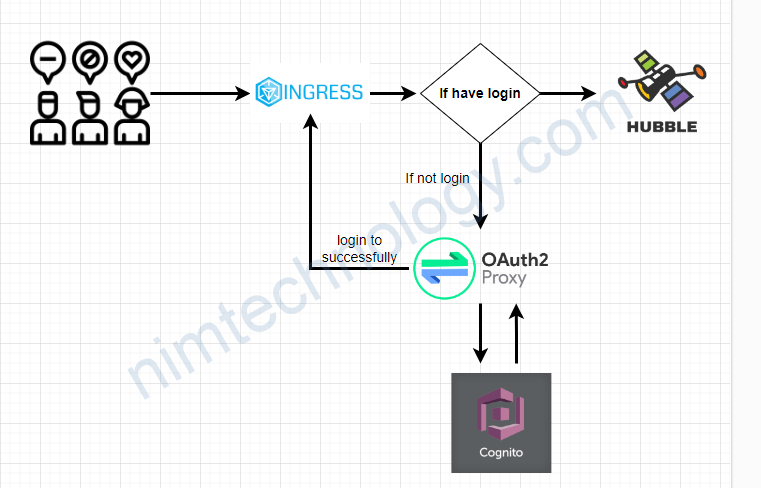
Đầu tiên, người dùng sẽ access vào hubble.
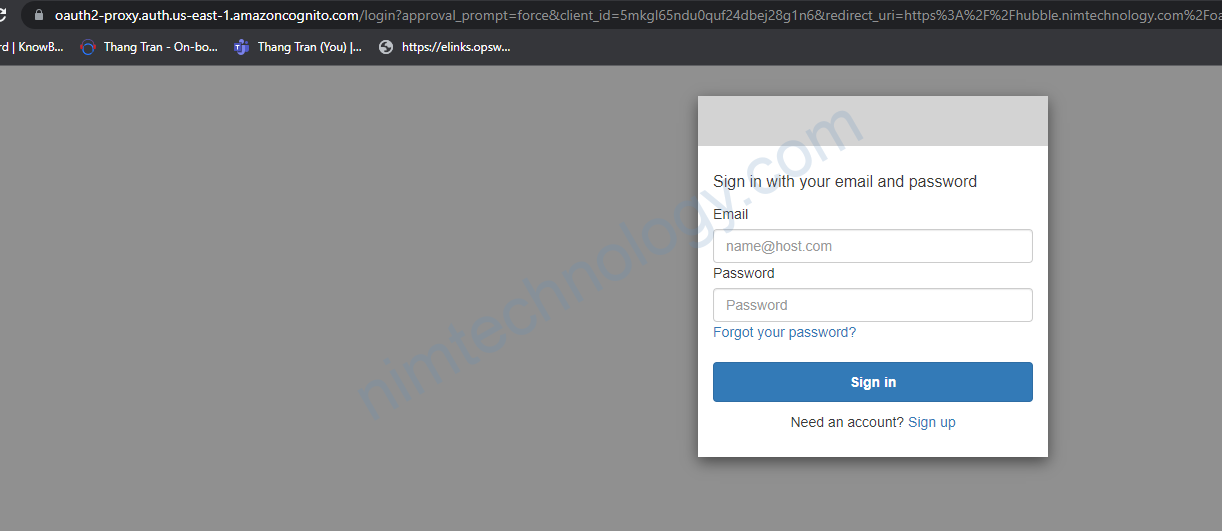
Nếu chưa login thì bạn sẽ thực hiện login with cognito.
KHi đã login thành công thì bạn được quền access Hubble.
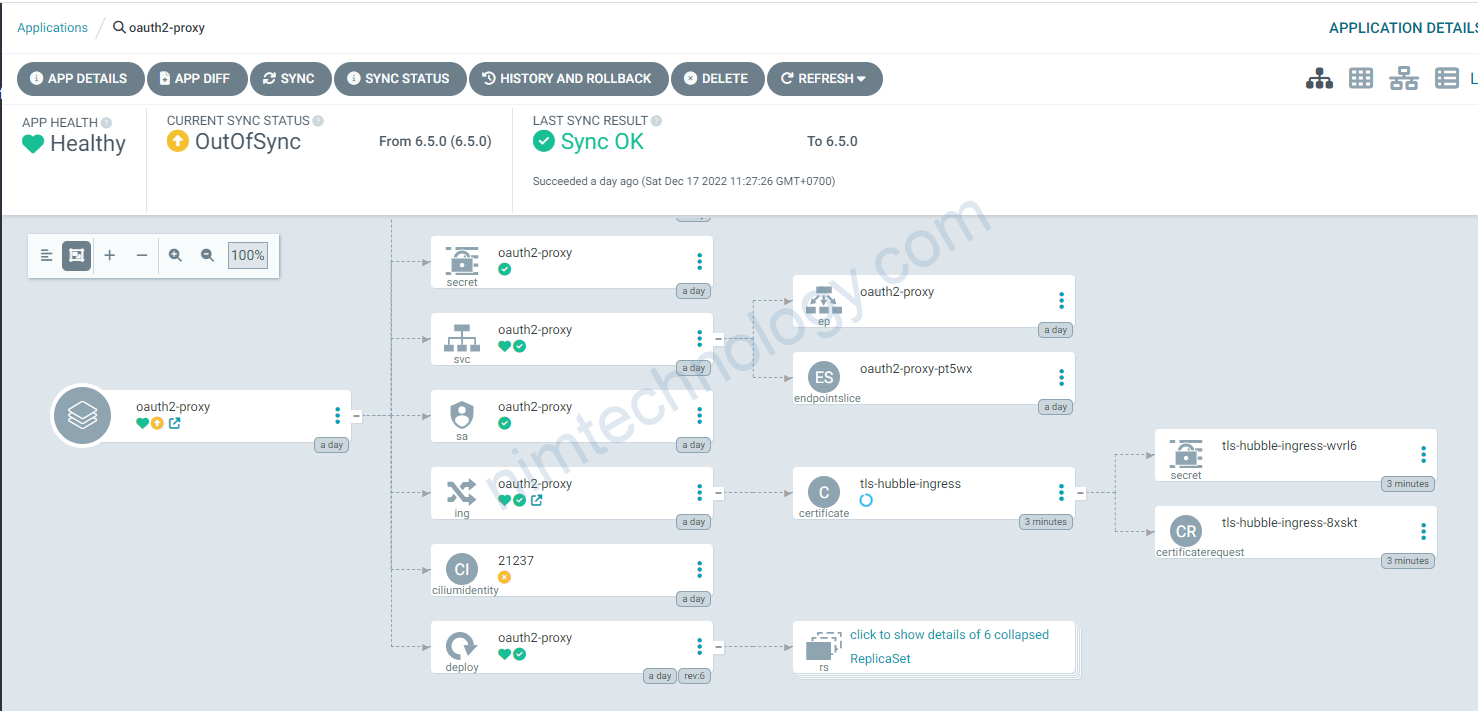
1.2.2) Install Oauth2-Proxy
Helm repo:https://oauth2-proxy.github.io/manifests
1.2.2.1) the value has secrets.
Value:
config:
  clientID: "5mkgl65ndu0quf24dbXXXX6"
  clientSecret: "2e4rpq73v10ju4e201t0i7iln06k41u1qqeqdmeXXXXXX"
  cookieSecret: "aXVybTZsUUtEbS9KSlk0Y1plMXYvU09RYXXXXXX"
  configFile: |-
    email_domains = [ "*" ]
    upstreams = [ "file:///dev/null" ]
extraArgs:
  oidc-issuer-url: "https://cognito-idp.us-east-1.amazonaws.com/us-east-1_kCJ8VXXXj"
  oidc-jwks-url: "https://cognito-idp.us-east-1.amazonaws.com/us-east-1_kCJ8VXXXj/.well-known/jwks.json"
  provider: oidc
  provider-display-name: "Cognito SSO"
  cookie-secure: true
  cookie-name: "_oauth2_proxy"
  skip-provider-button: true
  scope: openid
ingress:
  enabled: true
  hosts: [hubble.nimtechnology.com]
  path: /oauth2
  annotations:
    # If Using cert-manager + letsencrypt
    #cert-manager.io/cluster-issuer: letsencrypt-production
    nginx.ingress.kubernetes.io/proxy-buffer-size: "8k"
    nginx.ingress.kubernetes.io/proxy-buffering: "on"
    kubernetes.io/ingress.class: "nginx"
  ingressClassName: nginx
  tls:
    - hosts:
        - hubble.nimtechnology.com
      secretName: tls-hubble-ingress
1.2.2.2) the value doesn’t have secrets.
với cách trên chắc chắn bạn sẽ thấy là sẽ không thể gitops được
Vì không thể đẩy secret lên github
Đầu tiên bạn cần tạo secret:
apiVersion: v1
data:
  client-id: ++++++++
  client-secret: ++++++++
  cookie-secret: ++++++++
kind: Secret
metadata:
  name: oauth2-proxy
  namespace: oauth2-proxy
type: Opaque
và cuối cùng là value của chúng ta như sau:
config:
  configFile: |-
    email_domains = [ "*" ]
    upstreams = [ "file:///dev/null" ]
  existingSecret: "oauth2-proxy"
extraEnv:
  - name: OAUTH2_PROXY_CLIENT_ID
    valueFrom:
      secretKeyRef:
        key: client-id
        name: oauth2-proxy
  - name: OAUTH2_PROXY_CLIENT_SECRET
    valueFrom:
      secretKeyRef:
        key: client-secret
        name: oauth2-proxy
  - name: OAUTH2_PROXY_COOKIE_SECRET
    valueFrom:
      secretKeyRef:
        key: cookie-secret
        name: oauth2-proxy
extraArgs:
  oidc-issuer-url: "https://cognito-idp.us-west-2.amazonaws.com/us-west-2_rjg57f68Q"
  oidc-jwks-url: "https://cognito-idp.us-west-2.amazonaws.com/us-west-2_rjg57f68Q/.well-known/jwks.json"
  provider: oidc
  provider-display-name: "Cognito SSO"
  cookie-secure: true
  cookie-name: "_oauth2_proxy"
  skip-provider-button: true
  scope: openid
  insecure-oidc-allow-unverified-email: true
ingress:
  enabled: true
  hosts:
    - cost-analyzer-uat.nimtechnology.com
  path: /oauth2
  annotations:
    cert-manager.io/cluster-issuer: letsencrypt-production
    nginx.ingress.kubernetes.io/proxy-buffer-size: "8k"
    nginx.ingress.kubernetes.io/proxy-buffering: "on"
    kubernetes.io/ingress.class: "nginx"
  ingressClassName: nginx
  tls:
    - hosts:
        - cost-analyzer-uat.nimtechnology.com
      secretName: tls-oauth2-proxy-ingress
https://github.com/oauth2-proxy/oauth2-proxy/issues/1355
https://gist.github.com/randomk/9e8a1145820428f201ab277caf397790
https://github.com/oauth2-proxy/manifests/blob/main/helm/oauth2-proxy/values.yaml
1.3) Create an ingress for your application.

apiVersion: networking.k8s.io/v1
kind: Ingress
metadata:
  annotations:
    cert-manager.io/issuer: hubble
    cert-manager.io/issuer-kind: Issuer
    nginx.ingress.kubernetes.io/auth-signin: https://$host/oauth2/start?rd=$escaped_request_uri
    nginx.ingress.kubernetes.io/auth-url: https://$host/oauth2/auth
    nginx.ingress.kubernetes.io/configuration-snippet: |
      proxy_set_header Origin "";
      proxy_hide_header l5d-remote-ip;
      proxy_hide_header l5d-server-id;
    nginx.ingress.kubernetes.io/proxy-buffer-size: 8k
    nginx.ingress.kubernetes.io/proxy-buffering: "on"
    #nginx.ingress.kubernetes.io/upstream-vhost: $service_name.$namespace.svc.cluster.local:80
  managedFields:
  name: ingress-hubble
  namespace: kube-system
spec:
  ingressClassName: nginx
  rules:
  - host: hubble.nimtechnology.com
    http:
      paths:
      - backend:
          service:
            name: hubble-ui
            port:
              number: 80
        path: /
        pathType: Prefix
  tls:
  - hosts:
    - hubble.nimtechnology.com
    secretName: tls-hubble-ingress
Giờ bạn truy cập hubble thì sẽ tự động yêu cầu đăng nhập:
2) Oauth2-proxy integrate with gitlab
https://oak-tree.tech/blog/k8s-nginx-oauth2-gitlab
3) Oauth2-proxy integrate with Google
Để tạo lấy được …. bạn có thể tham khảo bài biết bên dưới.
sau khi bạn đã tạo xong rồi thì chúng ta lấy credential thôi
https://console.cloud.google.com/apis/credentials
config:
  clientID: "5mkgl65ndu0quf24dbXXXX6"
  clientSecret: "2e4rpq73v10ju4e201t0i7iln06k41u1qqeqdmeXXXXXX"
  cookieSecret: "aXVybTZsUUtEbS9KSlk0Y1plMXYvU09RYXXXXXX"
  configFile: |-
    email_domains = [ "*" ]
    upstreams = [ "file:///dev/null" ]
extraArgs:
  redirect-url: https://vscode.nimtechnology.com/oauth2/callback
  provider: google
  provider-display-name: "Nimtechnology SSO"
  cookie-secure: true
  cookie-name: _oauth2_proxy
  skip-provider-button: "true"
  scope: openid
ingress:
  enabled: true
  hosts: [vscode.nimtechnology.com]
  path: /oauth2
  annotations:
    # If Using cert-manager + letsencrypt
    #cert-manager.io/cluster-issuer: letsencrypt-production
    nginx.ingress.kubernetes.io/proxy-buffer-size: "8k"
    nginx.ingress.kubernetes.io/proxy-buffering: "on"
    kubernetes.io/ingress.class: "nginx"
  ingressClassName: nginx
  tls:
    - hosts:
        - vscode.nimtechnology.com
      secretName: tls-oauth2-proxy-ingress
4) Restrict users login
config:
  clientID: "5mkgl65ndu0quf24dbXXXX6"
  clientSecret: "2e4rpq73v10ju4e201t0i7iln06k41u1qqeqdmeXXXXXX"
  cookieSecret: "aXVybTZsUUtEbS9KSlk0Y1plMXYvU09RYXXXXXX"
  configFile: |-
    upstreams = [ "file:///dev/null" ]
extraArgs:
  redirect-url: https://vscode.nimtechnology.com/oauth2/callback
  provider: google
  provider-display-name: "Nimtechnology SSO"
  cookie-secure: true
  cookie-name: _oauth2_proxy
  skip-provider-button: "true"
  scope: email
ingress:
  enabled: true
  hosts: [vscode.nimtechnology.com]
  path: /oauth2
  annotations:
    # If Using cert-manager + letsencrypt
    #cert-manager.io/cluster-issuer: letsencrypt-production
    nginx.ingress.kubernetes.io/proxy-buffer-size: "8k"
    nginx.ingress.kubernetes.io/proxy-buffering: "on"
    kubernetes.io/ingress.class: "nginx"
  ingressClassName: nginx
  tls:
    - hosts:
        - vscode.nimtechnology.com
      secretName: tls-oauth2-proxy-ingress
authenticatedEmailsFile:
  enabled: true
  persistence: configmap
  restricted_access: |-
    mr.nim94@gmail.com
How to generate cookie secret
# -- server specific cookie for the secret; create a new one with `openssl rand -base64 32 | head -c 32 | base64`Resolve Error.
403 – Forbidden – Login Failed: The upstream identity provider returned an error: invalid_request
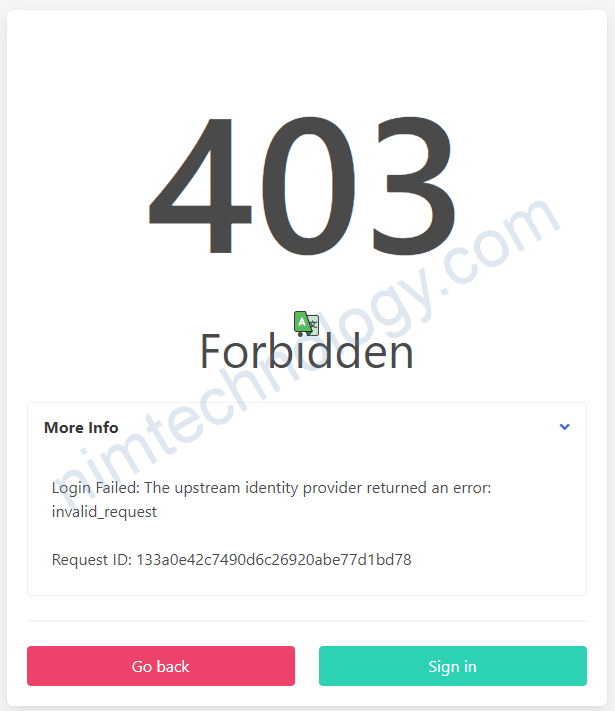
Khi login thì xuất hiện lỗi sau:
Login Failed: The upstream identity provider returned an error: invalid_requestChỗ này bị lỗi chỗ scope
Hiện tại trong value mình set là như sau:
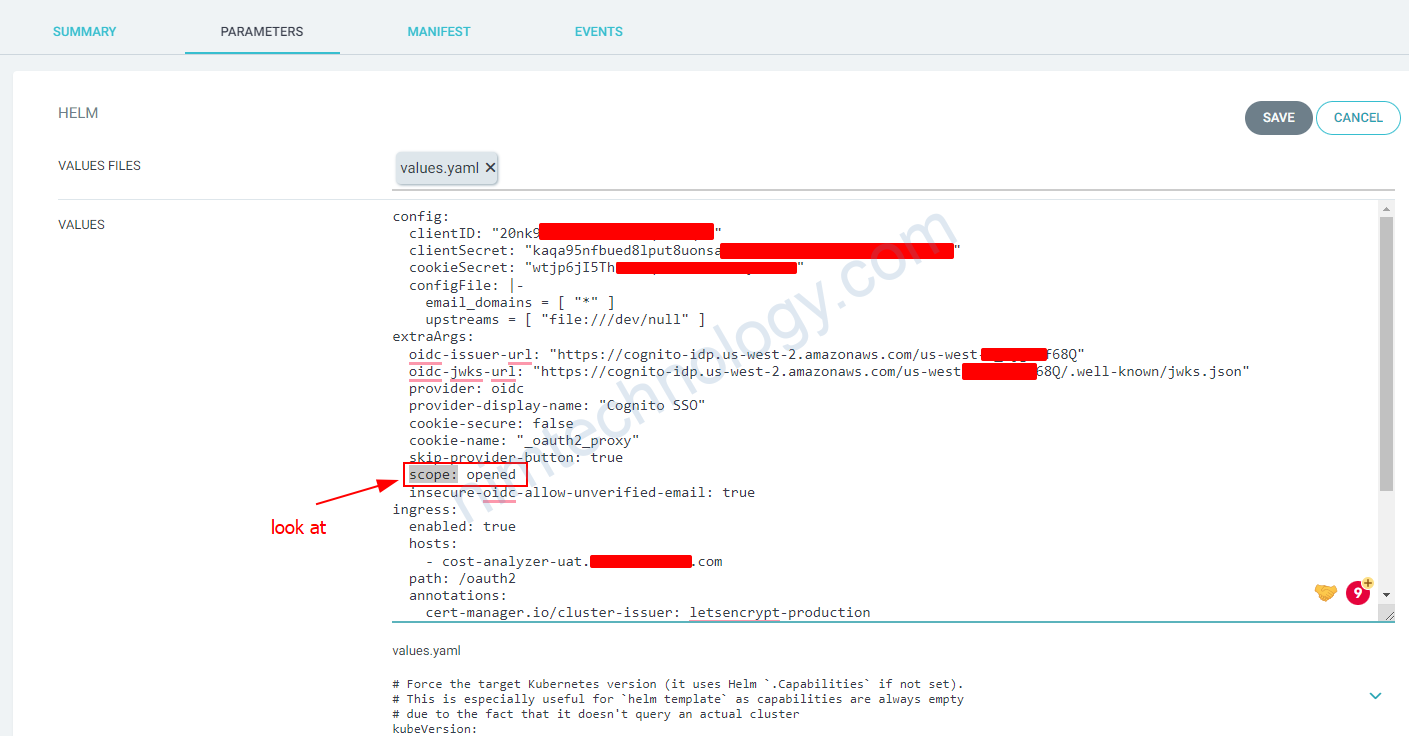
scope: opened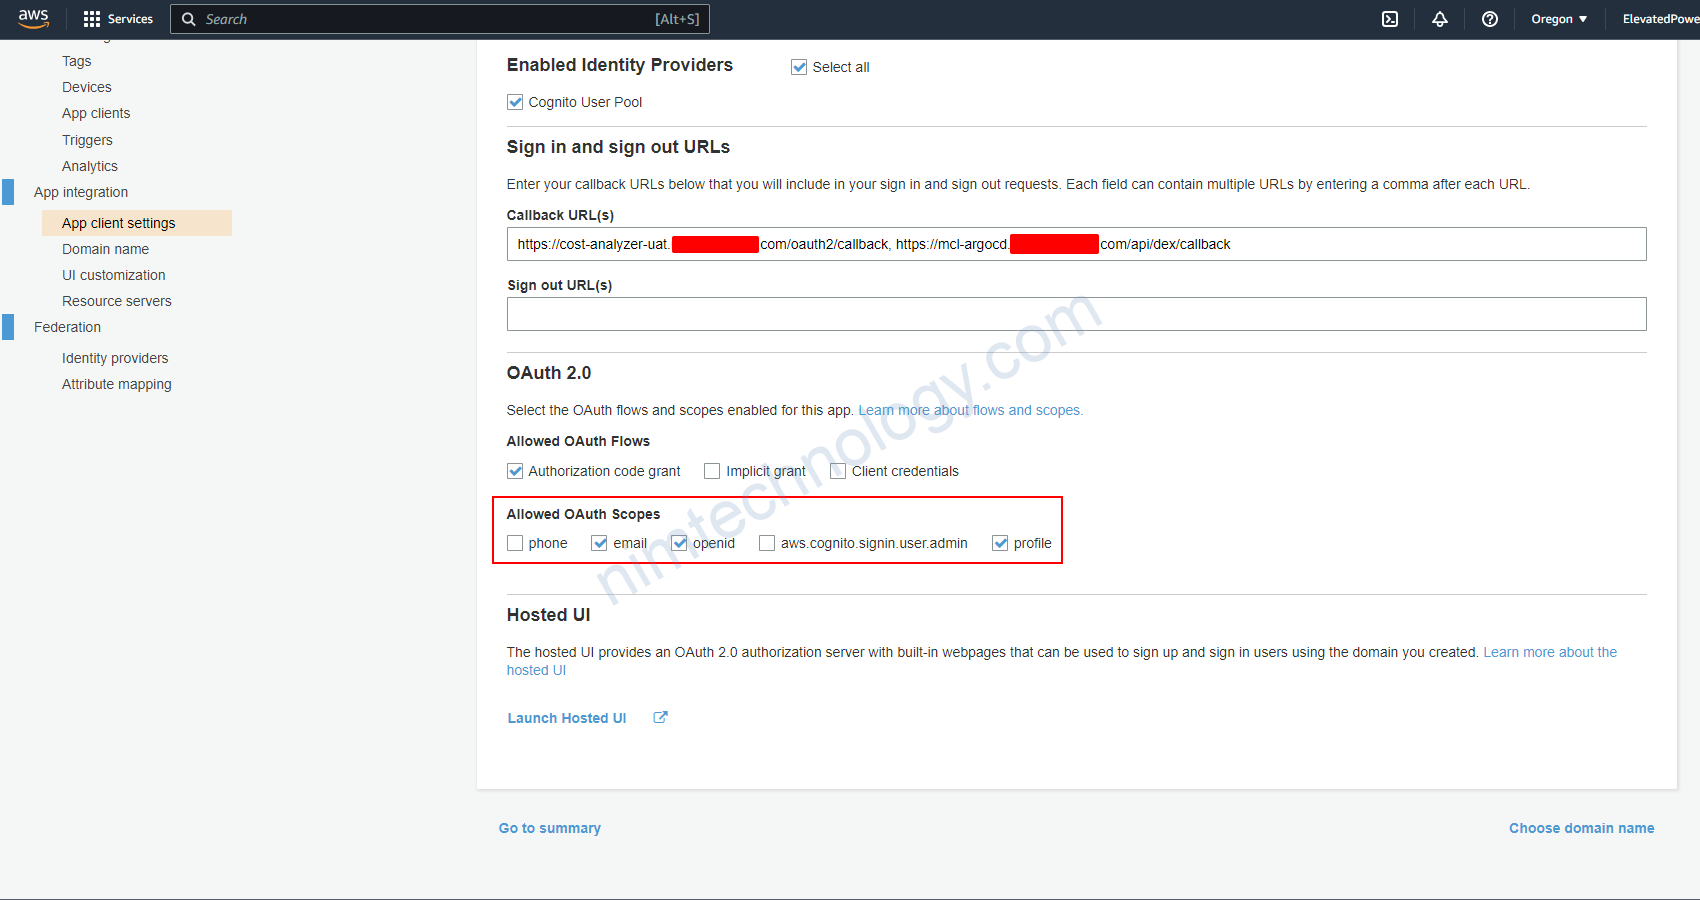
Bạn phải change scope thành openid
Error redeeming code during OAuth2 callback: missing email

Bạn cần kiểm tra đây có phải là email ko?
Error: could not be resolved (3: Host not found)
https://github.com/oauth2-proxy/oauth2-proxy/issues/920
mình gặp lỗi này:
2023/03/05 19:02:10 [error] 2859#2859: *398460 argo-workflow.nimtechnology.com could not be resolved (3: Host not found), client: 10.244.1.213, server: argo-workflow.nimtechnology.com, request: "GET / HTTP/1.1", subrequest: "/_external-auth-Lw-Prefix", host: "argo-workflow.nimtechnology.com"
82
2023/03/05 19:02:10 [error] 2859#2859: *398460 auth request unexpected status: 502 while sending to client, client: 10.244.1.213, server: argo-workflow.nimtechnology.com, request: "GET / HTTP/1.1", host: "argo-workflow.nimtechnology.com"
thi hiện tại cách fix là bạn chuyển sang domain của svc:
nginx.ingress.kubernetes.io/auth-signin: https://$host/oauth2/start?rd=$escaped_request_uri
nginx.ingress.kubernetes.io/auth-url: http://oauth2-proxy.oauth2-proxy.svc.cluster.local/oauth2/auth ##look at
Error 400: redirect_uri_mismatch
Ở đây bị lối trên helm version:
REPO URL: https://oauth2-proxy.github.io/manifests
CHART: oauth2-proxy:6.13.1
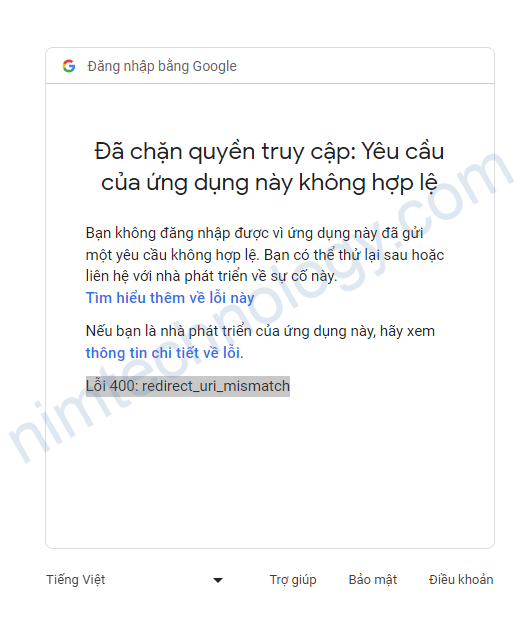
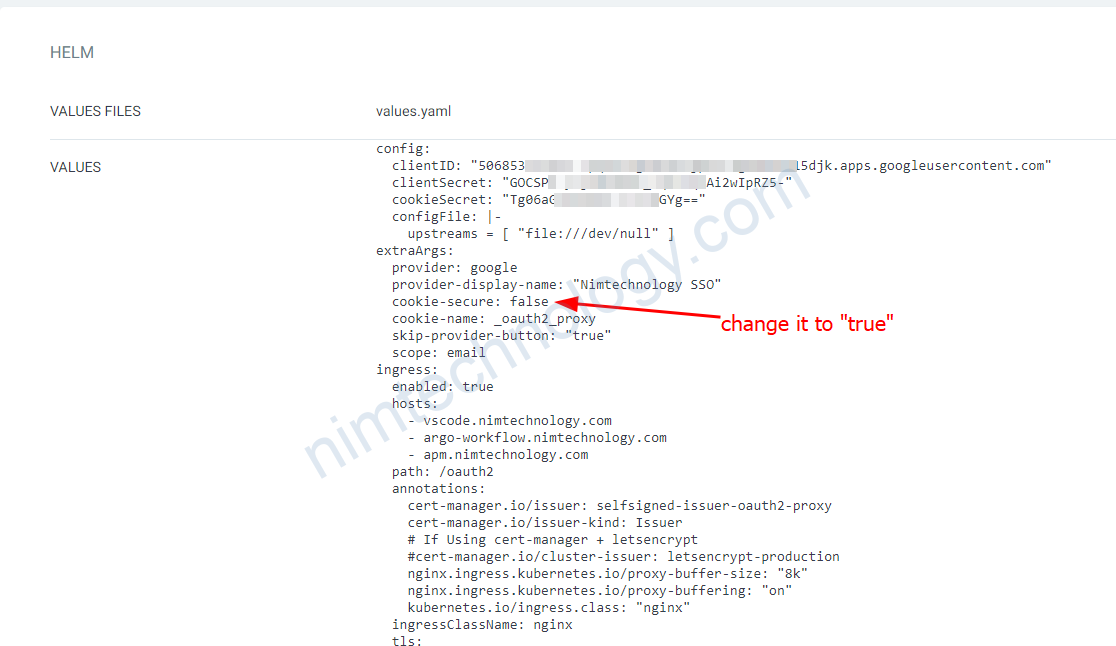
Thì bạn cần change cookie-secure là true
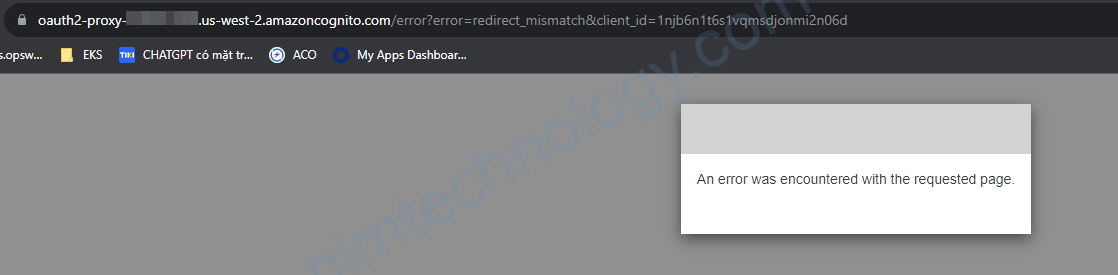
Error: An error was encountered with the requested page that Haven’t go to login yet.
Khi bạn bạn chưa kịp login thì web đã báo
Nếu bạn đã check tất cả các bước sau:
– Client ID: ok
– Client secret: ok
– User pool ID: ok
– everything configuration is ok
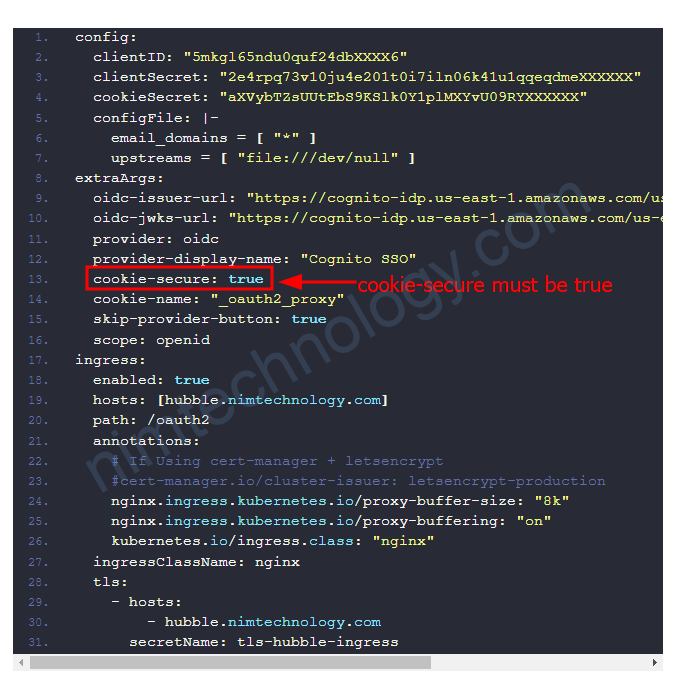
Lúc này mình xem log của Oauth2-proxy
10.195.10.101:53290 - 5ae62807ac9032278ed5ebce4d292d3b - - [2023/10/24 06:45:23] jinbe.nimtechnology.com GET - "/oauth2/auth" HTTP/1.1 "Mozilla/5.0 (Windows NT 10.0; Win64; x64) AppleWebKit/537.36 (KHTML, like Gecko) Chrome/118.0.0.0 Safari/537.36" 401 13 0.000
10.195.10.101:53296 - 4627afb73b8848882befd8846f91c229 - - [2023/10/24 06:45:23] jinbe.nimtechnology.com GET - "/oauth2/start?rd=%2F" HTTP/1.1 "Mozilla/5.0 (Windows NT 10.0; Win64; x64) AppleWebKit/537.36 (KHTML, like Gecko) Chrome/118.0.0.0 Safari/537.36" 302 335 0.000
10.195.10.101:53290 - ec22b7dd0a52c8d4978f6ec14875938e - - [2023/10/24 06:45:24] jinbe.nimtechnology.com GET - "/oauth2/auth" HTTP/1.1 "Mozilla/5.0 (Windows NT 10.0; Win64; x64) AppleWebKit/537.36 (KHTML, like Gecko) Chrome/118.0.0.0 Safari/537.36" 401 13 0.000
10.195.10.101:53296 - 09e6f81d17bd7f359ea25a9e294f9a16 - - [2023/10/24 06:45:24] jinbe.nimtechnology.com GET - "/oauth2/start?rd=%2F" HTTP/1.1 "Mozilla/5.0 (Windows NT 10.0; Win64; x64) AppleWebKit/537.36 (KHTML, like Gecko) Chrome/118.0.0.0 Safari/537.36" 302 335 0.000
Bạn cũng sẽ thấy là chúng ta chưa đên bược login

Lúc này bạn cần kiêm tra value file:
cookie-secure phải là true
Using Oauth2-proxy to protect the rest API.
https://community.boomi.com/s/article/JWT-Authentication-with-Azure-AD-Quickstart-Guide
https://github.com/oauth2-proxy/oauth2-proxy/issues/2822
https://szabo.jp/2023/07/04/authenticating-github-workflows-with-oauth2-proxy