Nếu bạn gắn challenge là các node mới scaleup cần phải pull image mới
Vậy thì ta sẽ cần lưu trước Docker images vào instance trước khi instance được run lên đúng không nào?
Manager của mình tìm ra 1 solution là Bottle Rocket.
Chúng ta cùng tìm hiểu nào!
Bottlerocket, hệ điều hành được tối ưu hóa cho container của AWS, cung cấp một cách hiệu quả và tự nhiên để lưu trữ các ảnh Docker/container vào bộ nhớ cache, điều này có thể giảm đáng kể thời gian khởi động container trong các cụm Amazon EKS.
Data Volume Design: Bottlerocket tách biệt phân vùng hệ điều hành (OS volume) khỏi phân vùng dữ liệu chuyên dụng(data volume). Data volume được sử dụng để lưu trữ ảnh container và dữ liệu tạm thời, làm cho nó trở nên lý tưởng để lưu trữ ảnh vào bộ nhớ cache.
Prefetching Images: Bạn có thể pull trước (tìm nạp trước) các container images vào ổ chứa dữ liệu ( data volume) của một Bottlerocket instance, sau đó tạo ảnh chụp nhanh cho ổ chứa này. New EKS nodes có thể được khởi chạy bằng cách sử dụng cái snapshot này, đảm bảo rằng các images yêu cầu đã có sẵn trong local, loại bỏ việc pull các image từ remote registries cho việc startup các pod.
Performance Gains: Benchmarks show rằng với việc cached 1 image 3GB, thời gian pod readiness rơi xuống từ khoảng 32 seconds đến gần như ngay lập tức.
Bạn có thể tham khảo tài liệu này: https://blog.securityinsights.io/aws-bottlerocket-reinventing-container-security-and-efficiency-for-modern-workloads

Create an EC2 Instance:
This step involves creating an EC2 instance with a specific AMI and instance type. If you want to do this manually, follow these steps:
Bước này bao gồm việc tạo một phiên bản EC2 với một AMI và instance type cụ thể. Nếu bạn muốn thực hiện việc này thủ công, hãy làm theo các bước sau:
Tạo role:
TRUST_POLICY=$(cat <<EOF
{
  "Version": "2012-10-17",
  "Statement": [
    {
      "Effect": "Allow",
      "Principal": {
        "Service": "ec2.amazonaws.com"
      },
      "Action": "sts:AssumeRole"
    }
  ]
}
EOF
)

aws iam create-role \
      --role-name BottlerocketSnapshotRole-Nim \
      --assume-role-policy-document "${TRUST_POLICY}" \
      --query 'Role.Arn' \
      --output text

aws iam attach-role-policy \
        --role-name BottlerocketSnapshotRole-Nim \
        --policy-arn "arn:aws:iam::aws:policy/AmazonEC2ContainerRegistryReadOnly"

aws iam attach-role-policy \
        --role-name BottlerocketSnapshotRole-Nim \
        --policy-arn "arn:aws:iam::aws:policy/AmazonSSMManagedInstanceCore"

aws iam attach-role-policy \
        --role-name BottlerocketSnapshotRole-Nim \
        --policy-arn "arn:aws:iam::aws:policy/AmazonEKSWorkerNodePolicy"

aws iam create-instance-profile \
  --instance-profile-name BottlerocketSnapshotProfile-Nim

aws iam add-role-to-instance-profile \
  --instance-profile-name BottlerocketSnapshotProfile-Nim \
  --role-name BottlerocketSnapshotRole-Nim
Đầu tiền là anh em cần get image-id:
AMI_ID=$(aws ssm get-parameter \
    --name "/aws/service/bottlerocket/aws-k8s-1.31/x86_64/latest/image_id" \
    --query 'Parameter.Value' \
    --output text)

USER_DATA='
[settings.host-containers.admin]
enabled = true
'


aws ec2 run-instances \
    --region eu-central-1 \
    --image-id ${AMI_ID} \
    --instance-type "m5.large" \
    --iam-instance-profile Arn="arn:aws:iam::XXXXXXXXX869:instance-profile/BottlerocketSnapshotProfile-Nim" \
    --user-data "${USER_DATA}" \
    --block-device-mappings '[{"DeviceName":"/dev/xvda","Ebs":{"VolumeSize":10,"VolumeType":"gp3","DeleteOnTermination":true}},{"DeviceName":"/dev/xvdb","Ebs":{"VolumeSize":100,"VolumeType":"gp3"}}]' \
    --tag-specifications 'ResourceType=instance,Tags=[{Key=Name,Value=BottlerocketSnapshotInstance-Nim}]' \
    --query 'Instances[0].InstanceId' \
    --output text
Lúc này bạn có thể dùng command check
chờ cho instance running:
aws ec2 wait instance-running --instance-ids i-0e2894a54ed62c6cc --region eu-central-1Chờ chờ SSM online hay không?
aws ssm describe-instance-information \
              --filters "Key=InstanceIds,Values=i-0e2894a54ed62c6cc" \
              --query "InstanceInformationList[0].PingStatus" \
              --output text
Bạn chờ cho đến khi output là online:

aws ssm send-command \
  --instance-ids i-0e2894a54ed62c6cc \
  --document-name "AWS-RunShellScript" \
  --comment "List containers" \
  --parameters commands="apiclient exec admin sheltie ctr -a /run/containerd/containerd.sock -n k8s.io images ls" \
  --region eu-central-1 \
  --output text \
  --query "Command.CommandId"
Xong bạn cần kiểm tra command id đã xong chưa?
aws ssm get-command-invocation --command-id 9cceafc2-e77c-40ab-9ed9-ad2e6e24452c --instance-id i-0e2894a54ed62c6cc --region eu-central-1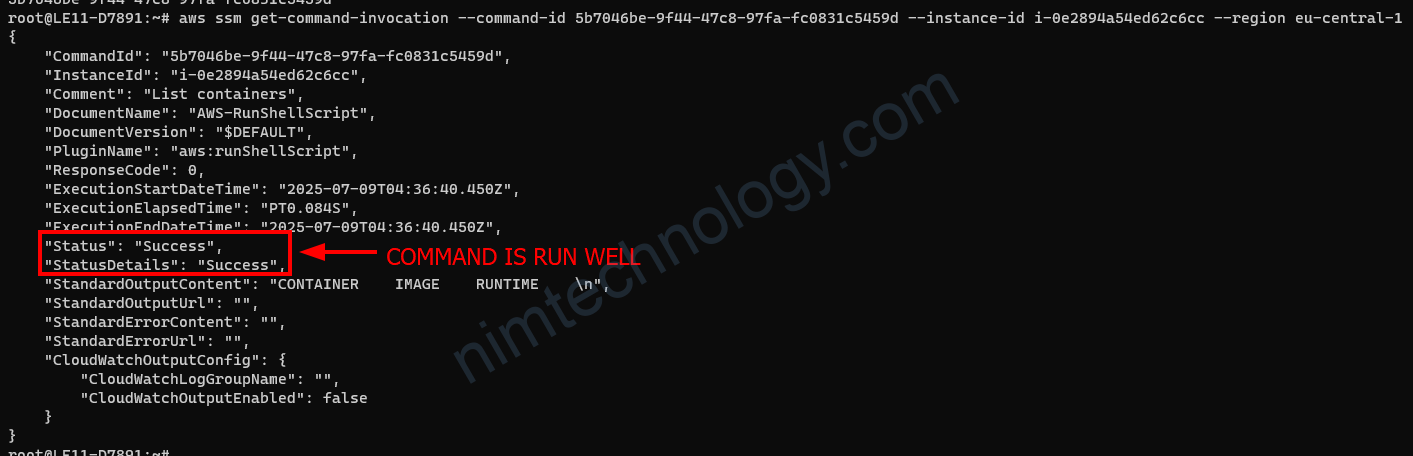
aws ssm send-command \
  --instance-ids i-0e2894a54ed62c6cc \
  --document-name "AWS-RunShellScript" \
  --comment "Pull image" \
  --parameters commands="apiclient exec admin sheltie ctr -a /run/containerd/containerd.sock -n k8s.io images pull docker.io/library/nginx:latest" \
  --region eu-central-1 \
  --output text \
  --query "Command.CommandId"
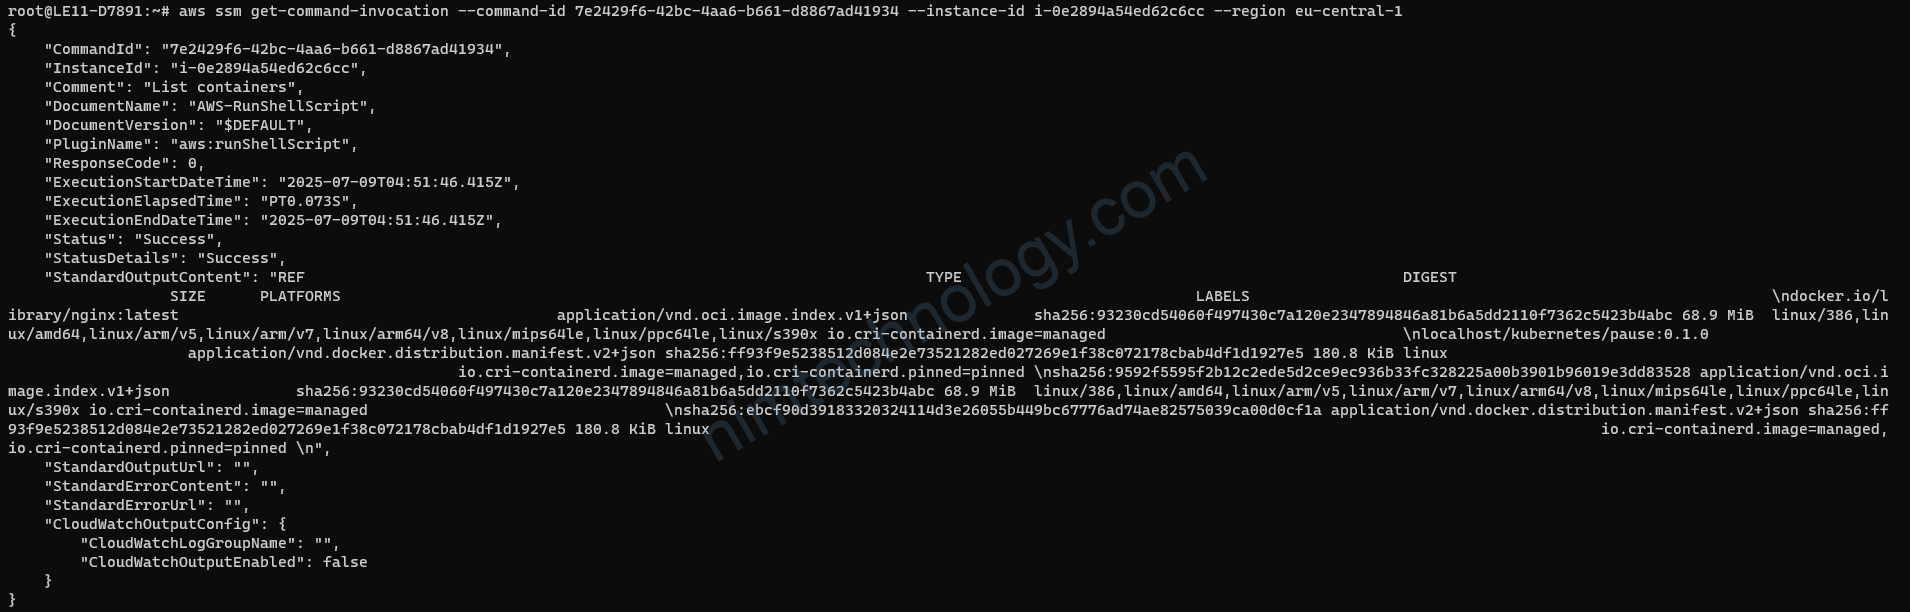
aws ssm get-command-invocation --command-id 9b9ff87c-7da0-4857-aaa8-2a5bca363d9b --instance-id i-0e2894a54ed62c6cc --region eu-central-1bạn có thể kiểm tra image một lần nữa:
aws ssm send-command \
  --instance-ids i-0e2894a54ed62c6cc \
  --document-name "AWS-RunShellScript" \
  --comment "List containers" \
  --parameters commands="apiclient exec admin sheltie ctr -a /run/containerd/containerd.sock -n k8s.io images ls" \
  --region eu-central-1 \
  --output text \
  --query "Command.CommandId"
Sau khi anh em pull image xong thì bạn thực hiện snapshot volume.
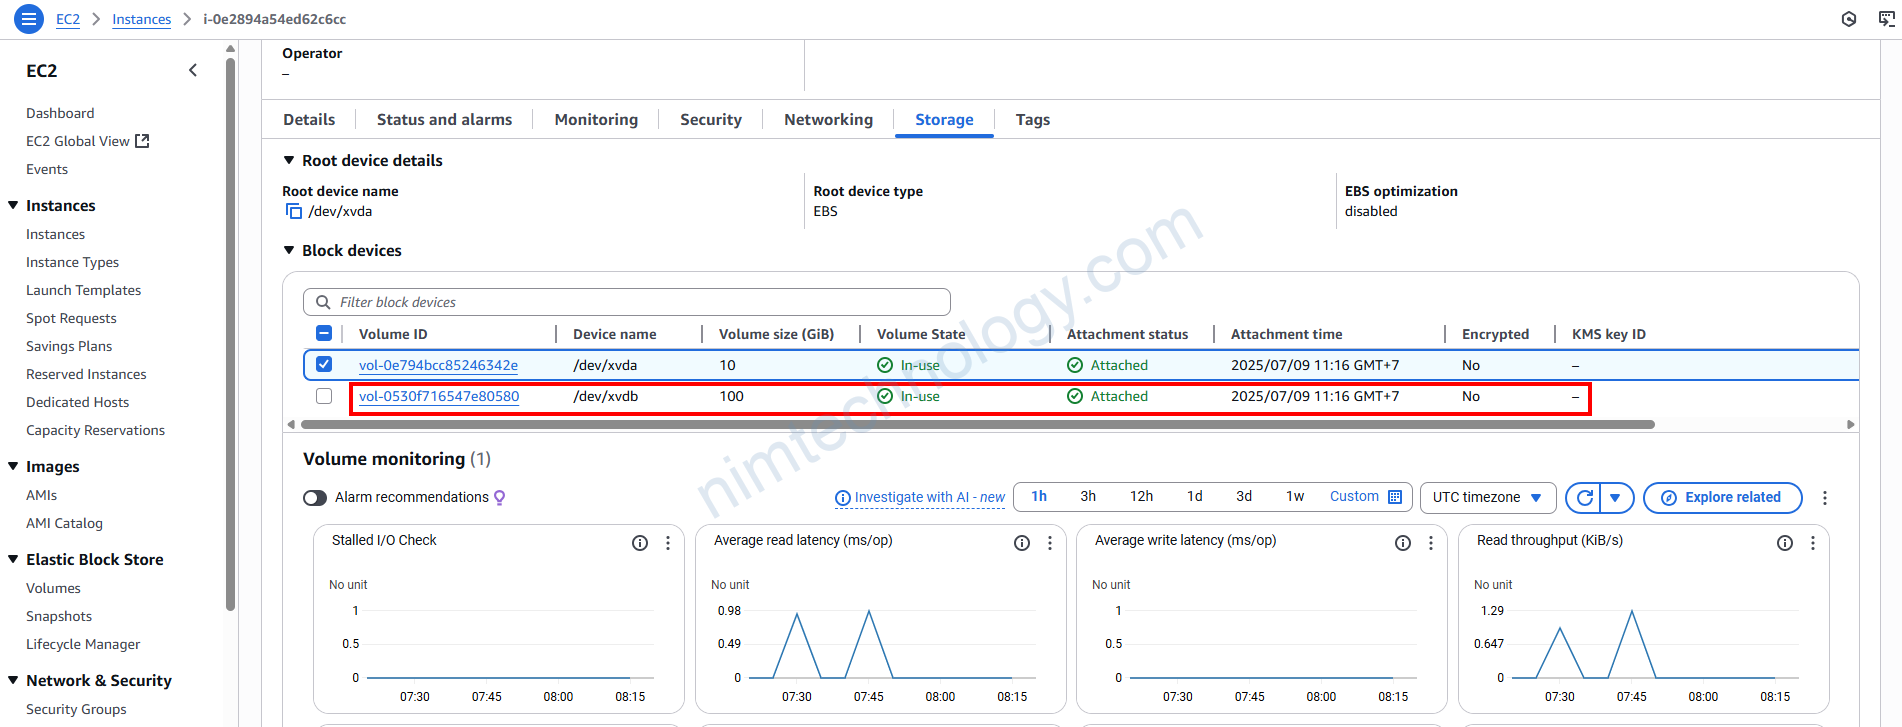
Trên tinh thần thì Instance
Anh em cần print ra được EBS VolumeID
VOLUME_ID=$(aws ec2 describe-instances \
  --instance-id i-0e2894a54ed62c6cc \
  --query "Reservations[0].Instances[0].BlockDeviceMappings[?DeviceName=='/dev/xvdb'].Ebs.VolumeId" \
  --output text)
Tạo Snapshot volume:
SNAPSHOT_ID=$(aws ec2 create-snapshot \
  --volume-id ${VOLUME_ID} \
  --description "Manual snapshot of data volume" \
  --query "SnapshotId" \
  --output text)
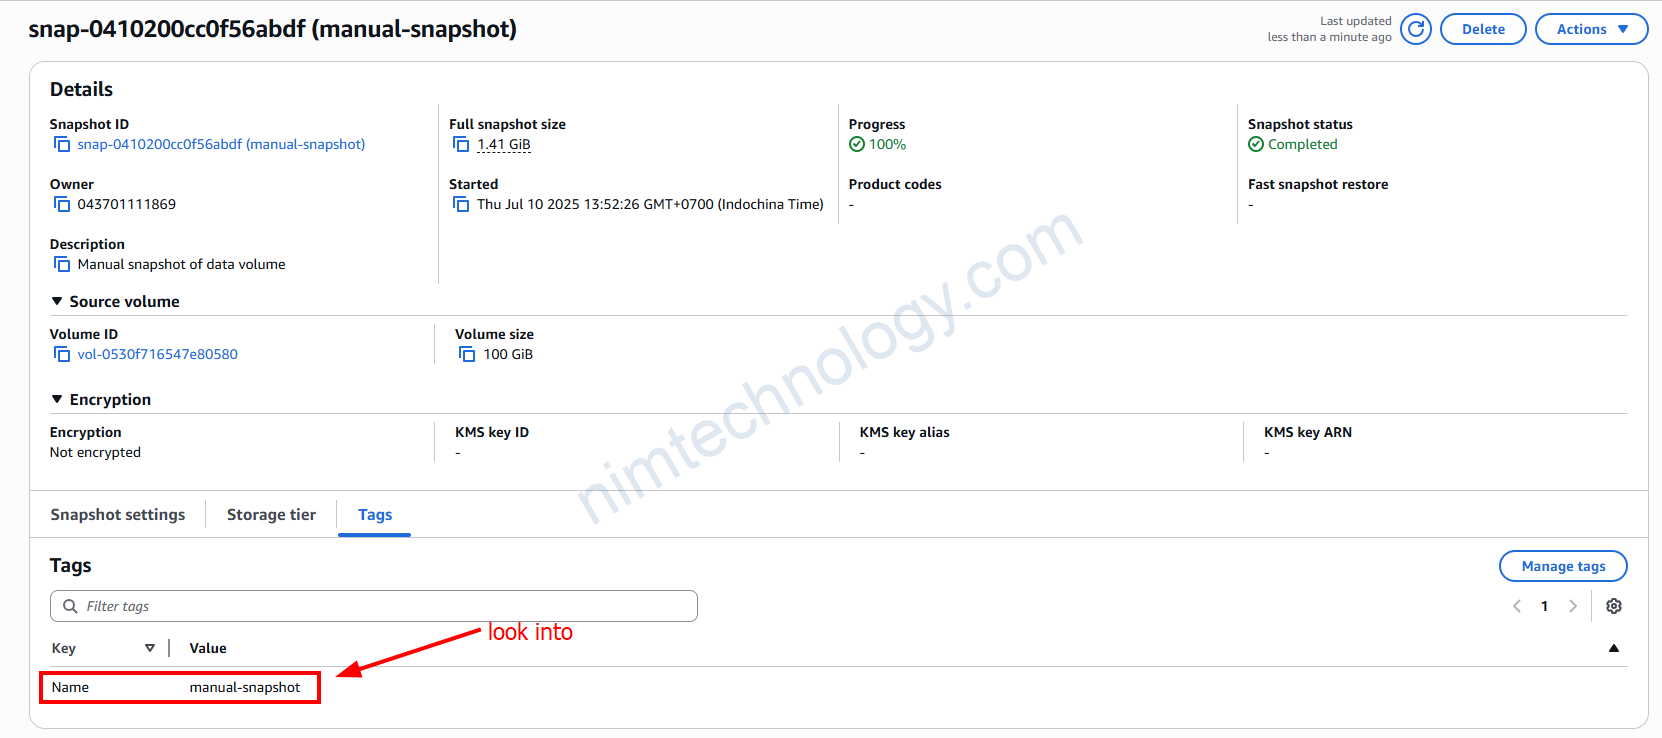
Bạn có thể đánh tag để đánh dây các snapshot volume
aws ec2 create-tags \
  --resources ${SNAPSHOT_ID} \
  --tags Key=Name,Value="manual-snapshot"
Để check cú là các việc snapshot volume đã hoàn tất bạn có thể viết script:
aws ec2 wait snapshot-completed --snapshot-ids "$SNAPSHOT_ID"Sau khi snapshot thành công bạn có thể terminate instance:
aws ec2 terminate-instances --instance-ids i-0e2894a54ed62c6ccUpdate AutoScaling Group.
Sau khi có snapshot thì chúng ta sẽ thực hiện replace nó vào template của Auto scaling Group.
Replace <ASG_NAME> with your Auto Scaling Group name:
aws autoscaling describe-auto-scaling-groups \
  --auto-scaling-group-names <ASG_NAME> \
  --query "AutoScalingGroups[0].MixedInstancesPolicy.LaunchTemplate.LaunchTemplateSpecification.LaunchTemplateId" \
  --output text
If the result is None or empty, try:
aws autoscaling describe-auto-scaling-groups \
  --auto-scaling-group-names <ASG_NAME> \
  --query "AutoScalingGroups[0].LaunchTemplate.LaunchTemplateId" \
  --output text
Get the Latest Launch Template Version
Replace <LT_ID> with the Launch Template ID from above:
aws ec2 describe-launch-template-versions \
  --launch-template-id <LT_ID> \
  --query 'max_by(LaunchTemplateVersions, &VersionNumber).VersionNumber' \
  --output text
Get the Source Version Data
aws ec2 describe-launch-template-versions \
  --launch-template-id <LT_ID> \
  --versions <SOURCE_VERSION> \
  --query "LaunchTemplateVersions[0].LaunchTemplateData" \
  --output json
Create a New Launch Template Version with the New Snapshot
Prepare a JSON block for the new version, updating the BlockDeviceMappings to use your new snapshot ID (<SNAPSHOT_ID>).
Example (edit as needed):
{
  "ImageId": "<AMI_ID>",
  "InstanceType": "<INSTANCE_TYPE>",
  "UserData": "<BASE64_USER_DATA>",
  "BlockDeviceMappings": [
    {
      "DeviceName": "/dev/xvdb",
      "Ebs": {
        "SnapshotId": "<SNAPSHOT_ID>",
        "VolumeSize": 100,
        "VolumeType": "gp3",
        "DeleteOnTermination": true
      }
    }
  ]
}
Save this as lt-data.json.
Then run:
aws ec2 create-launch-template-version \
  --launch-template-id <LT_ID> \
  --source-version <SOURCE_VERSION> \
  --version-description "manual-update-$(date +%Y%m%d-%H%M%S)" \
  --launch-template-data file://lt-data.json \
  --query 'LaunchTemplateVersion.VersionNumber' \
  --output text
Set the New Version as Default
Replace <NEW_VERSION> with the version number returned above:
aws ec2 modify-launch-template \
  --launch-template-id <LT_ID> \
  --default-version <NEW_VERSION>
Update the ASG to Use the New Launch Template Version
aws autoscaling update-auto-scaling-group \
  --auto-scaling-group-name <ASG_NAME> \
  --launch-template "LaunchTemplateId=<LT_ID>,Version=<NEW_VERSION>"