Bài này bạn sẽ cũng mình providing 1 cluster EKS or K8s on AWS bằng terraform
Mình sẽ không thể giải thích từng line.
nhưng chỗ nào mình thấy khó hiểu mình sẽ note lại
1) Overview
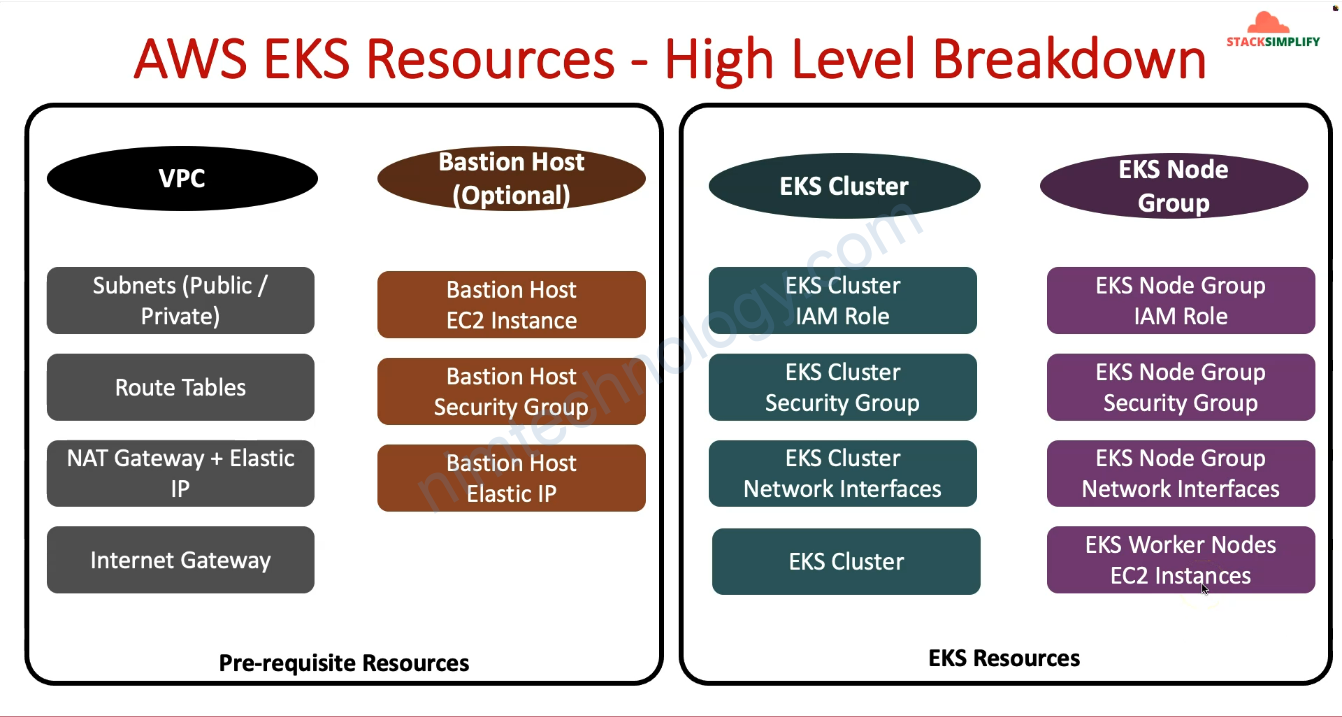
2) Using terraform to provide a EKS cluster.
Bài này thì chúng ta sẽ tạo 1 cluster EKS Public
Endpoint của Node controller sẽ public và các node worker sẽ access vào controller qua IP Public
Bạn sẽ thao khảo code ở link bên dưới!
https://github.com/mrnim94/terraform-aws/tree/master/eks/AWS-EKS-Cluster-Basics
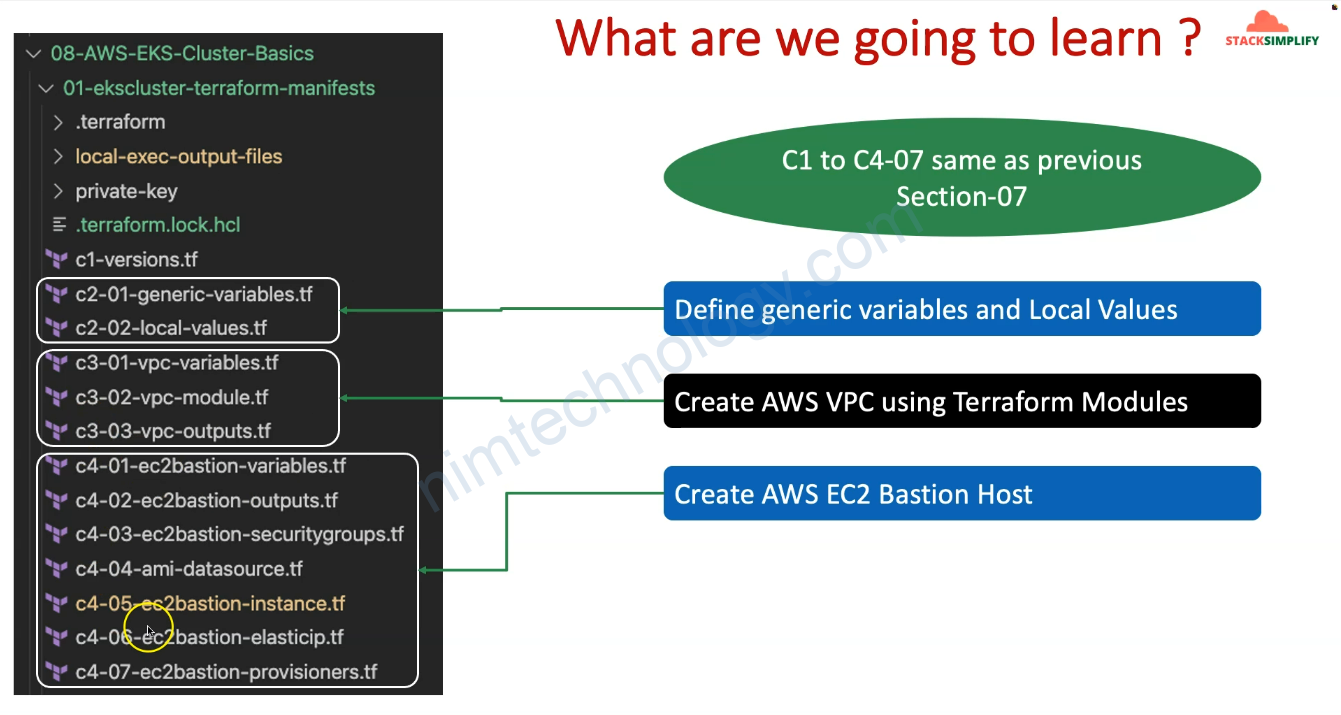
Đầu tiên chúng ta đi soi variable:
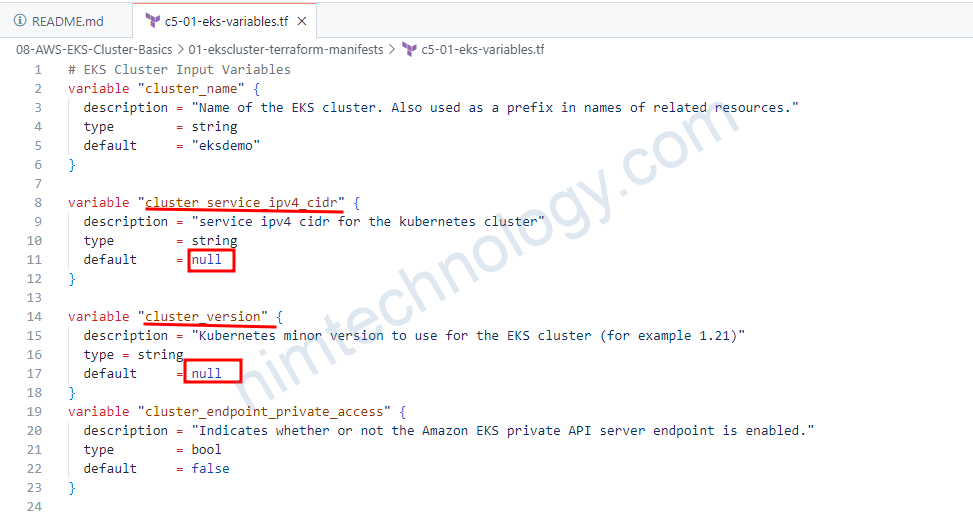
cluster_service_ipv4_cidr –> service_ipv4_cidr: chỗ này thì bạn dùng để khai báo IP service cho cluster k8s
trong resource aws_eks_cluster có key version thì variable cluster_version: để quy định cluster k8s sẽ có version là bao nhiêu
==> nếu để null thì chúng ta có thể edit bằng file có đuôi là .tfvars

endpoint_public_access = var.cluster_endpoint_public_access
==> (Optional) Whether the Amazon EKS public API server endpoint is enabled. Default is

Tìm hiểu về IAM role cho eks cluster
chúng ta kiềm hiểu 2 policy này trước.


# Create IAM Role
resource "aws_iam_role" "eks_master_role" {
  name = "${local.name}-eks-master-role"

  assume_role_policy = <<POLICY
{
  "Version": "2012-10-17",
  "Statement": [
    {
      "Effect": "Allow",
      "Principal": {
        "Service": "eks.amazonaws.com"
      },
      "Action": "sts:AssumeRole"
    }
  ]
}
POLICY
}

# Associate IAM Policy to IAM Role
resource "aws_iam_role_policy_attachment" "eks-AmazonEKSClusterPolicy" {
  policy_arn = "arn:aws:iam::aws:policy/AmazonEKSClusterPolicy"
  role       = aws_iam_role.eks_master_role.name
}

resource "aws_iam_role_policy_attachment" "eks-AmazonEKSVPCResourceController" {
  policy_arn = "arn:aws:iam::aws:policy/AmazonEKSVPCResourceController"
  role       = aws_iam_role.eks_master_role.name
}

/*
# Optionally, enable Security Groups for Pods
# Reference: https://docs.aws.amazon.com/eks/latest/userguide/security-groups-for-pods.html
resource "aws_iam_role_policy_attachment" "eks-AmazonEKSVPCResourceController" {
  policy_arn = "arn:aws:iam::aws:policy/AmazonEKSVPCResourceController"
  role       = aws_iam_role.eks_master_role.name
}
*/
Tiếp đến là chúng ta có 1 file c5-04-iamrole-for-eks-nodegroup.tf
# IAM Role for EKS Node Group
resource "aws_iam_role" "eks_nodegroup_role" {
  name = "${local.name}-eks-nodegroup-role"

  assume_role_policy = jsonencode({
    Statement = [{
      Action = "sts:AssumeRole"
      Effect = "Allow"
      Principal = {
        Service = "ec2.amazonaws.com"
      }
    }]
    Version = "2012-10-17"
  })
}

resource "aws_iam_role_policy_attachment" "eks-AmazonEKSWorkerNodePolicy" {
  policy_arn = "arn:aws:iam::aws:policy/AmazonEKSWorkerNodePolicy"
  role       = aws_iam_role.eks_nodegroup_role.name
}

resource "aws_iam_role_policy_attachment" "eks-AmazonEKS_CNI_Policy" {
  policy_arn = "arn:aws:iam::aws:policy/AmazonEKS_CNI_Policy"
  role       = aws_iam_role.eks_nodegroup_role.name
}

resource "aws_iam_role_policy_attachment" "eks-AmazonEC2ContainerRegistryReadOnly" {
  policy_arn = "arn:aws:iam::aws:policy/AmazonEC2ContainerRegistryReadOnly"
  role       = aws_iam_role.eks_nodegroup_role.name
}


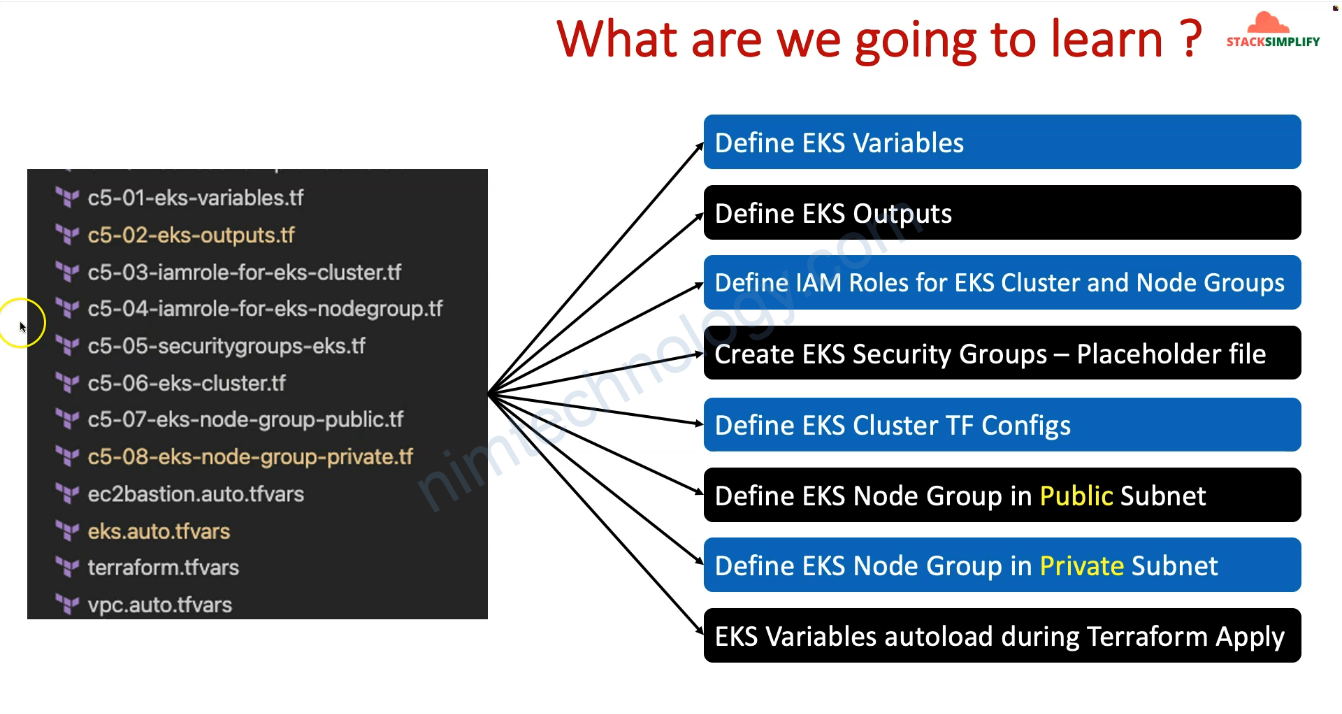
c5-06-eks-cluster.tf giờ chúng ta thực hiện tại EKS cluster.
# Create AWS EKS Cluster
resource "aws_eks_cluster" "eks_cluster" {
  name     = "${local.name}-${var.cluster_name}"
  role_arn = aws_iam_role.eks_master_role.arn
  version = var.cluster_version

  vpc_config {
    subnet_ids = module.vpc.public_subnets
    endpoint_private_access = var.cluster_endpoint_private_access
    endpoint_public_access  = var.cluster_endpoint_public_access
    public_access_cidrs     = var.cluster_endpoint_public_access_cidrs
  }

  kubernetes_network_config {
    service_ipv4_cidr = var.cluster_service_ipv4_cidr
  }

  # Enable EKS Cluster Control Plane Logging
  enabled_cluster_log_types = ["api", "audit", "authenticator", "controllerManager", "scheduler"]

  # Ensure that IAM Role permissions are created before and deleted after EKS Cluster handling.
  # Otherwise, EKS will not be able to properly delete EKS managed EC2 infrastructure such as Security Groups.
  depends_on = [
    aws_iam_role_policy_attachment.eks-AmazonEKSClusterPolicy,
    aws_iam_role_policy_attachment.eks-AmazonEKSVPCResourceController,
  ]
}
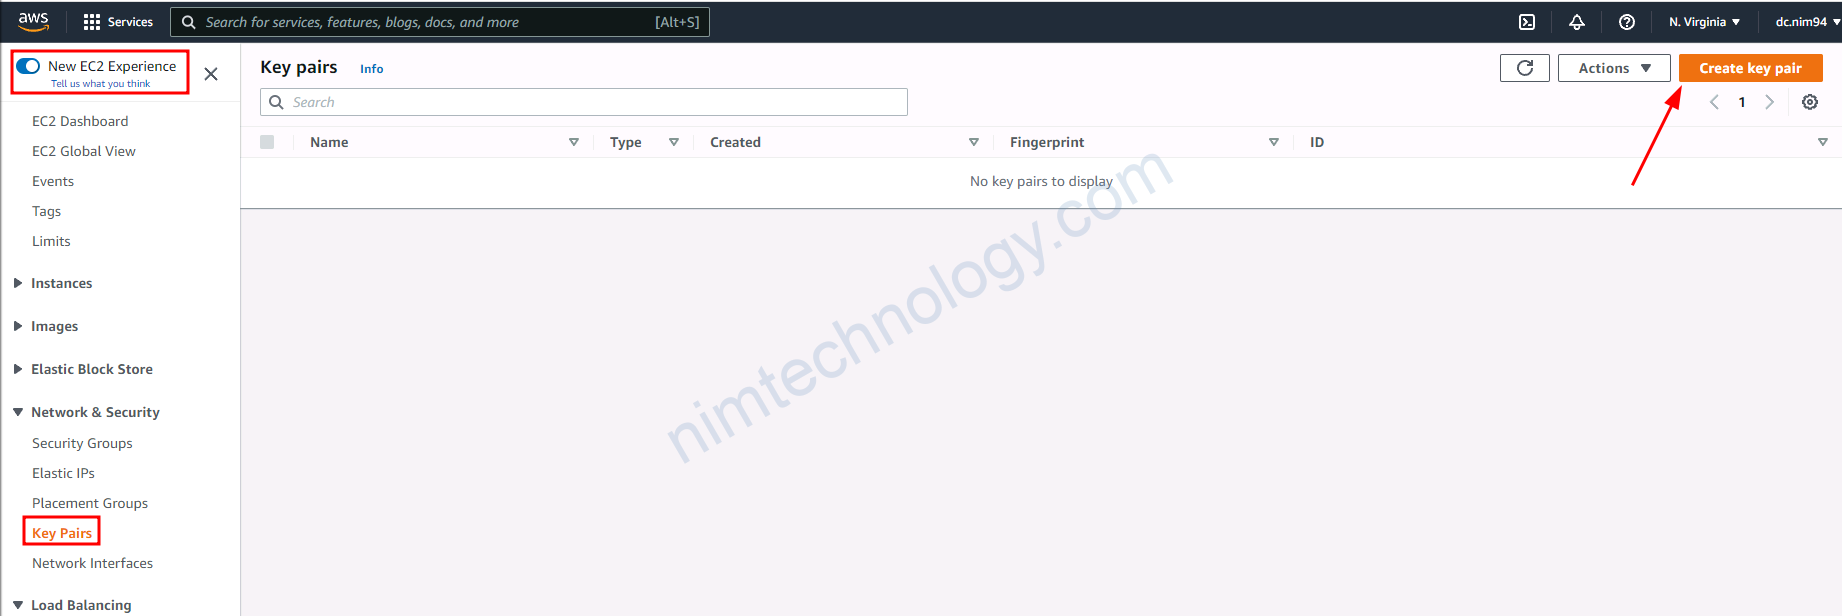
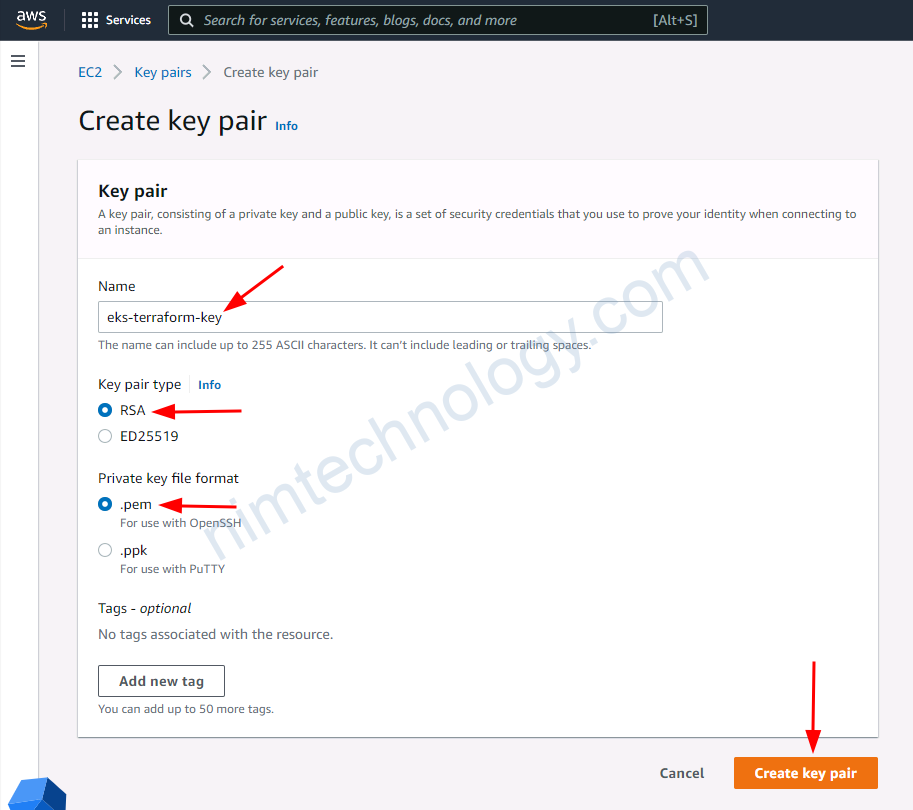
Create keypair or ssh-key on AWS
Ở line code này
https://github.com/mrnim94/terraform-aws/blob/master/eks/AWS-EKS-Cluster-Basics/c5-07-eks-node-group-public.tf#L16-L18
bạn cần cần đưa vào 1 ssh để bạn có thể access được con node
thực hiện tại keypair hoặc inport key nhé
sau đó chúng ta tạo các workler node EKS.
# Create AWS EKS Node Group - Public
resource "aws_eks_node_group" "eks_ng_public" {
  cluster_name    = aws_eks_cluster.eks_cluster.name

  node_group_name = "${local.name}-eks-ng-public"
  node_role_arn   = aws_iam_role.eks_nodegroup_role.arn
  subnet_ids      = module.vpc.public_subnets
  #version = var.cluster_version #(Optional: Defaults to EKS Cluster Kubernetes version)

  ami_type = "AL2_x86_64"
  capacity_type = "ON_DEMAND"
  disk_size = 20
  instance_types = ["t3.medium"]


  remote_access {
    ec2_ssh_key = "eks-terraform-key"
  }

  scaling_config {
    desired_size = 1
    min_size     = 1
    max_size     = 2
  }

  # Desired max percentage of unavailable worker nodes during node group update.
  update_config {
    max_unavailable = 1
    #max_unavailable_percentage = 50    # ANY ONE TO USE
  }

  # Ensure that IAM Role permissions are created before and deleted after EKS Node Group handling.
  # Otherwise, EKS will not be able to properly delete EC2 Instances and Elastic Network Interfaces.
  depends_on = [
    aws_iam_role_policy_attachment.eks-AmazonEKSWorkerNodePolicy,
    aws_iam_role_policy_attachment.eks-AmazonEKS_CNI_Policy,
    aws_iam_role_policy_attachment.eks-AmazonEC2ContainerRegistryReadOnly,
  ]

  tags = {
    Name = "Public-Node-Group"
  }
}
OoK! Giờ bạn clone code của mình về và bạn thực hiện terraform apply
là 1 bạn đã có 1 cluster k8s trên AWS.
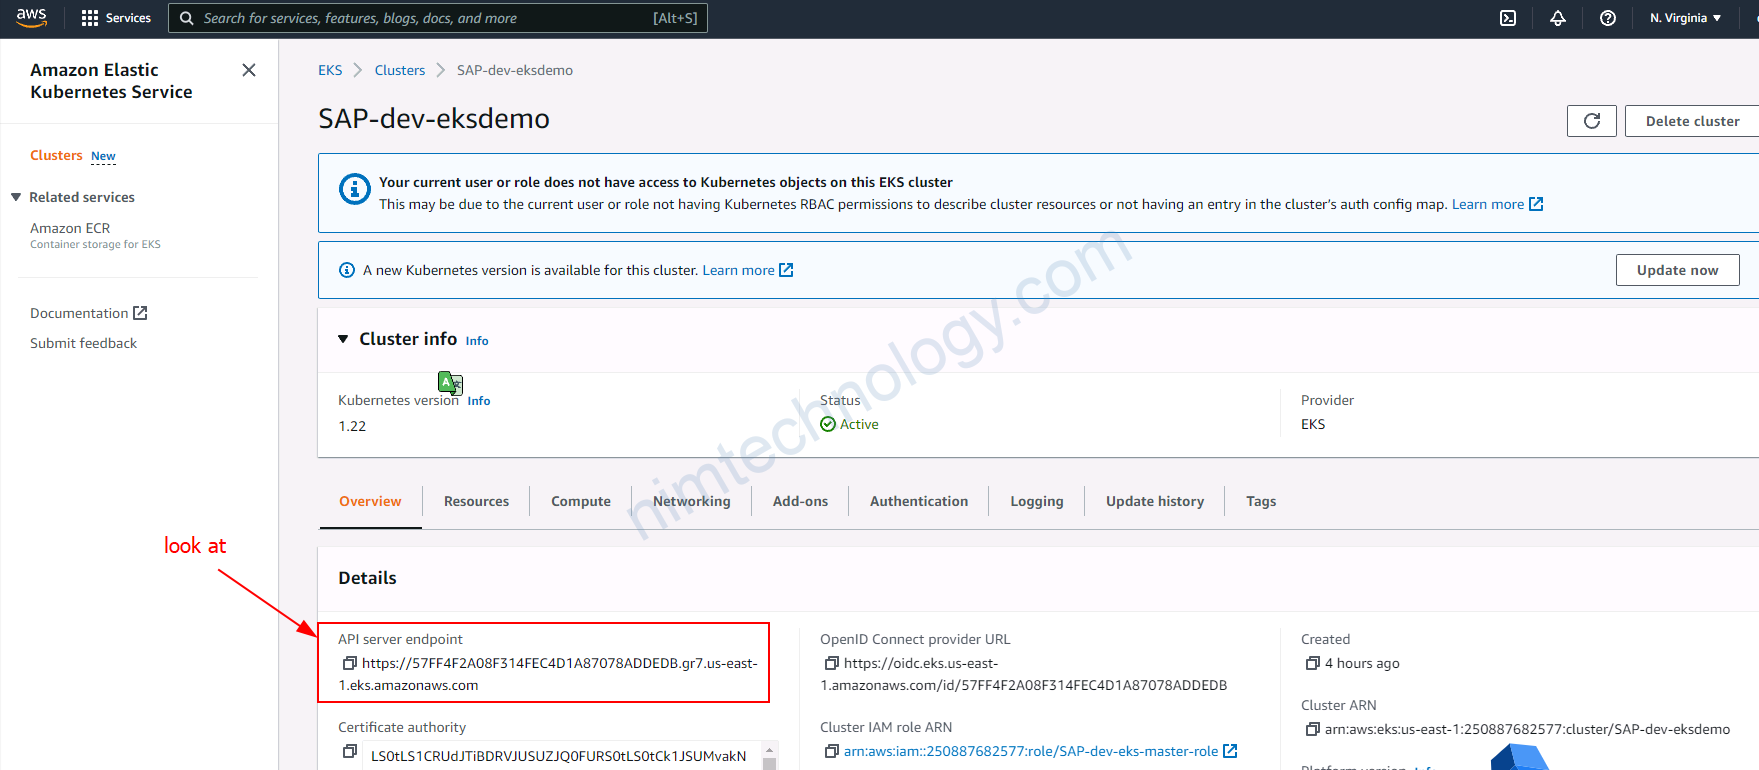
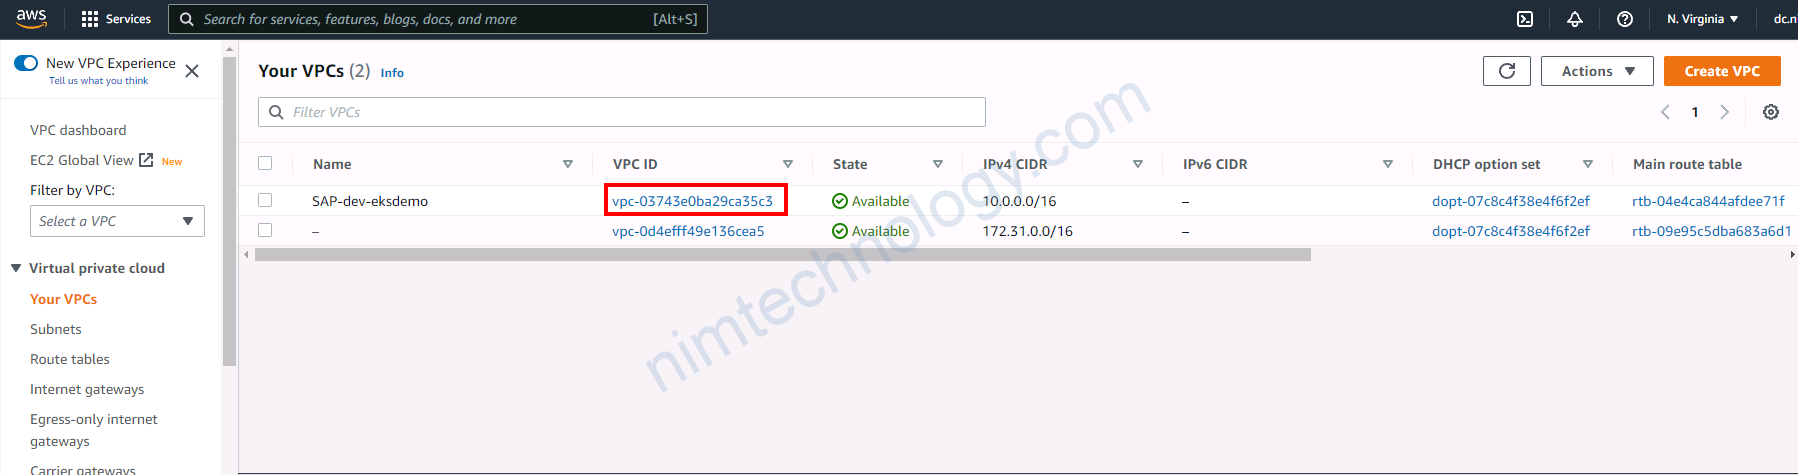
Verify EKS Cluster from AWS Mgmt Console
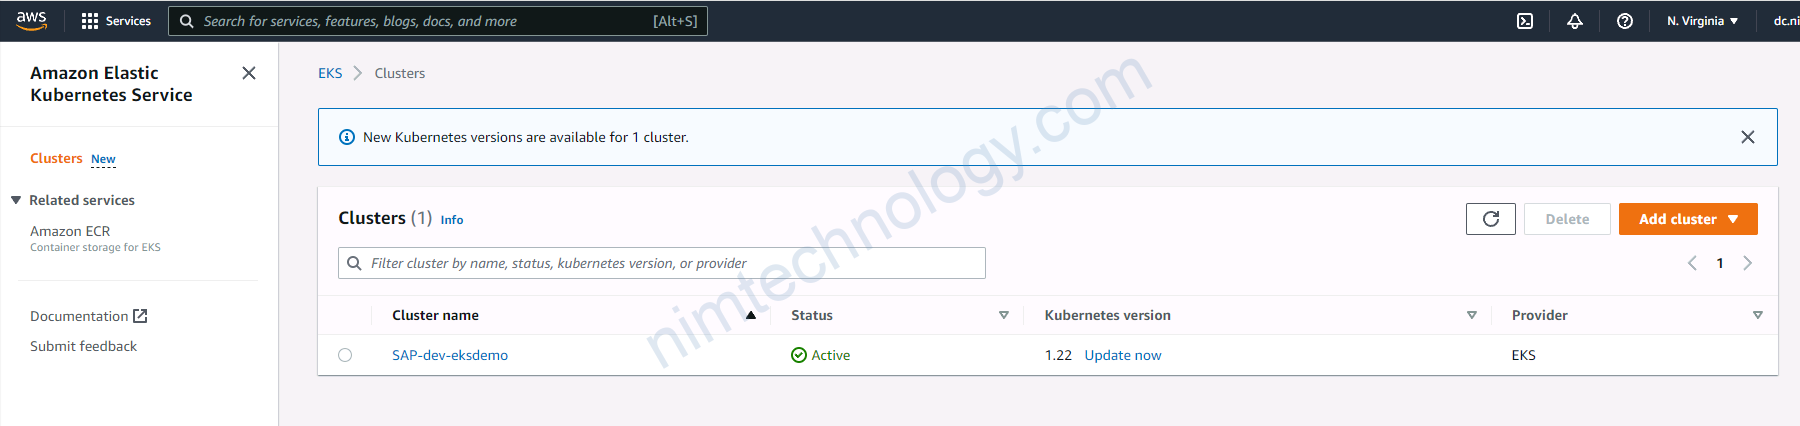
Bạn sẽ cần nhớ tên cluster
thực hiện cài kubectl và aws cli.
thực hiện cấu hình authen aws cli
aws configure
Sau khi đã config xong thì thực hiện export ra file kubeconfig để gõ lệnh kubectl.
aws eks --region <region-code> update-kubeconfig --name <cluster_name>
aws eks --region us-east-1 update-kubeconfig --name SAP-dev-eksdemo

#list the eks cluster on aws
aws eks list-clusters --region <region_name> --profile <profile_name>
Install kubectl, configure kubeconfig and verify
Giờ thử soi file kubeconfigcat /root/.kube/config
apiVersion: v1
clusters:
- cluster:
    certificate-authority-data: LS0tLS1CRUdJTiBDRVJUSUZJQ0FURS0tLS0tCk1JSUMvakNDQWVhZ0F3SUJBZ0lCQURBTkJna3Foa2lHOXcwQkFRc0ZBREFWTVJNd0VRWURWUVFERXdwcmRXSmwKY201bGRHVnpNQjRYRFRJeU1EZ3hPVEF5TVRrek5sb1hEVE15TURneE5qQXlNVGt6Tmxvd0ZURVRNQkVHQTFVRQpBeE1LYTNWaVpYSnVaWFJsY3pDQ0FTSXdEUVlKS29aSWh2Y05BUUVCQlFBRGdnRVBBRENDQVFvQ2dnRUJBTVg2ClpNTWhKeG9paHRZYU5meWIxWHZtMUxzRlJSbS9RVE9yQjRxZ0UyZXMveFFsMVV1VVdaZkhIa2gzS0RVcWRtMTYwVGs1NAoxVTArVHNFRjFPUjh2Y0cxUWxnSWYwQ29ZUDQrYWR1TkN4aVJ6RWw0K1FDZzB0bEUra0NSMTZSQWRWUFp6clRnCmRpYUJHQnRxOHBhaEUzTDJCWDVJR3JxZFRCUFY0LzMxcWUyanBEeG9qOG5oNzd6TXdGNFU0ZTVOSE9QQUNoVi8KN2NrPQotLS0tLUVORCBDRVJUSUZJQ0FURS0tLS0tCg==
    server: https://57FF4F2A08F314FEC4D1A87078ADDEDB.gr7.us-east-1.eks.amazonaws.com
  name: arn:aws:eks:us-east-1:250887682577:cluster/SAP-dev-eksdemo
contexts:
- context:
    cluster: arn:aws:eks:us-east-1:250887682577:cluster/SAP-dev-eksdemo
    user: arn:aws:eks:us-east-1:250887682577:cluster/SAP-dev-eksdemo
  name: arn:aws:eks:us-east-1:250887682577:cluster/SAP-dev-eksdemo
current-context: arn:aws:eks:us-east-1:250887682577:cluster/SAP-dev-eksdemo
kind: Config
preferences: {}
users:
- name: arn:aws:eks:us-east-1:250887682577:cluster/SAP-dev-eksdemo
  user:
    exec:
      apiVersion: client.authentication.k8s.io/v1beta1
      args:
      - --region
      - us-east-1
      - eks
      - get-token
      - --cluster-name
      - SAP-dev-eksdemo
      command: aws
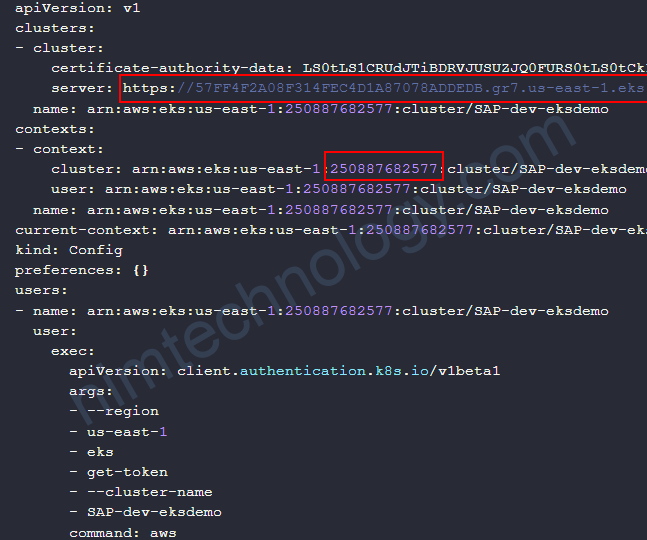
Đầu tiên ta chú ý đến
server: https://57FF4F2A08F314FEC4D1A87078ADDEDB.gr7.us-east-1.eks.amazonaws.com
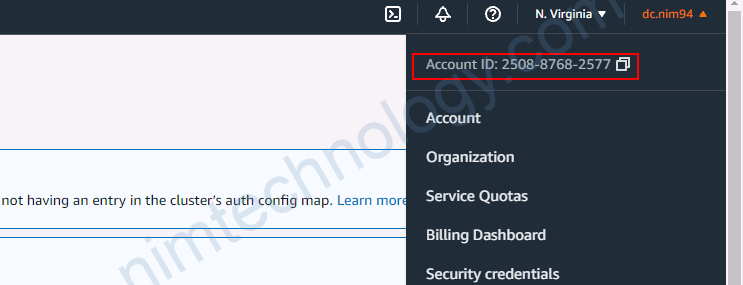
arn:aws:eks:us-east-1:250887682577
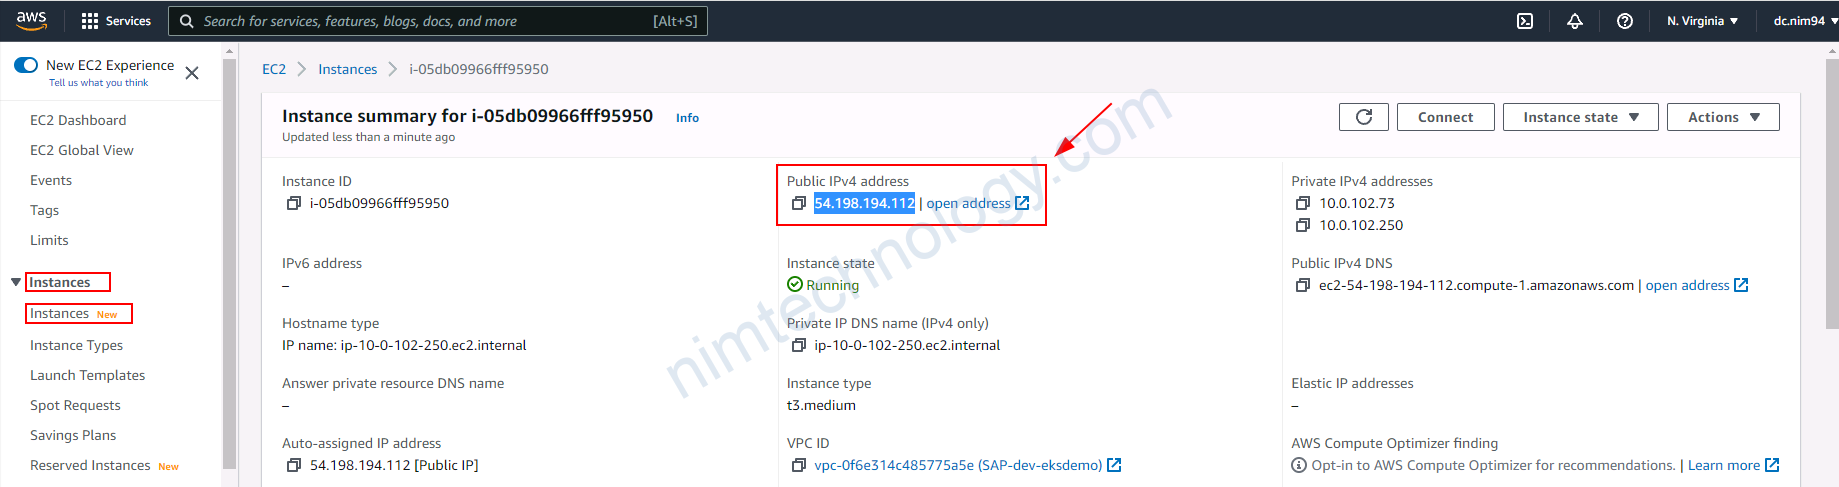
Bước tiếp theo chúng ta có thể ssh vào các con worker node hem!
Ở bước trên bạn đã có private key, giờ chúng ta sẽ sài
chmod 400 private-key/eks-terraform-key.pem
ssh -i private-key/eks-terraform-key.pem ec2-user@<IP-Public-of-node (EC2)>
Nếu bạn không chạy lên trên thì sẽ bị lỗi ntn
ssh -i private-key/eks-terraform-key.pem ec2-user@54.198.194.112
The authenticity of host '54.198.194.112 (54.198.194.112)' can't be established.
ECDSA key fingerprint is SHA256:hvU67Fy+5vEwJhmaXHFyxxKgohHZ/XPX9QCM3qKFdfM.
Are you sure you want to continue connecting (yes/no/[fingerprint])? yes
Please type 'yes', 'no' or the fingerprint: yes
Please type 'yes', 'no' or the fingerprint: yes
Warning: Permanently added '54.198.194.112' (ECDSA) to the list of known hosts.
@@@@@@@@@@@@@@@@@@@@@@@@@@@@@@@@@@@@@@@@@@@@@@@@@@@@@@@@@@@
@         WARNING: UNPROTECTED PRIVATE KEY FILE!          @
@@@@@@@@@@@@@@@@@@@@@@@@@@@@@@@@@@@@@@@@@@@@@@@@@@@@@@@@@@@
Permissions 0644 for 'private-key/eks-terraform-key.pem' are too open.
It is required that your private key files are NOT accessible by others.
This private key will be ignored.
Load key "private-key/eks-terraform-key.pem": bad permissions
Sau khi đã ssh thì ta chạy 1 số lệnh kiểm tra con node
>>>>>
ps -ef | grep kube
>>>>>
root      3052     1  1 04:14 ?        00:02:36 /usr/bin/kubelet --cloud-provider aws --config /etc/kubernetes/kubelet/kubelet-config.json --kubeconfig /var/lib/kubelet/kubeconfig --container-runtime docker --network-plugin cni --node-ip=10.0.102.250 --pod-infra-container-image=602401143452.dkr.ecr.us-east-1.amazonaws.com/eks/pause:3.5 --v=2 --node-labels=eks.amazonaws.com/nodegroup-image=ami-0cca3d8b6715c9f74,eks.amazonaws.com/capacityType=ON_DEMAND,eks.amazonaws.com/nodegroup=SAP-dev-eks-ng-public --max-pods=17
root      3697  3675  0 04:14 ?        00:00:01 kube-proxy --v=2 --config=/var/lib/kube-proxy-config/config --hostname-override=ip-10-0-102-250.ec2.internal
root     17563 16548  0 06:49 pts/0    00:00:00 grep --color=auto kube
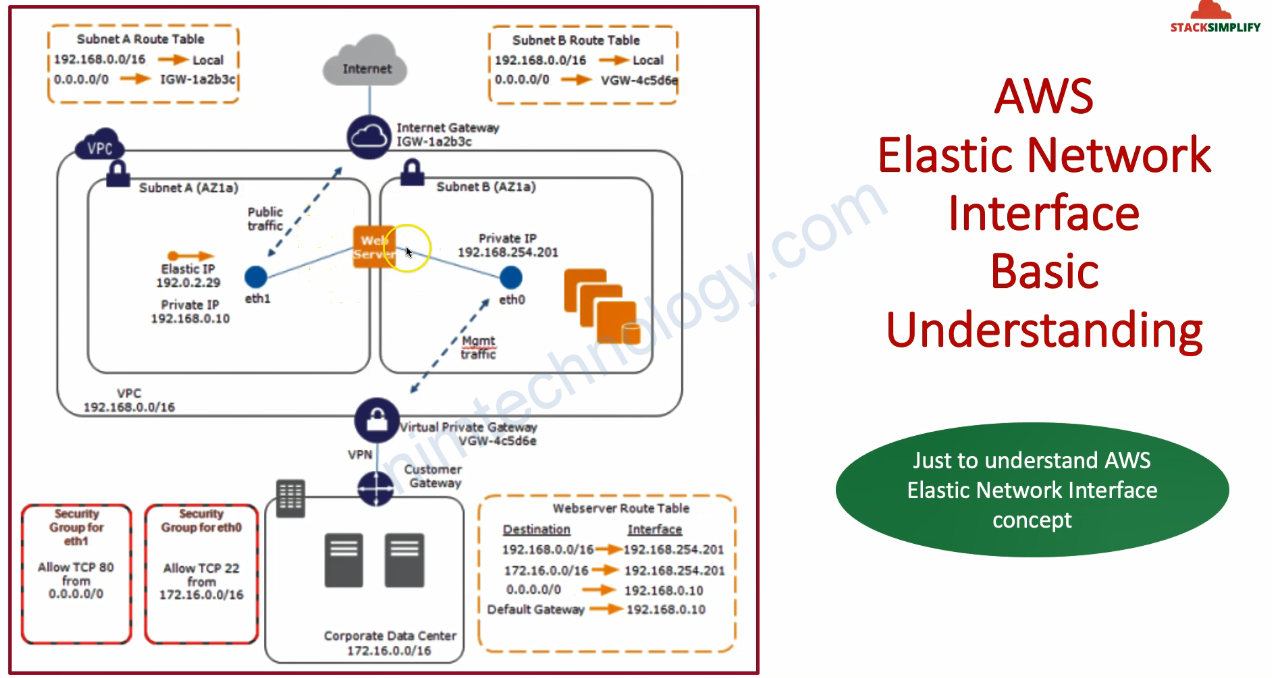
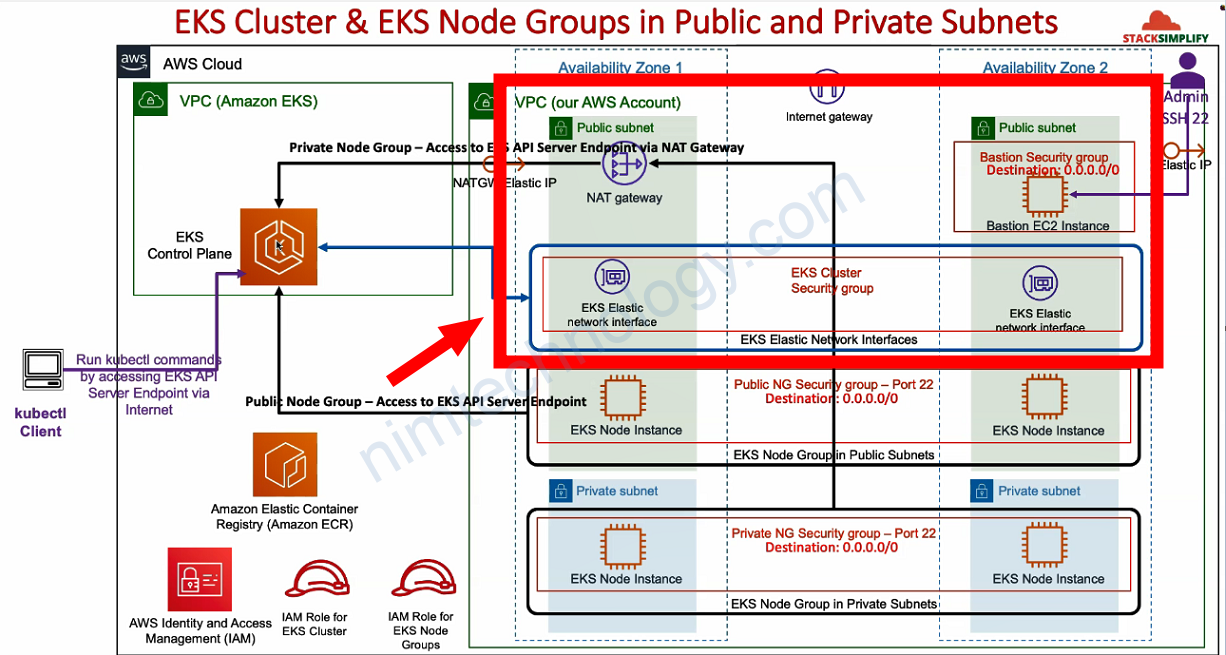
3) Understand EKS Cluster Network Interfaces
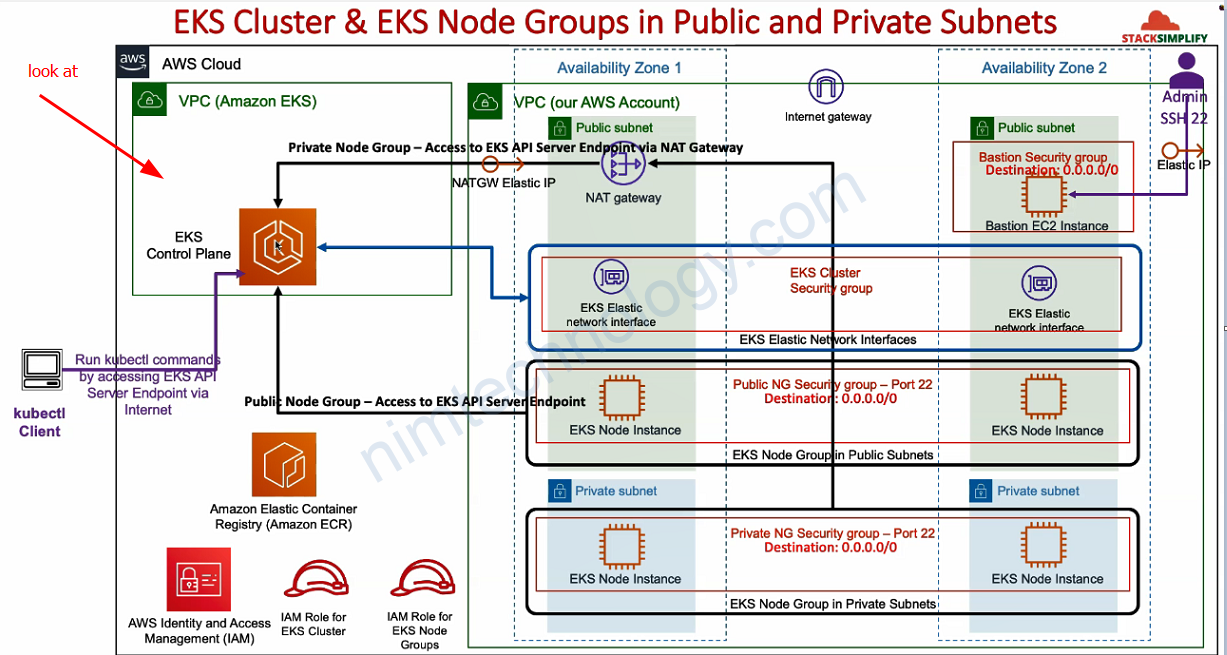
Bạn sẽ thấy là EKS Control Plane nó nằm ở VPC của amazon và con này thì do Amazon quản lý.
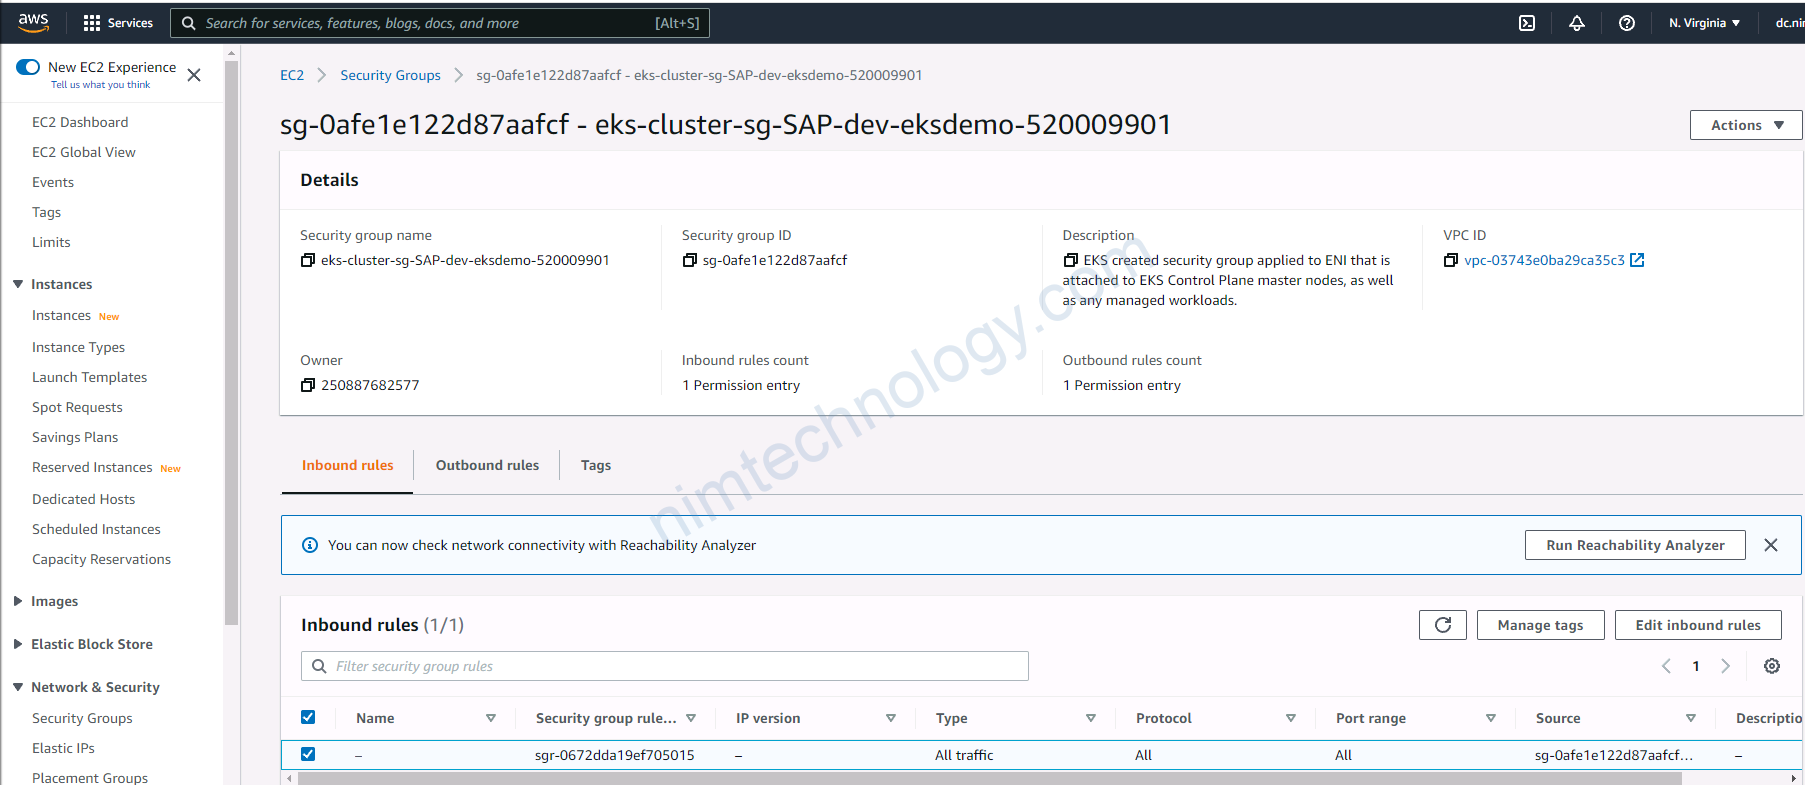
Elastic Network Interfaces (ENI)
– When you create the cluster, Amazon EKS creates and manages network interfaces in your account that have Amazon EKS <Cluster name> in their description.

bạn sẽ thấy EKS đã tạo

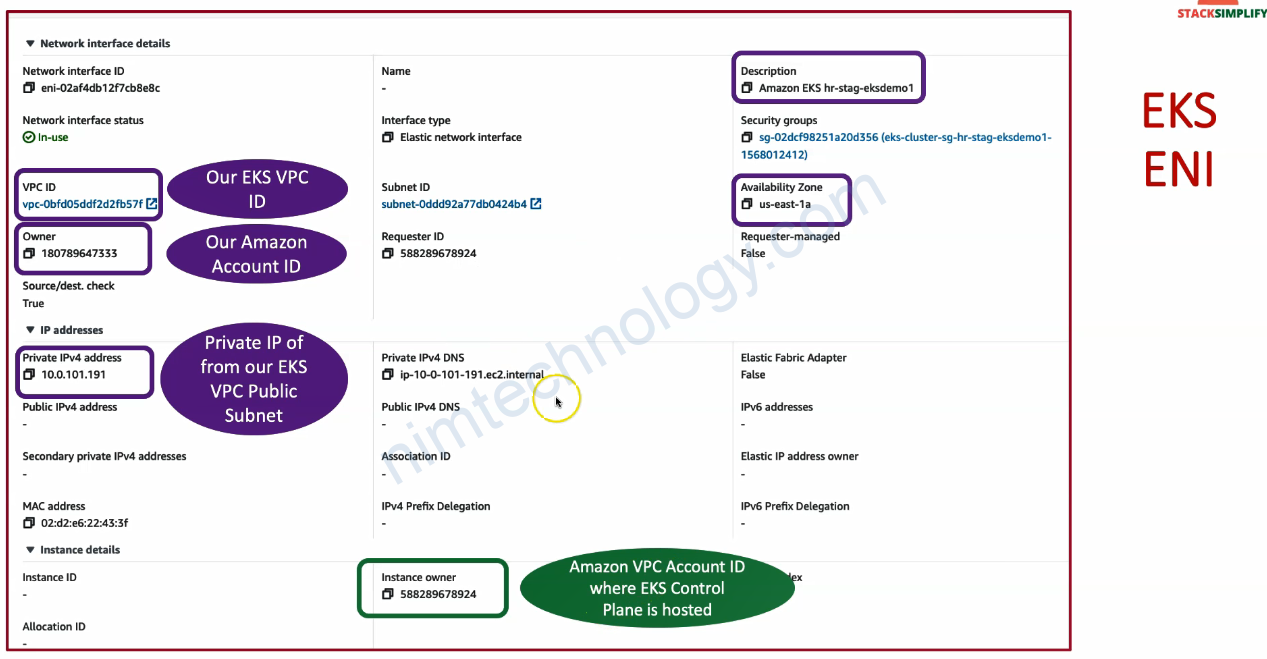
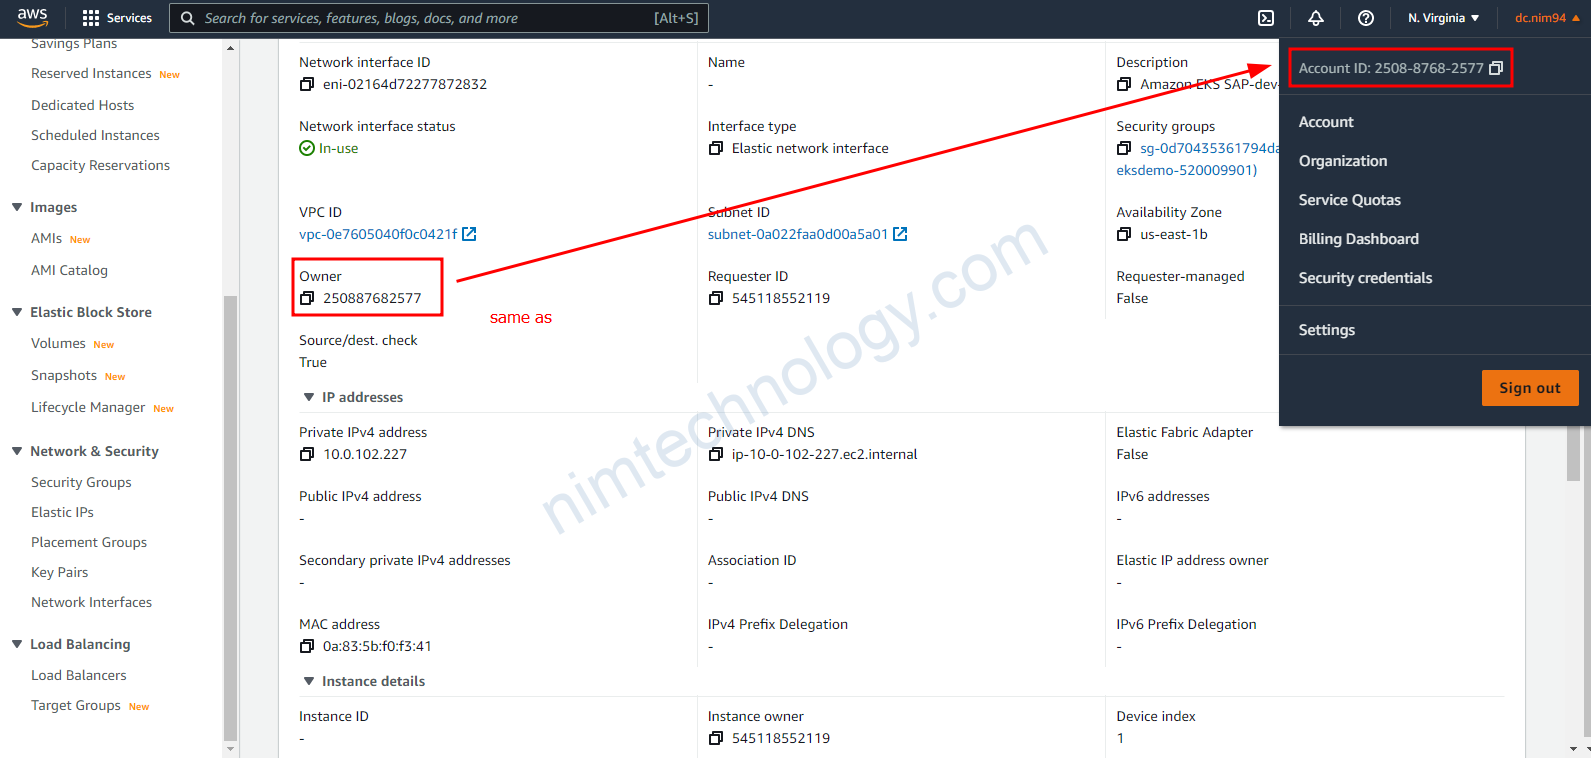
– These network interfaces allow AWS Fargate and Amazon EC2 instances to communicate with the EKS control plane present in Amazon VPC in Amazon Account (Not our AWS Account).
– The Amazon EKS created cluster security group and any additional security groups that you specify when you create your cluster are applied to these network interfaces.
– Very Important Note: These Network Interfaces were created in our EKS VPC in our AWS account but attached to EKS Control Plane Master Node instances of Amazon VPC.
Quay trợ lại 1 chút
và việc tạo ở đâu là do chúng ta quyết định
Bạn có thể view phần config VPC bên dưới
https://github.com/mrnim94/terraform-aws/blob/master/eks/AWS-EKS-Cluster-Basics/c5-06-eks-cluster.tf#L7-L8
bạn thấy chỗ đó đang nhân subnet public
vpc_config {
    subnet_ids = module.vpc.public_subnets
...
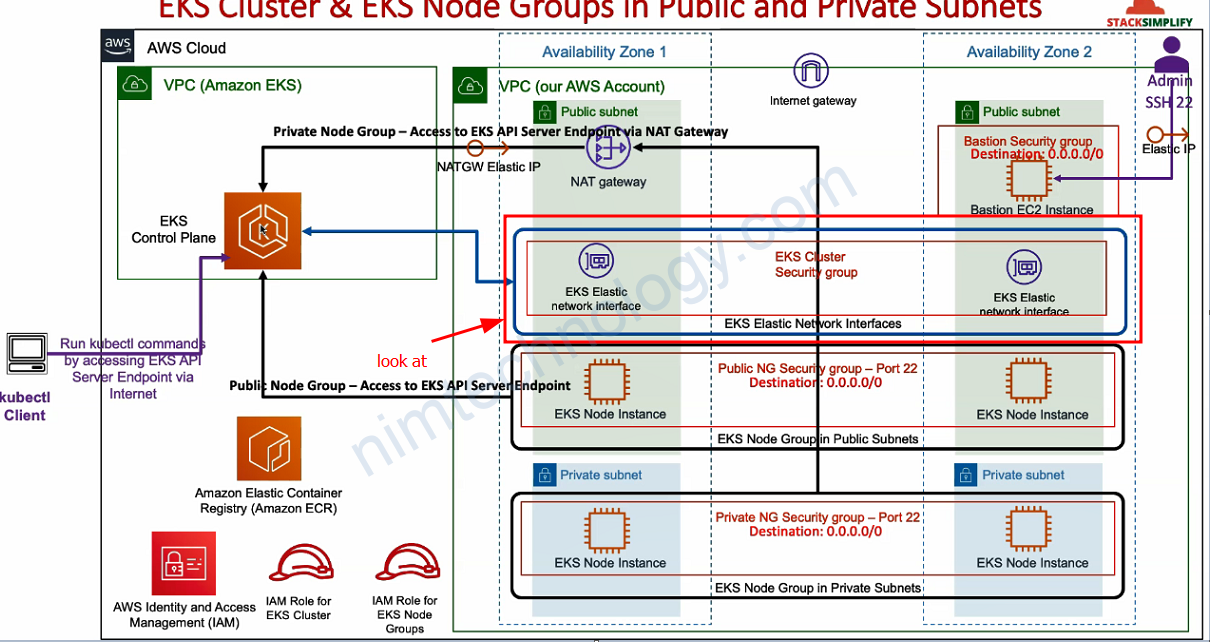
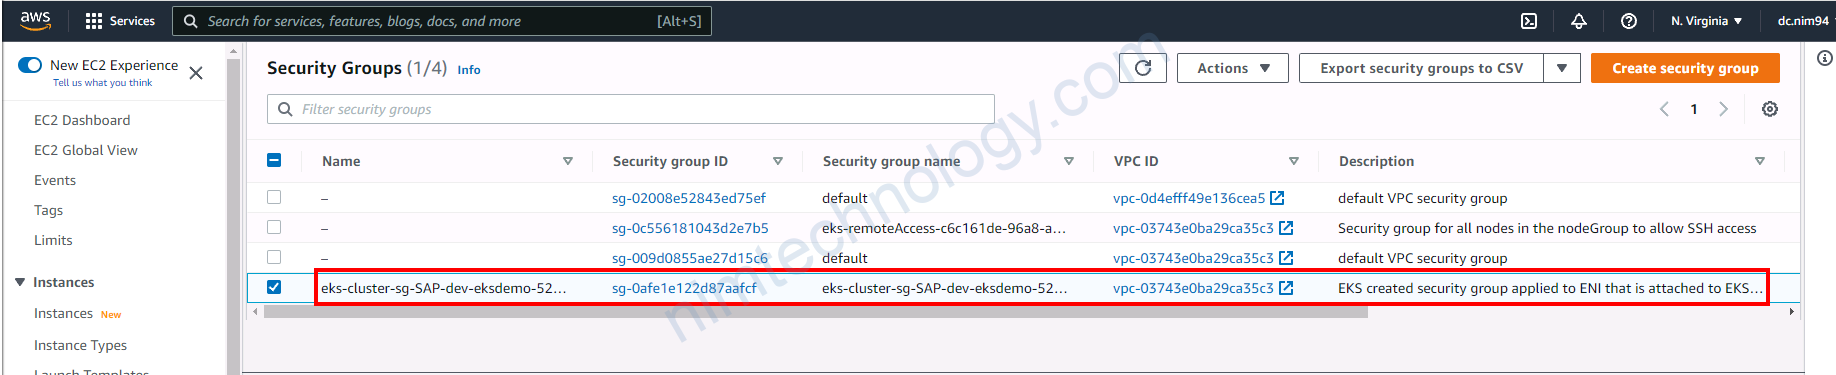
4) EKS Security Groups
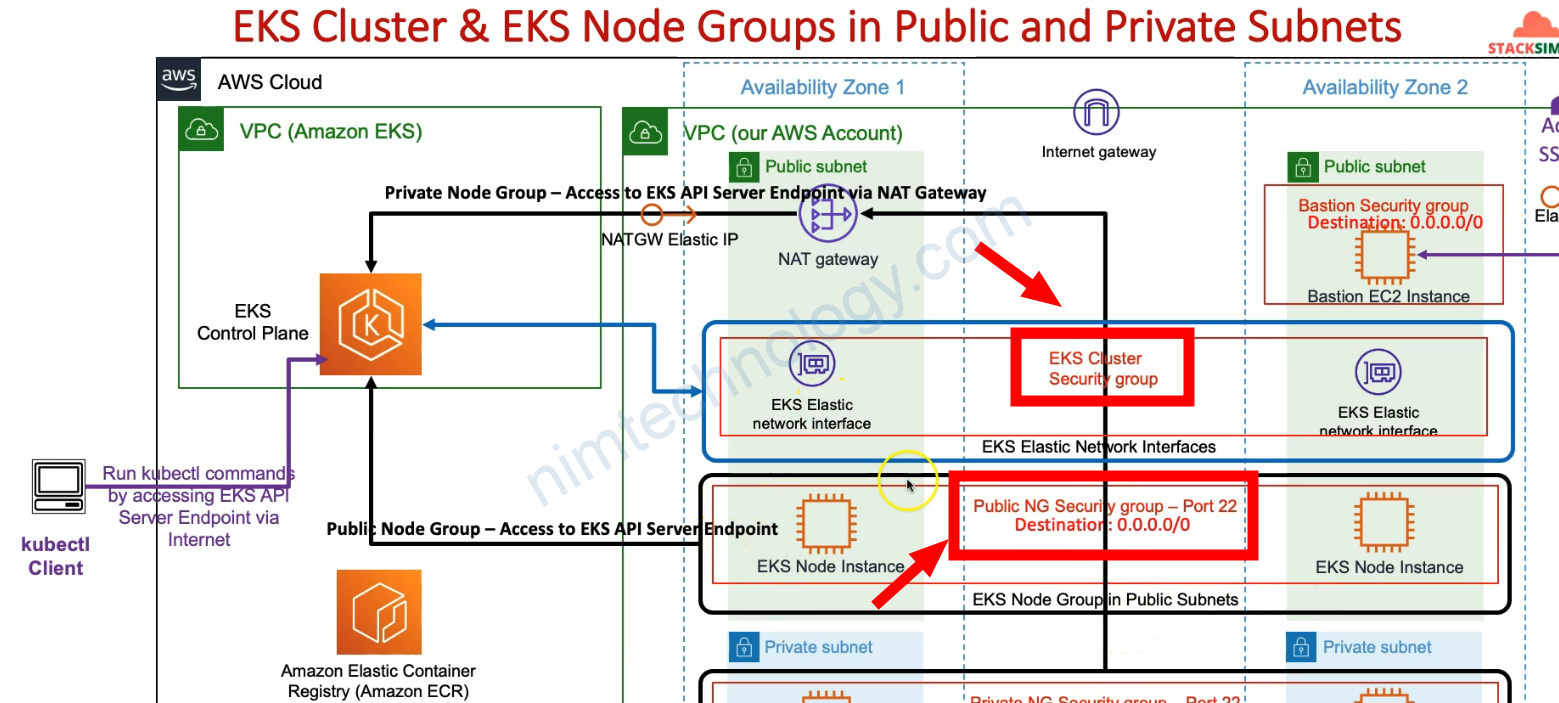
Bạn sẽ thấy là nó sẽ có 2 Security Group
– SG Cluster
– SG Node
Giờ ta trở lại mô hình thực tế!
Trở lại với EC2 -> Security Group.
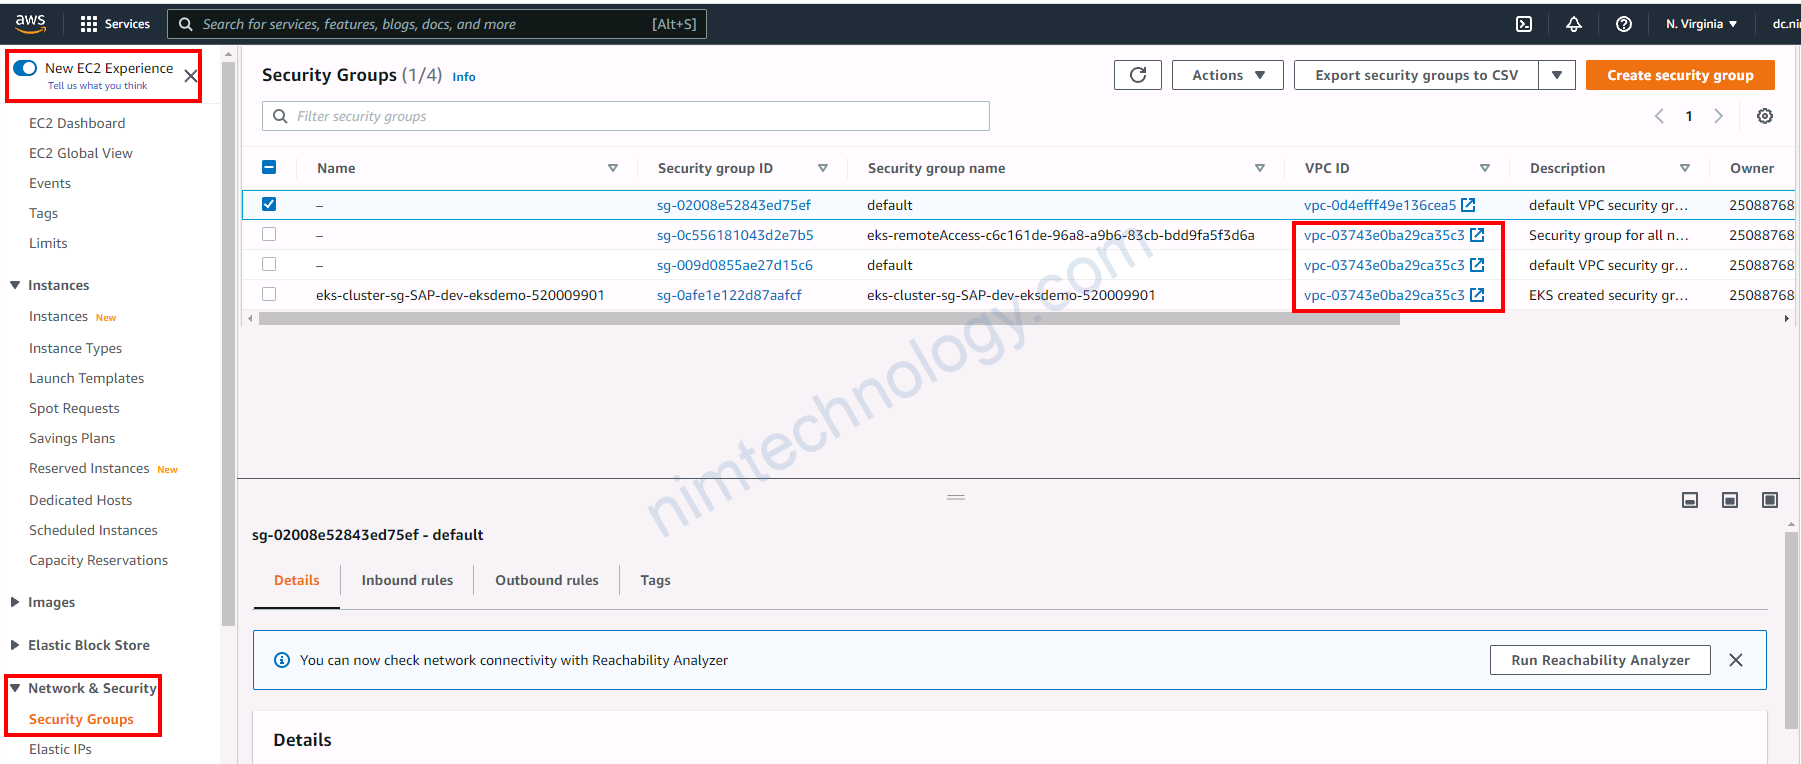

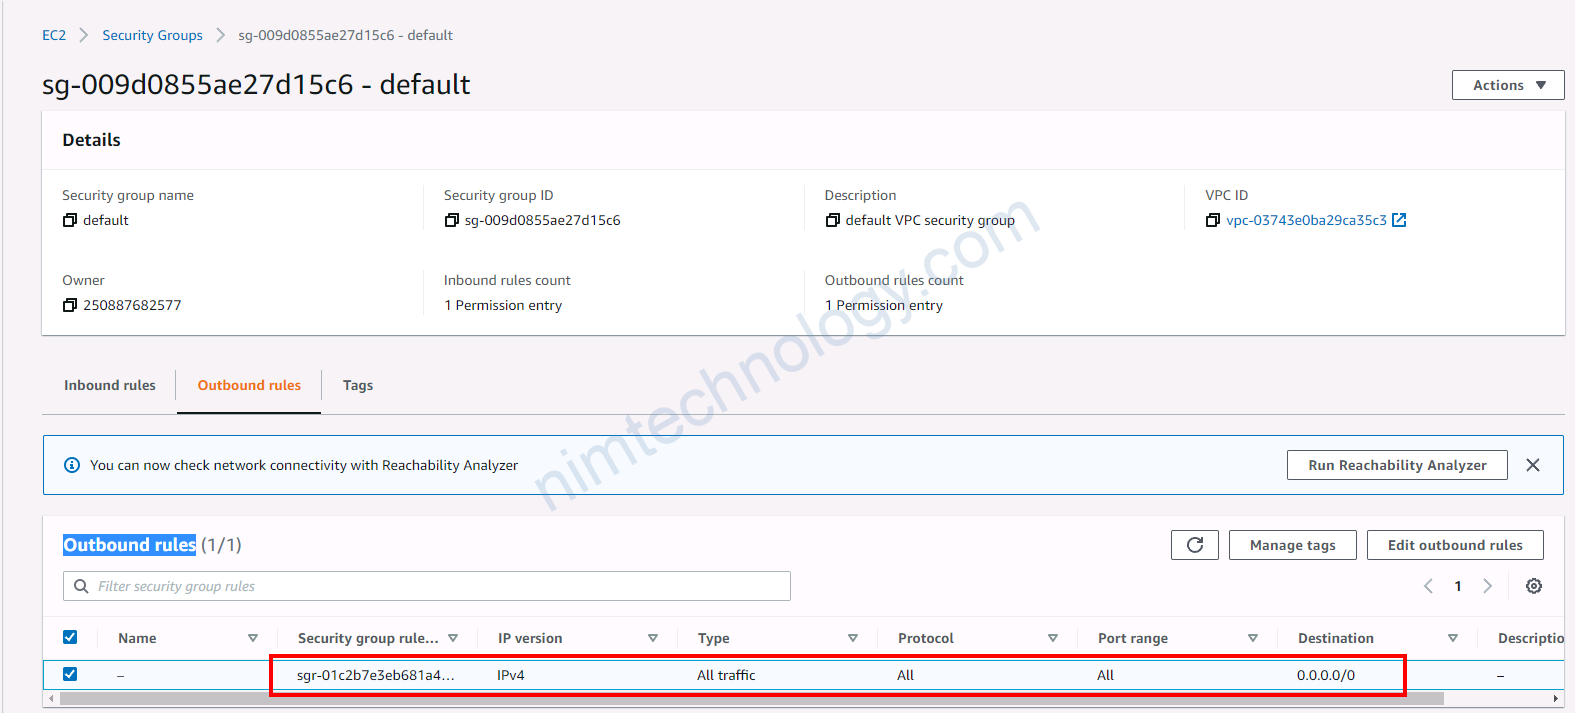
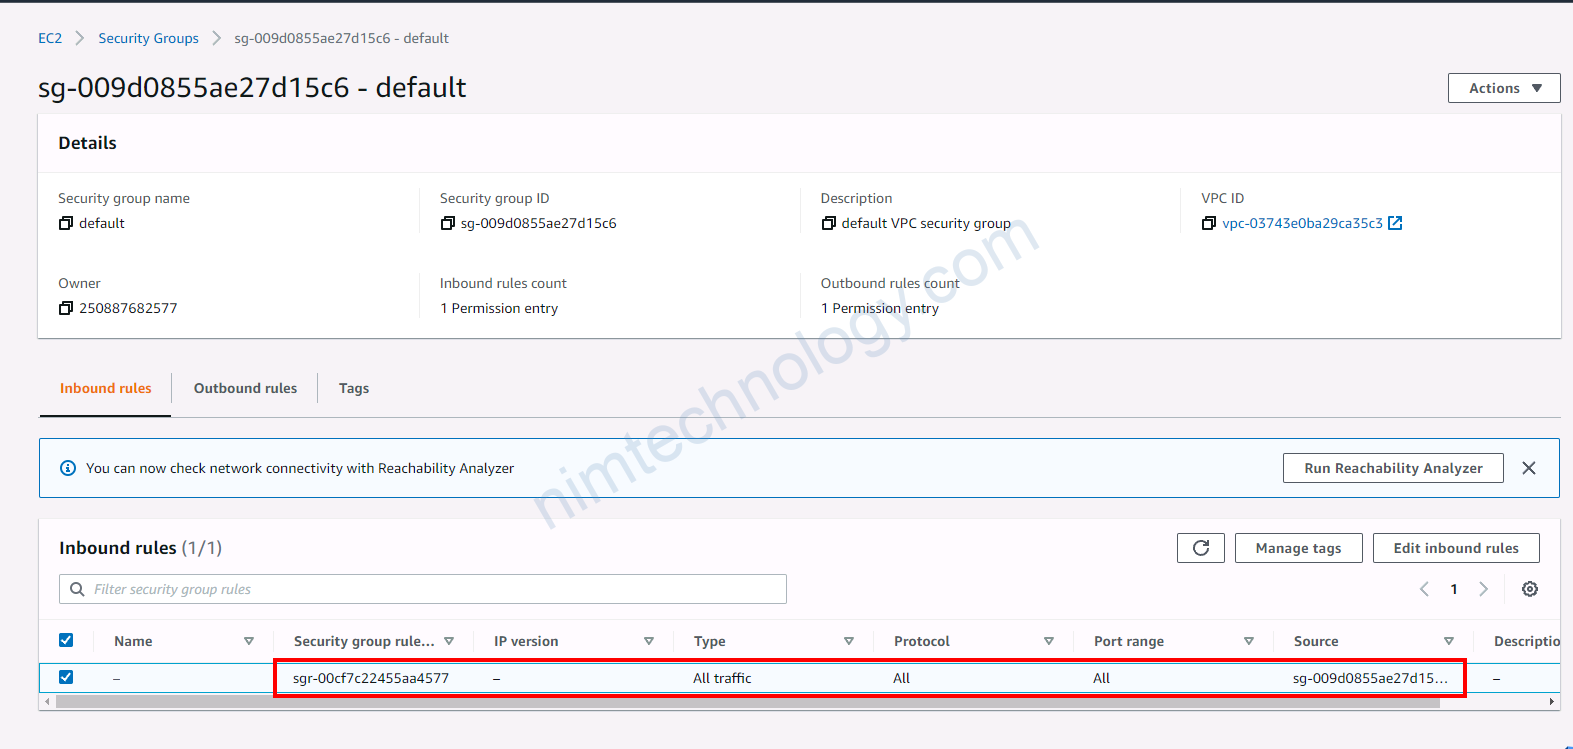
sg-009d0855ae27d15c6 – default
Được tạo mặc định khi create VPC thì phải
Inbound rules và Outbound rules
đều là All traffic, All protocol, All port range.
– SecurityGroup Cluster
– SecurityGroup Node
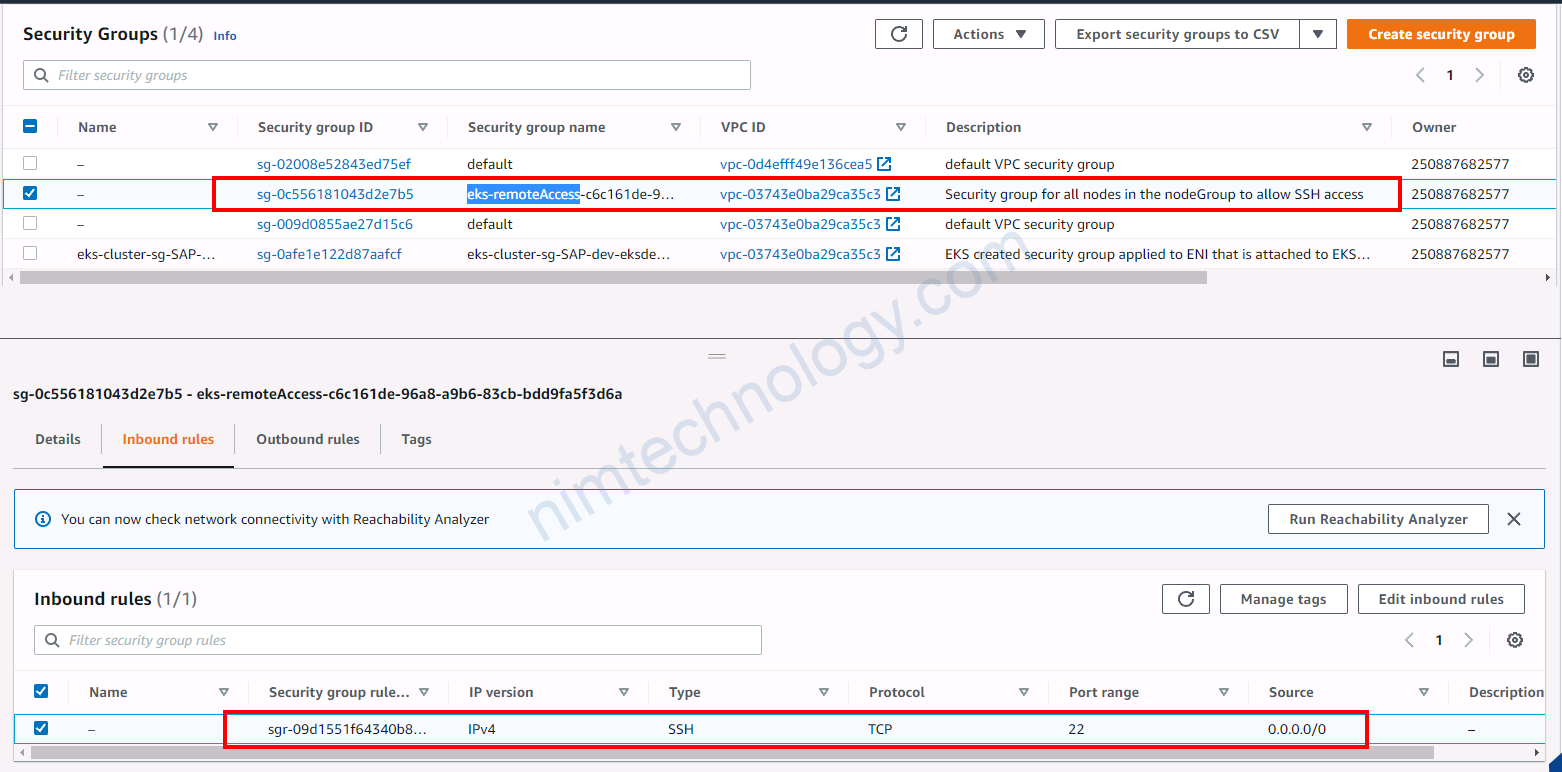
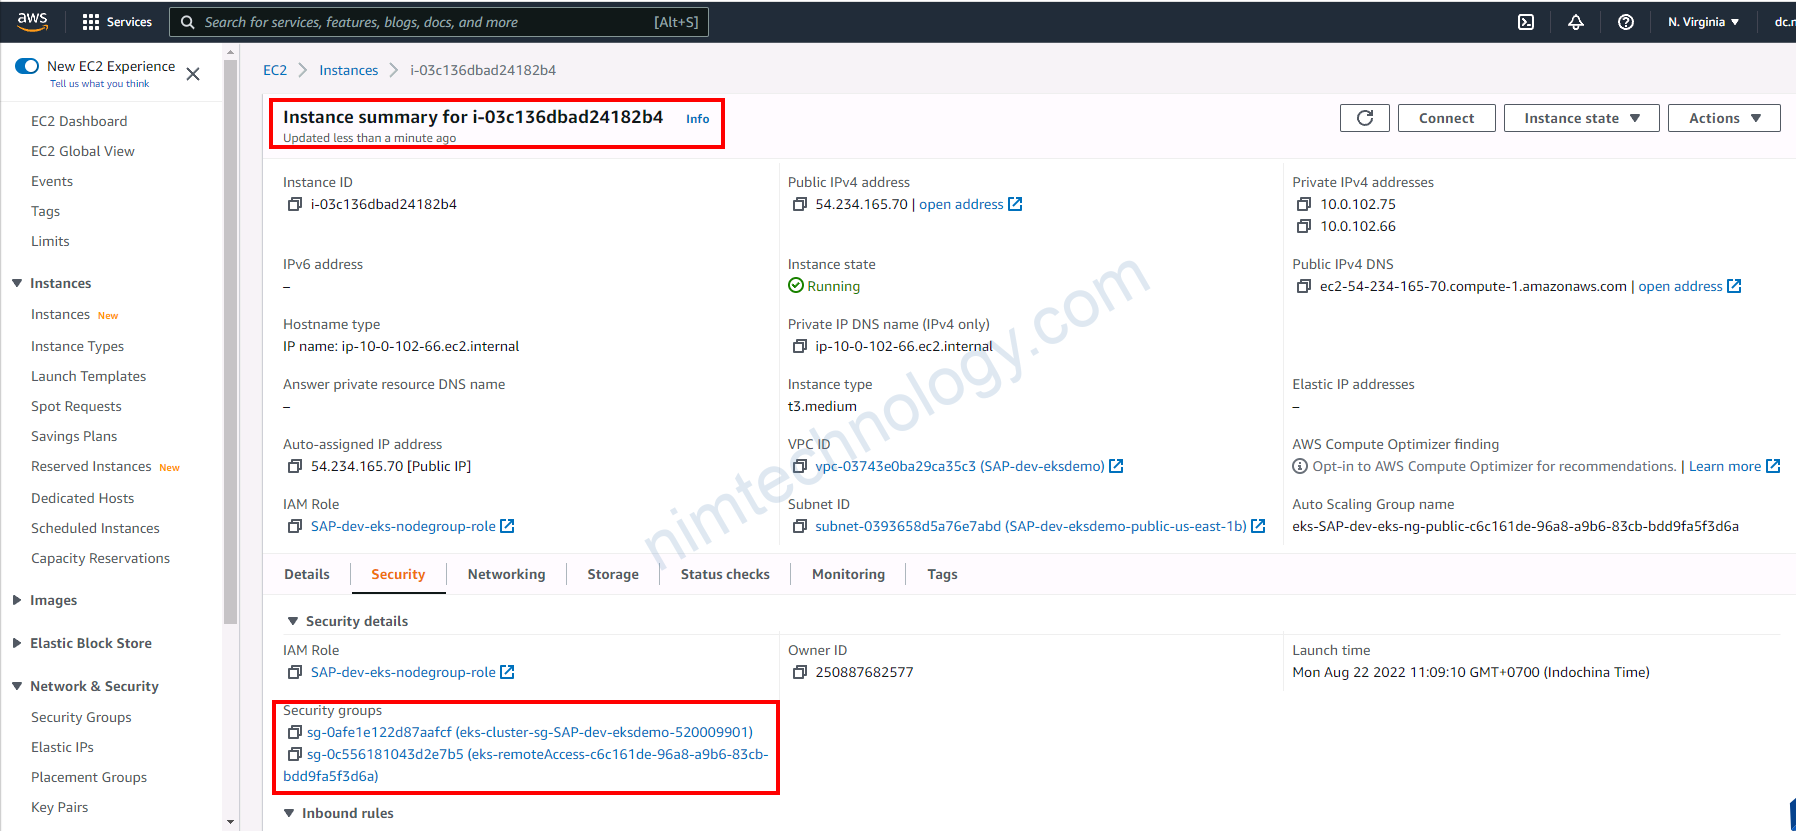
Như theo chuyên gia khuyên thì nếu bạn muốn change bất cứ cái gì liên quan đền incoming thì change trong SG eks-remoteAccess-xxxx
Bạn cũng thấy ở trên là chúng ta đang có SG để access incoming SSH.
Vậy cài nào đã tạo SG này.
https://github.com/mrnim94/terraform-aws/blob/master/eks/AWS-EKS-Cluster-Basics/c5-07-eks-node-group-public.tf#L16-L18
bạn soi dòng này
# Create AWS EKS Node Group - Public
resource "aws_eks_node_group" "eks_ng_public" {
  cluster_name    = aws_eks_cluster.eks_cluster.name

  #>>>Look at belove
  remote_access {
    ec2_ssh_key = "eks-terraform-key"
  }
.......
https://registry.terraform.io/providers/hashicorp/aws/latest/docs/resources/eks_node_group#remote_access-configuration-blockec2_ssh_key – (Optional) EC2 Key Pair name that provides access for SSH communication with the worker nodes in the EKS Node Group. If you specify this configuration, but do not specify source_security_group_ids when you create an EKS Node Group, port 22 on the worker nodes is opened to the Internet (0.0.0.0/0).
==> là do cài này nó tạo