By default, the Microsoft Windows Remote Desktop does not allow GPU rendering. You can enable the Use the hardware default graphics adapter for all Remote Desktop Services sessions option to work around this issue.
- Display the Windows Run dialog by pressing the Win + R keys on the keyboard.
- Type gpedit.msc in the Open entry, and then click OK to display the Local Group Policy Editor application.
- Using the navigation panel on the left side, select Administrative Templates > Windows Components > Remote Desktop Services > Remote Desktop Session Host > Remote Session Environment > RemoteFX for Windows Server.
-
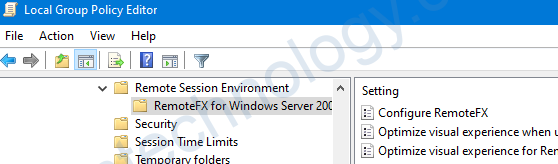
- Under Setting, enable each of the following options: right-click each one, select Edit, and then click Enable.
- Configure RemoteFX
- Optimize visual experience when using RemoteFX
- Optimize visual experience for Remote Desktop Service SessionsWhen completed, these should be enabled as shown below:
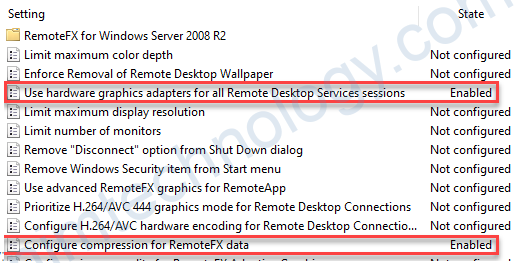
- From the navigation panel on the left side, select Remote Session Environment.
- Under Setting, enable each of the following options: right-click each one, select Edit, and then click Enable.
- Use the hardware default graphics adapter for all Remote Desktop Services sessions
- Configure compression for RemoteFX dataWhen completed, these should be enabled as shown below:
- Restart the computer for the changes to the Group Policy to take effect. The engineering software can then be operated from the host computer using Remote Desktop.
Hardware Acceleration Setup – NVidia Check
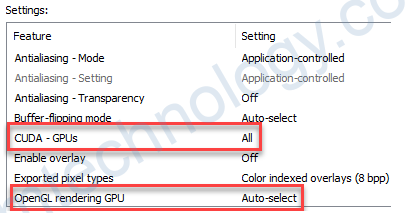
- Open the NVIDIA Control Panel to enter NVIDIA graphics card configuration.
- Under 3D Settings > Manage 3D settings > Global Settings tab, ensure that CUDA – GPUs = ALL and OpenGL rendering GPU = Auto-selected options are set.