Đầu tiên mình có 1 table như sau:
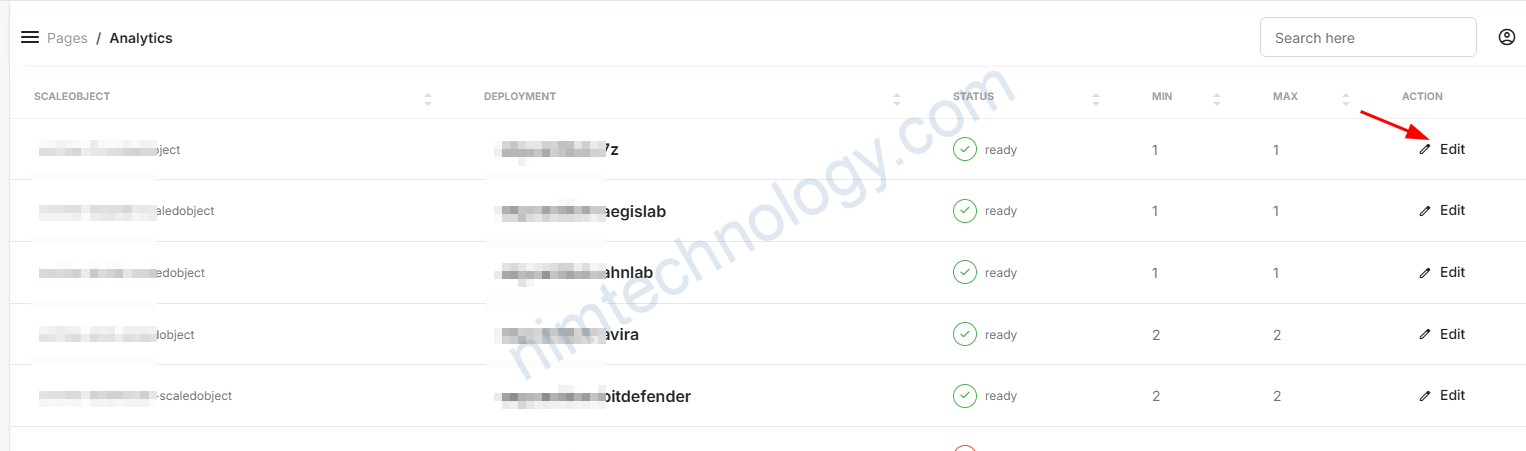
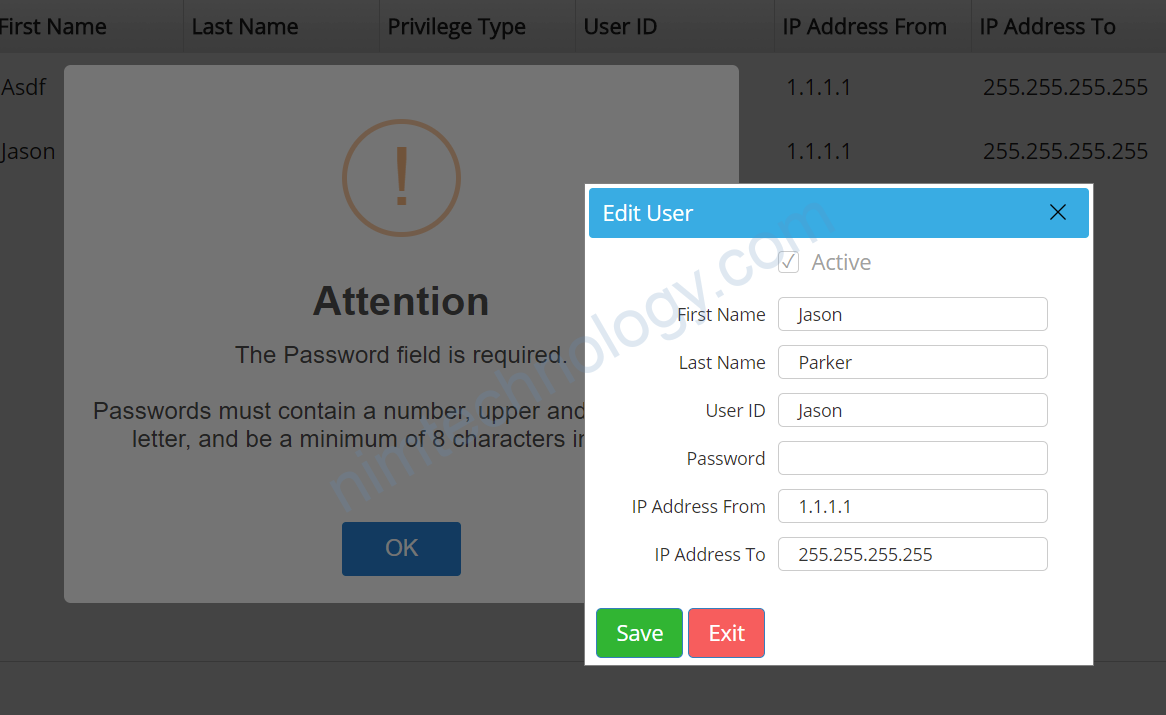
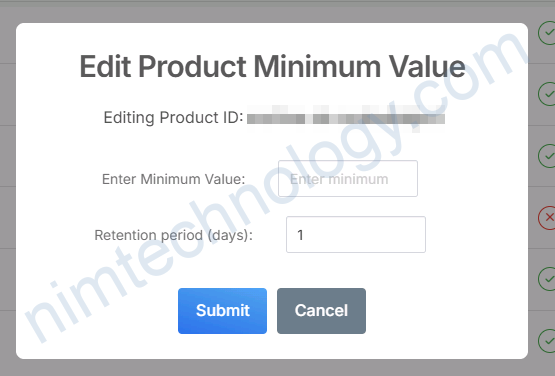
Mình mong muốn là khi ấn vào edit nó hiện 1 popup để người dùng chỉnh min của hệ thống.
<table class="table table-flush dataTable-table" id="datatable-search">
    <thead class="thead-light">
        <tr>
            <th data-sortable="" style="width: 28.2309%;"><a href="#" class="dataTable-sorter">ScaleObject</a></th>
            <th data-sortable="" style="width: 29.4228%;"><a href="#" class="dataTable-sorter">Deployment</a></th>
            <th data-sortable="" style="width: 12.4843%;"><a href="#" class="dataTable-sorter">Status</a></th>
            <th data-sortable="" style="width: 7.59097%;"><a href="#" class="dataTable-sorter">Min</a></th>
            <th data-sortable="" style="width: 8.09285%;"><a href="#" class="dataTable-sorter">Max</a></th>
            <th data-sortable="" style="width: 14.1782%;"><a href="#" class="dataTable-sorter">Action</a></th>
        </tr>
    </thead>
    <tbody>
        <tr>
            <td>
                <div class="d-flex align-items-center">
                    <p id="customCheck1" class="text-xs font-weight-normal ms-2 mb-0">archive-bitdefender-scaledobject</p>
                </div>
            </td>
            <td class="font-weight-normal">
                <h6 class="ms-3 my-auto">eng-archive-bitdefender</h6>
            </td>
            <td class="text-xs font-weight-normal">
                <div class="d-flex align-items-center">
                    <button class="btn btn-icon-only btn-rounded btn-outline-success mb-0 me-2 btn-sm d-flex align-items-center justify-content-center">
                        <i class="material-symbols-rounded text-sm" aria-hidden="true">done</i>
                    </button>
                    <span>ready</span>
                </div>
            </td>
            <td class="text-sm font-weight-normal">
                2
            </td>
            <td class="text-sm font-weight-normal">
                2
            </td>
            <td class="text-xs font-weight-normal">
                <a class="btn btn-link text-dark px-3 mb-0" href="javascript:;"><i class="material-symbols-rounded text-sm me-2">edit</i>Edit</a>
            </td>
        </tr>
    </tbody>
</table>
document.addEventListener("DOMContentLoaded", () => {
    document.querySelectorAll(".btn-link").forEach((editButton) => {
        editButton.addEventListener("click", function () {
            // Your code here
        });
    });
});
document.addEventListener("DOMContentLoaded", () => { … });
This means: “Wait until the web page has fully loaded (HTML is ready to work with) before running this code.”
This ensures that all the elements (like buttons) exist in the page before the script tries to find and interact with them.
document.querySelectorAll(".btn-link")
This means: “Find all elements in the page that have the class btn-link.”
It collects all the “Edit” buttons in the table (or elsewhere) into a list (like a group of items).
.forEach((editButton) => { … });
This means: “Go through each button in the list one by one.”
For every editButton, it runs the function provided inside the { … }.
editButton.addEventListener("click", function () { … });
This means: “When someone clicks this specific editButton, run the code inside the { … }.”
It attaches a “click listener” to each button, so it knows what to do when clicked.
function () { … }
This is the actual code that runs when someone clicks the button.
Inside this function, you can write any code to define what happens when the Edit button is clicked (e.g., show a popup, send data, etc.).
        <script src="https://cdn.jsdelivr.net/npm/sweetalert2@11"></script>
        <script>
          // Attach an event listener to the Edit button
          document.addEventListener("DOMContentLoaded", () => {
            document.querySelectorAll(".btn-link").forEach((editButton) => {
              editButton.addEventListener("click", function () {
                // Get the product ID from the row
                const productRow = this.closest("tr");
                const scaleOject = productRow.querySelector("p.text-xs").textContent.trim(); // e.g., "#10421"
                // Get the environment from the card header (using the ID)
                var environment = $('#k8s-environment').text().trim();

                // Split the string by space and take the first word
                var environment = environment.split(' ')[0].toLowerCase();

                // SweetAlert2 for input
                Swal.fire({
                  title: "Edit Product Minimum Value",
                  html: `
                    <p>Editing Product ID: <strong>${scaleOject}</strong></p>
                    <label for="minValueInput">Enter Minimum Value:</label>
                    <input id="minValueInput" type="number" class="swal2-input" min="0" placeholder="Enter minimum value" />
                    <label for="retentionPeriod">Retention period (days):</label>
                    <input id="retentionPeriod" type="number" class="swal2-input" value="1" placeholder="Enter minimum value" />
                  `,
                  showCancelButton: true,
                  confirmButtonText: "Submit",
                  preConfirm: () => {
                    const minValue = document.getElementById("minValueInput").value;
                    const retentionPeriod = document.getElementById("retentionPeriod").value;

                    // Validate inputs
                    if (!minValue || minValue < 0) {
                      Swal.showValidationMessage("Please enter a valid number greater than or equal to 0");
                    }
                    if (!retentionPeriod || retentionPeriod < 1) {
                      Swal.showValidationMessage("Please enter a valid number greater than or equal to 1");
                    }

                    // Return validated values
                    return { minValue, retentionPeriod };
                  }
                }).then((result) => {
                  if (result.isConfirmed) {
                    const { minValue, retentionPeriod } = result.value;

                    // Use AJAX to send the data
                    $.ajax({
                      url: "{{asset('/update-min-max-scale-object')}}",
                      type: "POST",
                      data: {
                        _token: document.querySelector('meta[name="csrf-token"]').getAttribute('content'), // Laravel CSRF token
                        scaleOject: scaleOject,
                        minValue: minValue,
                        environment: environment,
                        retentionPeriod: retentionPeriod
                      },
                      success: function (data) {
                        console.log('Success:', data);
                        // Reload the page
                        location.reload();
                        // Optionally, update the UI or show a success message
                        Swal.fire({
                          icon: 'success',
                          title: 'Success',
                          text: 'Minimum value updated successfully!'
                        });
                      },
                      error: function (error) {
                        console.error('Error:', error);
                        // Handle errors, e.g., display an error message
                        Swal.fire({
                          icon: 'error',
                          title: 'Oops...',
                          text: 'Something went wrong!'
                        });
                      }
                    });
                  }
                });
              });
            });
          });
        </script>
tiếp theo bạn cần tạo popup thông qua việc custom HTML
                // SweetAlert2 for input
                Swal.fire({
                  title: "Edit Product Minimum Value",
                  html: `
                    <p>Editing Product ID: <strong>${scaleOject}</strong></p>
                    <label for="minValueInput">Enter Minimum Value:</label>
                    <input id="minValueInput" type="number" class="swal2-input" min="0" placeholder="Enter minimum value" />
                    <label for="retentionPeriod">Retention period (days):</label>
                    <input id="retentionPeriod" type="number" class="swal2-input" value="1" placeholder="Enter minimum value" />
                  `,
                  showCancelButton: true,
                  confirmButtonText: "Submit",
Lúc này sẽ có 1 function preConfirm để assess các Input đã đặt được các requirement hay chưa như là không được để trống hoặc lớn hơn 1
                  preConfirm: () => {
                    const minValue = document.getElementById("minValueInput").value;
                    const retentionPeriod = document.getElementById("retentionPeriod").value;

                    // Validate inputs
                    if (!minValue || minValue < 0) {
                      Swal.showValidationMessage("Please enter a valid number greater than or equal to 0");
                    }
                    if (!retentionPeriod || retentionPeriod < 1) {
                      Swal.showValidationMessage("Please enter a valid number greater than or equal to 1");
                    }

                    // Return validated values
                    return { minValue, retentionPeriod };
                  }
If any of these conditions fail, an error message is shown using Swal.showValidationMessage() and the process stops.
If both inputs are valid, the code returns the values of minValue and retentionPeriod as an object: { minValue, retentionPeriod }.
Tiếp theo là tiếp nhận input và gửi đi:
                }).then((result) => {
                  if (result.isConfirmed) {
                    const { minValue, retentionPeriod } = result.value;

                    // Use AJAX to send the data
                    $.ajax({
                      url: "{{asset('/update-min-max-scale-object')}}",
                      type: "POST",
                      data: {
                        _token: document.querySelector('meta[name="csrf-token"]').getAttribute('content'), // Laravel CSRF token
                        scaleOject: scaleOject,
                        minValue: minValue,
                        environment: environment,
                        retentionPeriod: retentionPeriod
                      },
                      success: function (data) {
                        console.log('Success:', data);
                        // Reload the page
                        location.reload();
                        // Optionally, update the UI or show a success message
                        Swal.fire({
                          icon: 'success',
                          title: 'Success',
                          text: 'Minimum value updated successfully!'
                        });
                      },
                      error: function (error) {
                        console.error('Error:', error);
                        // Handle errors, e.g., display an error message
                        Swal.fire({
                          icon: 'error',
                          title: 'Oops...',
                          text: 'Something went wrong!'
                        });
                      }
                    });
                  }
                });
              });
            });
          });
        </script>
- Check Confirmation:
The if (result.isConfirmed) part ensures that the user actually clicked the “Submit” button in the popup. If not, it does nothing. - Extract Input Values:
The inputs minValue and retentionPeriod entered by the user are retrieved from result.value. - Send Data to the Server (AJAX):
– AJAX is used to send the data to the server without refreshing the page.
– The data sent includes:
+ scaleObject: The ID of the product being edited.
+ minValue: The minimum value entered by the user.
+ retentionPeriod: The retention period entered by the user.
+ environment: The environment (e.g., development, production).
+ _token: A CSRF token to ensure the request is secure (required by Laravel). - Handle the Response from the Server:
– If successful (success):
+ A success message is displayed to the user using SweetAlert2.
+ The page is reloaded to show the updated information.
– If an error occurs (error):
+ An error message is displayed, indicating something went wrong.