Helm chart thì đã rất là quen thuộc với anh em sử dụng kubernetes
Chắc chắn là anh em từng sử dụng helm chart offical để deploy spinnaker, jenkins, ….
Nói chung là rất nhiều.
Và mình đã gặp 1 số case này. Không phải là tất cả các helm chart để được chi tiết và mọi ngóc ngách của các manifest yaml. Vẫn khó hiểu đúng không?
Mình ví dụ như sau:
Bạn deploy spinnaker và bạn sử dụng chart của hãng!
Và giờ bạn muốn workload halyard hay redis phải có config thêm nodeSelector
Nhưng mà bạn đã mò nát trong values.yaml thì thấy không thấy có config nào liên quan đến nodeSelector
How must we do it?
1) pull chart hãng về và sửa helm chart (Cái này ok thôi, nhưng khi bạn update chart mới của hãng cũng khá là cực hình)
2) Cứ deploy lên đi, rồi edit mamifest bằng argocd hay kubectl.
2 cách trên thì ok sẽ chạy thôi, nhưng cách nữa sửa dụng Kustomize và chúng ta sẽ tìm hiểu thử sem sao?
1) Research the way to design “Kustomize”
Tài liệu mình tham khảo là:
https://foxutech.com/managing-kubernetes-resources-with-kustomize/
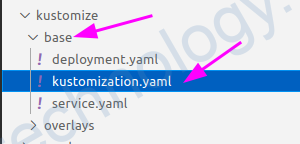
1.1) Instruct “base” in Kustomize.
Kustomize thì có 2 thứ quan trọng là:
– A base is a directory containing a file called kustomization.yaml, which can enumerate some set of resources with some customizations that will be applied to them. A base should be declared in the resources field of a kustomization file.
Nghĩa là trong thư mục base chúng ta có 1 file tên là kustomization.yaml
kustomization.yaml
###################

apiVersion: kustomize.config.k8s.io/v1beta1
kind: Kustomization

resources:
  - service.yaml
  - deployment.yaml
Bạn thấy ở mục resource thì nó liên kê 1 số manifest. Đây là các manifest tiêu chuẩn và chúng ta không liên tục thay đổi trực tiếp nội dung trong các file này!
Khi mà deploy lên k8s thì chúng ta sẽ deploy các manifest này lên k8s (service.yaml, deployment.yaml)
service.yaml
#####################

apiVersion: v1
kind: Service
metadata:
  name: kustom-demo-app
spec:
  ports:
    - name: http
      port: 8080
  selector:
    app: kustom-demo-app
deployment.yaml
#######################
apiVersion: apps/v1
kind: Deployment
metadata:
name: kustom-demo-app
spec:
selector:
matchLabels:
app: kustom-demo-app
template:
metadata:
labels:
app: kustom-demo-app
spec:
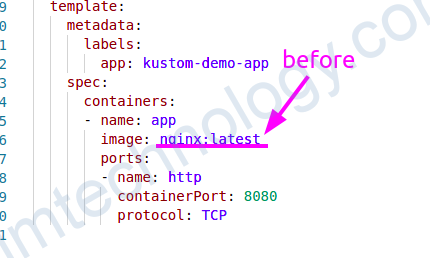
containers:
- name: app
image: nginx:latest
ports:
- name: http
containerPort: 8080
protocol: TCP
1.2) Instruct “overlay” in Kustomize
Tiếp đến là An overlay is a directory that refers to another kustomization directory as its, or one of its, bases.
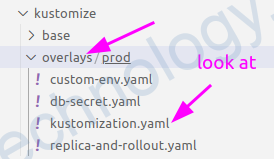
1.2.1) Overlay connect Base
Cũng giống như helm bạn cũng có thể view trước template như thế nào trong mỗi chỉnh sửa?
Install kustomize:
# curl -s "https://raw.githubusercontent.com/kubernetes-sigs/kustomize/master/hack/install_kustomize.sh"  | bash
# mv kustomize /usr/local/bin
và sau đó chạy lệnh này:
kustomize build kustomize/overlays/prod/1.2.2) Add the configuration to Manifest
Deployment Environment Variable
Đây là tính năng chỉnh của kustomize, để change config của của deployment chẳng hạn thì chúng ta không change các file trong thư mục base.
Bạn chỉnh cần tạo 1 file yaml ở thư mục overlays
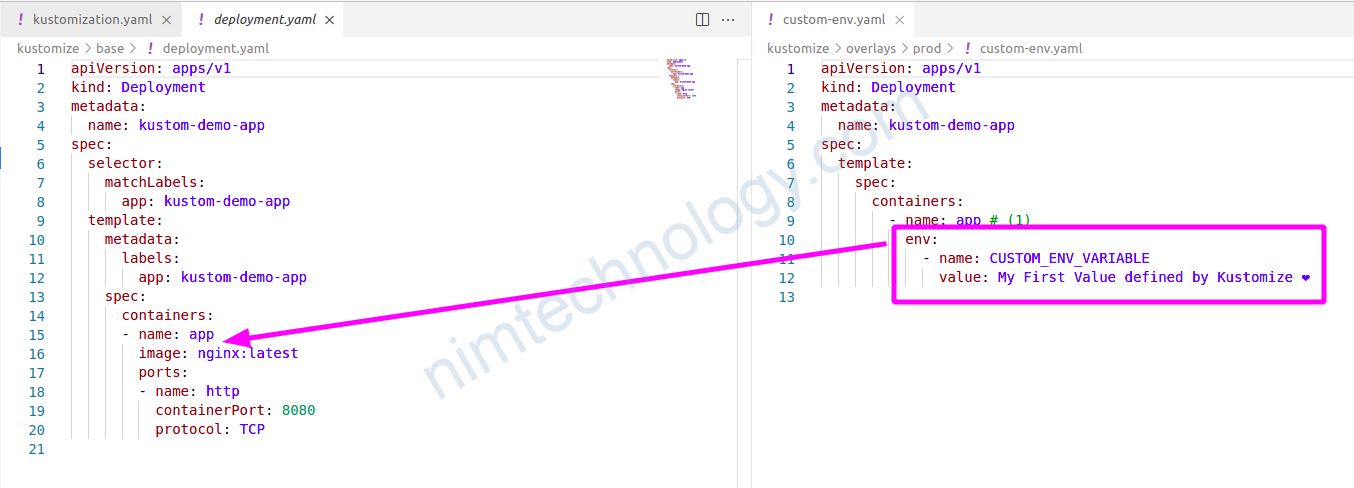
custom-env.yaml
#######################

apiVersion: apps/v1
kind: Deployment
metadata:
  name: kustom-demo-app
spec:
  template:
    spec:
      containers:
        - name: app # (1)
          env:
            - name: CUSTOM_ENV_VARIABLE
              value: My First Value defined by Kustomize ❤️
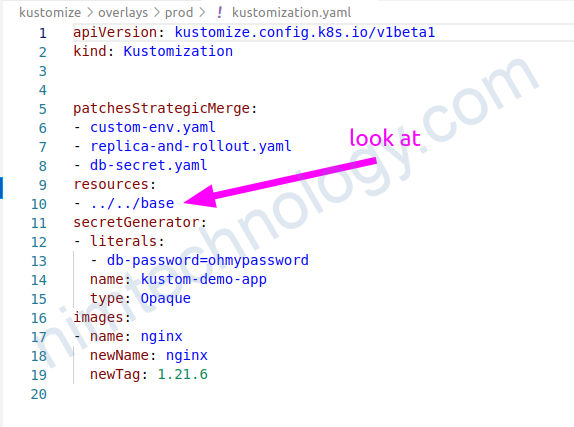
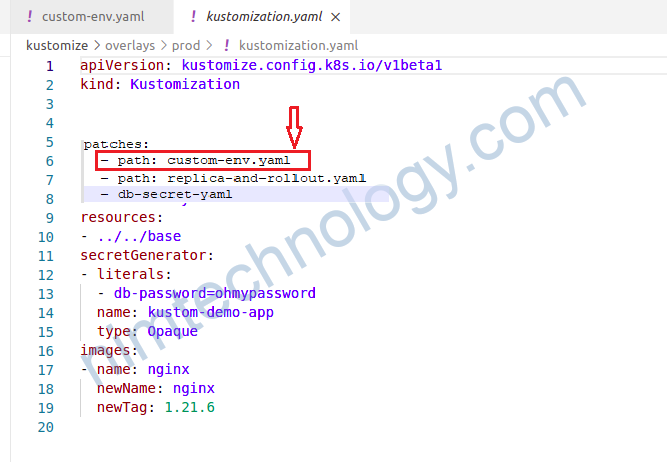
và bạn cũng cần khai bào file trên vào mục patchesStrategicMerge:
# Warning: ‘patchesStrategicMerge’ is deprecated. Please use ‘patches’ instead
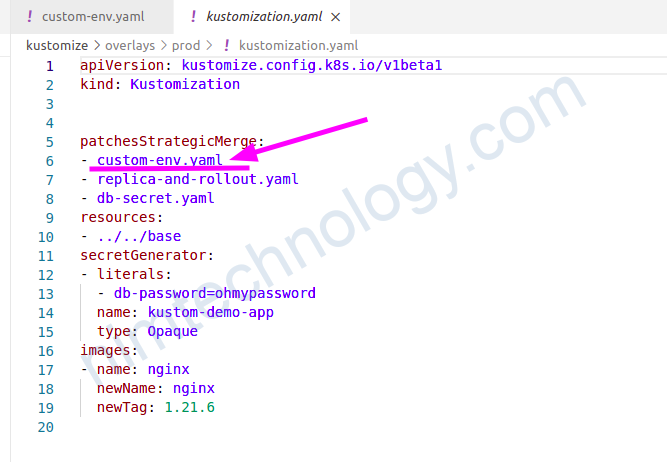
Đây là khi chúng ta sử dụng Patches.
Và ta cũng có nôi dụng của các file khác.
db-secret.yaml
####################

apiVersion: apps/v1
kind: Deployment
metadata:
  name: kustom-demo-app
spec:
  template:
    spec:
      containers:
      - name: app
        env:
        - name: "DB_PASSWORD"
          valueFrom:
            secretKeyRef:
              name: kustom-demo-app
              key: db.password

##################
custom-env.yaml
#####################

apiVersion: apps/v1
kind: Deployment
metadata:
  name: kustom-demo-app
spec:
  template:
    spec:
      containers:
        - name: app # (1)
          env:
            - name: CUSTOM_ENV_VARIABLE
              value: My First Value defined by Kustomize ❤️
1.2.3) Create a manifest throught Kustomize Configuration!
1.2.3.1) Create a secret via kustomize code.

secretGenerator: nó sẽ tạo manifest secret
1.2.3.2) Create a secret via kustomize Command.
thì có 2 cách:
Run command và kustomize sẽ thêm config trên
Chúng ta có thể tạo secret bằng kustomize mà ko push bất cứ file nào lên github
# cd kustomize/overlays/prod
# kustomize edit add secret kustom-demo-app --from-literal=nimtechnology=ohmypassword

kustomize edit add secret my-secret --from-literal=my-literal=12345
Cách còn lại bạn tự biết thêm vào kustomize.yaml
Bạn thử check lại các file manifest bạn sẽ thấy có thêm buil secret
# kustomize build kustomize/overlays/prod/
apiVersion: v1
data:
  db-password: b2hteXBhc3N3b3Jk
kind: Secret
metadata:
  name: kustom-demo-app-62dhmggmh9
type: Opaque
---
apiVersion: v1
kind: Service
metadata:
  name: kustom-demo-app
spec:
  ports:
  - name: http
    port: 8080
  selector:
    app: kustom-demo-app
---
apiVersion: apps/v1
kind: Deployment
metadata:
  name: kustom-demo-app
spec:
  replicas: 3
  selector:
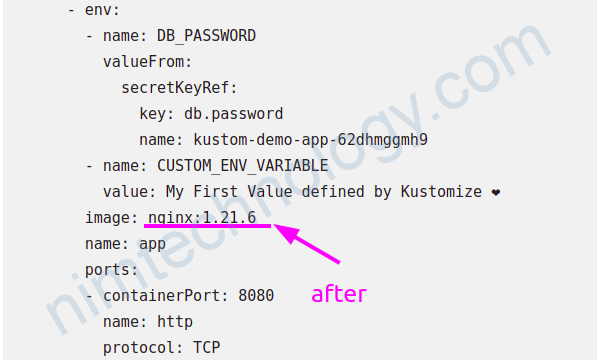
1.2.4) Change the image of a deployment
Để thay đổi 1 config nào đó trong deploy ví dụ như là image
cd kustomize/overlays/prod
TAG=1.21.6

kustomize edit set image nginx=nginx:$TAG
khi bạn chạy lệnh edit ở trên thì trong file Kustomization sẽ được thêm
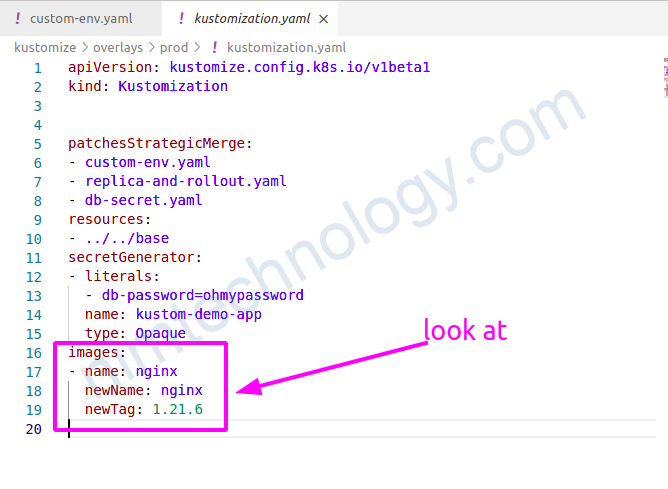
Khi bạn chạy
kustomize build kustomize/overlays/prod/thì bạn sẽ thấy được là image đã được thay đổi
Tất cả config ở trên bạn có thể tham khảo git repo sau:
https://github.com/foxutech/kubernetes
1.2.5) Using Kustomize to delete resources and fields in the manifest.
Mình chắc hẳn bạn sẽ muốn delete một số thử trong base manifest hoặc trong Helm chart (nếu values không làm đươc điều này)
Reference Links:
https://www.modb.pro/db/127982
https://tech.aabouzaid.com/2021/05/delete-a-manifest-from-kustomize-base.html
1.2.5.1) Delete Object or Kind.
Ở đây chúng ta sẽ delete 1 Kind luôn. Ví dụ bạn muốn delete service ra khỏi tòa bộ base resource hay helm chart,
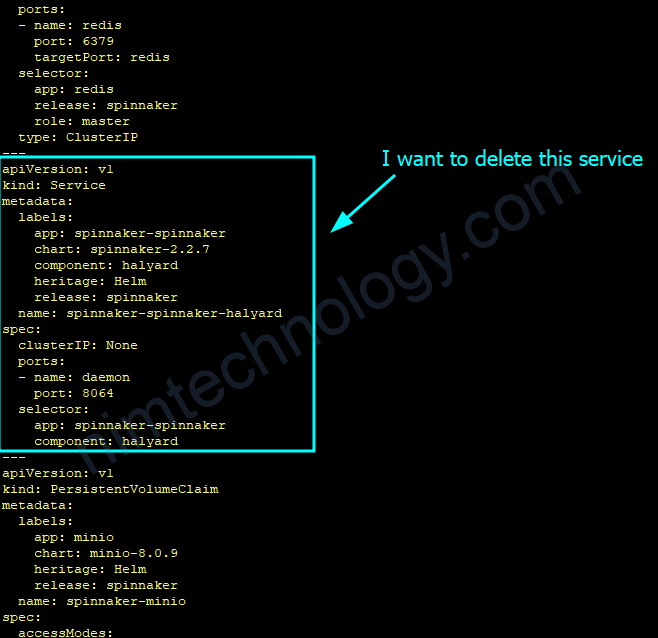
Ở đây chúng ta có 2 cách
Cách 1:
Tạo 1 file delete-service.yaml
apiVersion: v1
kind: Service
metadata:
  name: spinnaker-spinnaker-halyard
$patch: delete #look at
sau đó bạn sẽ có 1 file kustomization.yaml như sau
apiVersion: kustomize.config.k8s.io/v1beta1
kind: Kustomization

resources:
  - ../../base/dev
helmChartInflationGenerator:
  - chartName: spinnaker
    chartRepoUrl: https://helmcharts.opsmx.com/
    chartVersion: 2.2.7
    releaseName: spinnaker
    releaseNamespace: spinnaker
    values: values_helm.yaml

# You need to add below content
patches:
  - delete-service.yaml
1.2.5.2) Delete field.
Mình ví dụ như bạn muốn delete 1 env trong 1 deployment
Bạn tạo 1 file delete-env-deployment.yaml
apiVersion: extensions/v1beta1
kind: Deployment
metadata:
  name: flaskapp
spec:
  replicas: 1
  template:
    metadata:
      labels:
        app: flaskapp
        version: v1
    spec:
      containers:
        - name: flaskapp
          image: dustise/flaskapp
          env:
          - name: CONFIG
            $patch: delete #look at
và bạn có file kustomization.yaml như sau:
bases:
- ../add

# Warning: 'patchesStrategicMerge' is deprecated. Please use 'patches' instead
patchesStrategicMerge:
- delete-env-deployment.yam
từ các ví dụ bên trên thì bạn thấy là vị trí của $patch: delete rất là quan trọng
1.2.5.3) Delete a few lines inside the data of configmap.
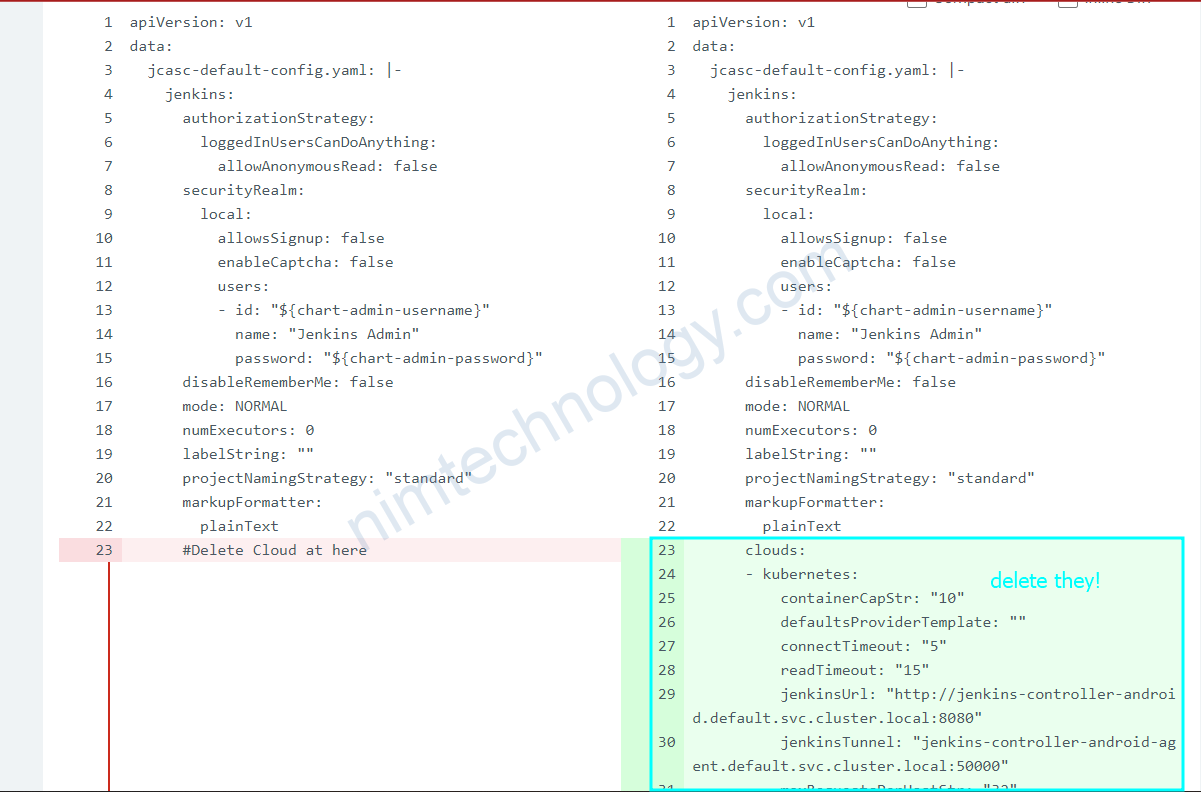
Ca nay là mình delete 1 line cloud trong data của config map.
Hiện tại mình dùng cách sau, copy lại toàn bộ Configmap và bỏ các line liên quan đến cloud.
file jenkins-jcasc-config.yaml
#Delete config cloud in jenkins controller
apiVersion: v1
data:
  jcasc-default-config.yaml: |-
    jenkins:
      authorizationStrategy:
        loggedInUsersCanDoAnything:
          allowAnonymousRead: false
      securityRealm:
        local:
          allowsSignup: false
          enableCaptcha: false
          users:
          - id: "${chart-admin-username}"
            name: "Jenkins Admin"
            password: "${chart-admin-password}"
      disableRememberMe: false
      mode: NORMAL
      numExecutors: 0
      labelString: ""
      projectNamingStrategy: "standard"
      markupFormatter:
        plainText
      #Delete Cloud at here
      crumbIssuer:
        standard:
          excludeClientIPFromCrumb: true
    security:
      apiToken:
        creationOfLegacyTokenEnabled: false
        tokenGenerationOnCreationEnabled: false
        usageStatisticsEnabled: true
    unclassified:
      location:
        adminAddress:
        url: https://build-android.tiki.services
kind: ConfigMap
metadata:
  labels:
    app.kubernetes.io/component: jenkins-controller
    app.kubernetes.io/instance: jenkins-controller-android
    app.kubernetes.io/managed-by: Helm
    app.kubernetes.io/name: jenkins
    helm.sh/chart: jenkins-4.1.1
    jenkins-controller-android-jenkins-config: 'true'
  name: jenkins-controller-android-jenkins-jcasc-config
  namespace: default
và file kustomization.yaml
apiVersion: kustomize.config.k8s.io/v1beta1
kind: Kustomization

#look at
patches:
- jenkins-jcasc-config.yaml

helmChartInflationGenerator:
  - chartName: jenkins
    chartRepoUrl: https://charts.jenkins.io
    chartVersion: 4.1.1
    releaseName: jenkins-controller-android
    releaseNamespace: default
    values: values_helm.yaml
2) Integrate between Kustomize and Helm-chart
2.1) structure introduction
Phần này mình sẽ demo thực tế và cách sắp xếp các file sẽ tùy cá nhân môi người nhé!
root@work-space-u20:~/mylab-helm-chart/spinnaker# tree
.
├── base
│   └── dev
│       ├── configmap-spinnaker-script.yaml
│       └── kustomization.yaml
├── manifest
│   └── dev
│       ├── kustomize.yaml
│       └── spinnaker_dev.yaml
└── overlays
    └── dev
        ├── add_label_sa.yaml
        ├── charts
        ├── kustomization.yaml
        └── values_helm.yaml
2.2) Design “base configuration”
base sẽ là nơi mình chứa các file yaml và nội dụng dụng của nó đã hoàn chỉnh và đây đủ
Mình sẽ show config
configmap-spinnaker-script.yaml
#####################

apiVersion: v1
data:
  config.sh: |-
    $HAL_COMMAND config features edit --artifacts true
    $HAL_COMMAND config artifact github enable
    export GITHUB_ACCOUNT_NAME=mrnim94
    $HAL_COMMAND config artifact github account add ${GITHUB_ACCOUNT_NAME} \
        --token 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
    $HAL_COMMAND config features edit --pipeline-templates true
kind: ConfigMap
metadata:
  name: spinnaker-scripts
kustomization.yaml
################

apiVersion: kustomize.config.k8s.io/v1beta1
kind: Kustomization

resources:
  - configmap-spinnaker-script.yaml
2.3) Design Overlays
Overlays mình sử dụng:
– chứa các Generator: helmChartInflationGenerator, secretGenerator, …
– chứa các config để thêm vào manifest: patches
Có 1 điểm cần chú ý với patches mình đã giới thiệu bên trên.
Mình config 1 file yaml như sau:
apiVersion: v1
kind: ServiceAccount
metadata:
 labels:
   organization: nimtechnology
Và mình gặp lỗi:
kustomize build --enable-helm > ../../manifest/dev/spinnaker_dev.yaml
Error: trouble configuring builtin PatchStrategicMergeTransformer with config: `
paths:
- add_label_sa.yaml
`: missing metadata.name in object {{v1 ConfigMap} {{ } map[organization:nimtechnology] map[]}}
Mục đích của mình là thêm label cho Service Account. Nó yêu cầu bạn khai bào thêm name của service acount đó. Vì có nhiều service account thì biết sửa cái nào
2.3.1) helmChartInflationGenerator (can ignored)
helmChartInflationGenerator (can ignored)Sau 1 ngày trải nghiệm thì mình thấy là nếu bạn sử dụng helmChartInflationGenerator trên argocd thì chúng ta không thể change chartVersion.
Lý do khi argocd run kustomize build –enable-helm thì nó sinh ra 1 folder chart trong argocd. Cho dừ bạn có change chartVersion thì nó cũng không tại lại chart với version mới
Bạn phải xóa folder chart thì mới generate ra chart mới nhưng trong argocd thì mình ko biết xóa chỗ nào?
kustomization.yaml
#######################

apiVersion: kustomize.config.k8s.io/v1beta1
kind: Kustomization

resources:
  - ../../base/dev
helmChartInflationGenerator:
  - chartName: spinnaker
    chartRepoUrl: https://helmcharts.opsmx.com/
    chartVersion: 2.2.7
    releaseName: test
    releaseNamespace: spinnaker
    values: values_helm.yaml
# Warning: 'patchesStrategicMerge' is deprecated. Please use 'patches' instead
patchesStrategicMerge:
  - add_label_sa.yaml
2.3.2) helmCharts
helmGlobals:
  chartHome: jenkins-controller-android_4.1.8/ #look at

helmCharts:
- name: jenkins
  includeCRDs: false
  releaseName: jenkins-controller-android
  version: 4.1.8 #look at
  repo: https://charts.jenkins.io
  valuesFile: values_helm.yaml
  namespace: default
cách hiện tại của mình là sử dụng helmCharts
mỗi khi bạn muốn change version thì bạn cần change 2 thử là:
– version trong helmCharts
– chartHome trong helmGlobals
Việc change này thì nó tạo ra 1 folder mới để bạn có thể generate chart mới!
values cho helm chart
values_helm.yaml
#########################

halyard:
  # Set to false to disable persistence data volume for halyard
  persistence:
    enabled: false
  additionalScripts:
    enabled: true
    configMapName: spinnaker-scripts
    configMapKey: config.sh
  additionalProfileConfigMaps:
    data:
      gate-local.yml: |-
        server:
          tomcat:
            protocolHeader: X-Forwarded-Proto
            remoteIpHeader: X-Forwarded-For
            internalProxies: .*
            httpsServerPort: X-Forwarded-Port
redis:
# Uncomment if you don't want to create a PVC for redis
  master:
    persistence:
      enabled: false
minio:
  resources:
    requests:
      memory: "2Gi"
  persistence:
    enabled: true
và mình cũng có test add thêm label Service Acount
add_label_sa.yaml
######################

apiVersion: v1
kind: ServiceAccount
metadata:
  name: test-spinnaker-halyard
  labels:
    organization: nimtechnology
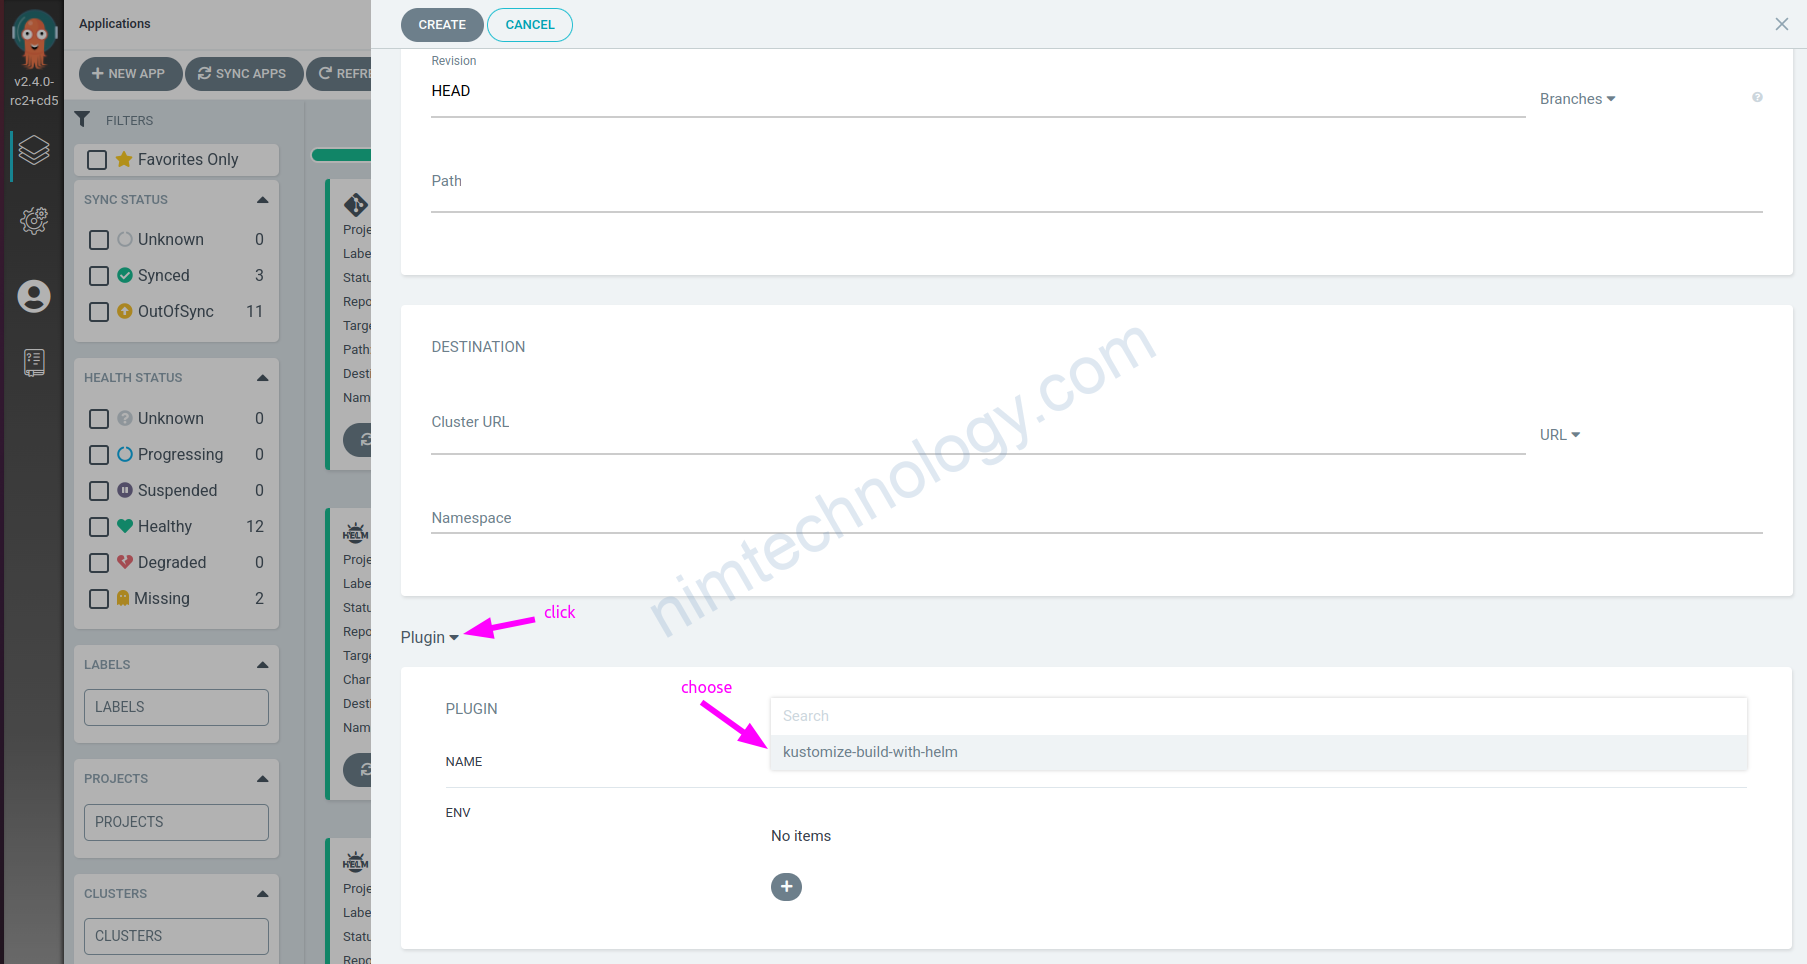
Define application of argocd
apiVersion: argoproj.io/v1alpha1
kind: Application
metadata:
  name: kubecost-nimtechnology-dev
  namespace: argocd
spec:
  destination:
    namespace: kubecost
    name: 'arn:aws:eks:us-west-2:04370XXXXXX:cluster/dev-mdcl-nimtechnology-engines'
  project: meta-structure
  source:
    path: meta-structure/kubecost
    repoURL: git@nimtechnology.org:metascan/mdce-nimtechnology-argo
    targetRevision: meta-structure
    plugin:
      name: kustomize-build-with-helm
2.4) Gen manifest and deploy
các file config của mình đã được chuẩn bị khá là chu đáo.
Mình gen ra file manifest
mkdir manifest/dev/
cd overlays/dev/
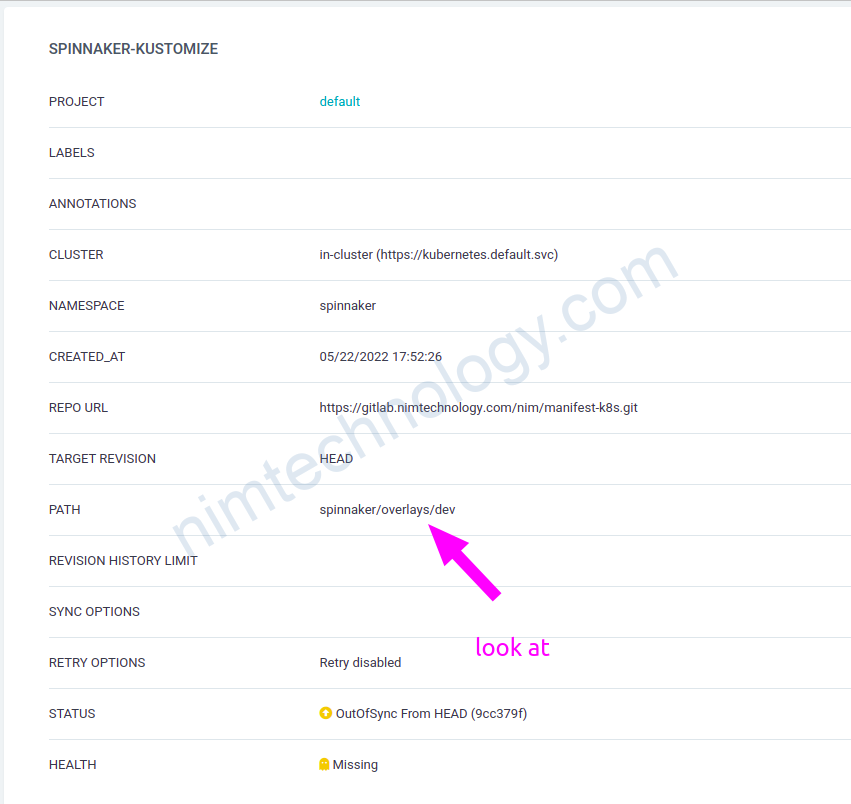
kustomize build --enable-helm > ../../manifest/dev/spinnaker_dev.yamlKhi run xong chúng ta sẽ có file manifest và bạn có thể dụng để kubectl apply -f manifest/dev/spinnaker_dev.yaml
Bạn sẽ hỏi là vậy có thể dùng với Argocd hem?
Mình mới test thì dụng được nhé!
3) Why my argocd does not work helmChartInflationGenerator.
Nếu bạn run helmChartInflationGenerator với argocd thì sẽ gặp lỗi
Unable to create application: application spec for spinnaker is invalid: InvalidSpecError: Unable to generate manifests in spinnaker/overlays/dev: rpc error: code = Unknown desc = `kustomize build .spinnaker/overlays/dev` failed exit status 1: Error: trouble configuring builtin HelmChartInflationGenerator with config: ` name: spinnaker releaseName: spinnaker repo: https://helmcharts.opsmx.com/ valuesFile: values_helm.yaml version: 2.2.7 `: must specify –enable-helm
Để Argocd worked với helmChart thì bạn cần phải thêm config sau vào configmap của argocd
Link reference:
https://github.com/argoproj/argo-cd/issues/7835#issuecomment-1027971749
apiVersion: v1
data:
  configManagementPlugins: |
    - name: kustomize-build-with-helm
      generate:
        command: [ "sh", "-c" ]
        args: [ "kustomize build --enable-helm" ]
kind: ConfigMap
metadata:
  labels:
    app.kubernetes.io/instance: argocd
    app.kubernetes.io/name: argocd-cm
    app.kubernetes.io/part-of: argocd
  name: argocd-cm
  namespace: argocd
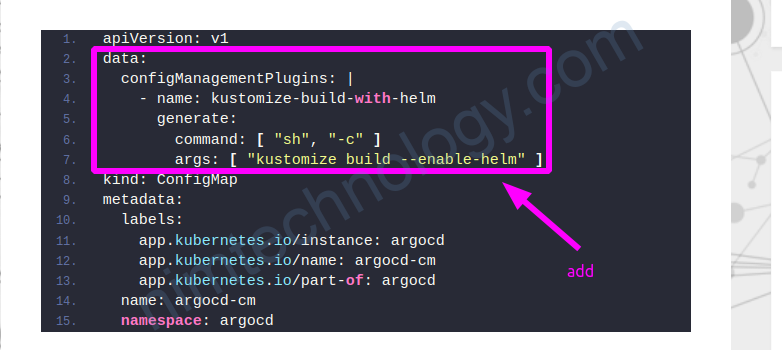
trong argocd thì bạn chọn plugin để sử dụng được config trên
4) Use the “patches” to merge or add the contents that you want to adjust the main configuration.
apiVersion: kustomize.config.k8s.io/v1beta1
kind: Kustomization

# helmGlobals:
#   chartHome: kubecost_1.101.0-rc.4_nim/
#   configHome: TMP_DIR/helm/

helmCharts:
- name: cost-analyzer
  includeCRDs: false
  releaseName: kubecost
  version: 1.101.0-rc.4
  repo: https://kubecost.github.io/cost-analyzer
  valuesFile: values_helm.yaml
  namespace: kubecost


#https://github.com/kubernetes-sigs/kustomize/blob/master/examples/inlinePatch.md
patches:
- target:
    kind: Service
    name: kubecost-cost-analyzer
  patch: |-
    apiVersion: v1
    kind: Service
    metadata:
      name: kubecost-cost-analyzer
      annotations:
        service.beta.kubernetes.io/aws-load-balancer-internal: 'true'
        labels:
          app: cost-analyzer
    spec:
      type: LoadBalancer
Cách 2: Mình sử dụng path in patches
https://github.com/kubernetes-sigs/kustomize/issues/3481#issuecomment-1434407293
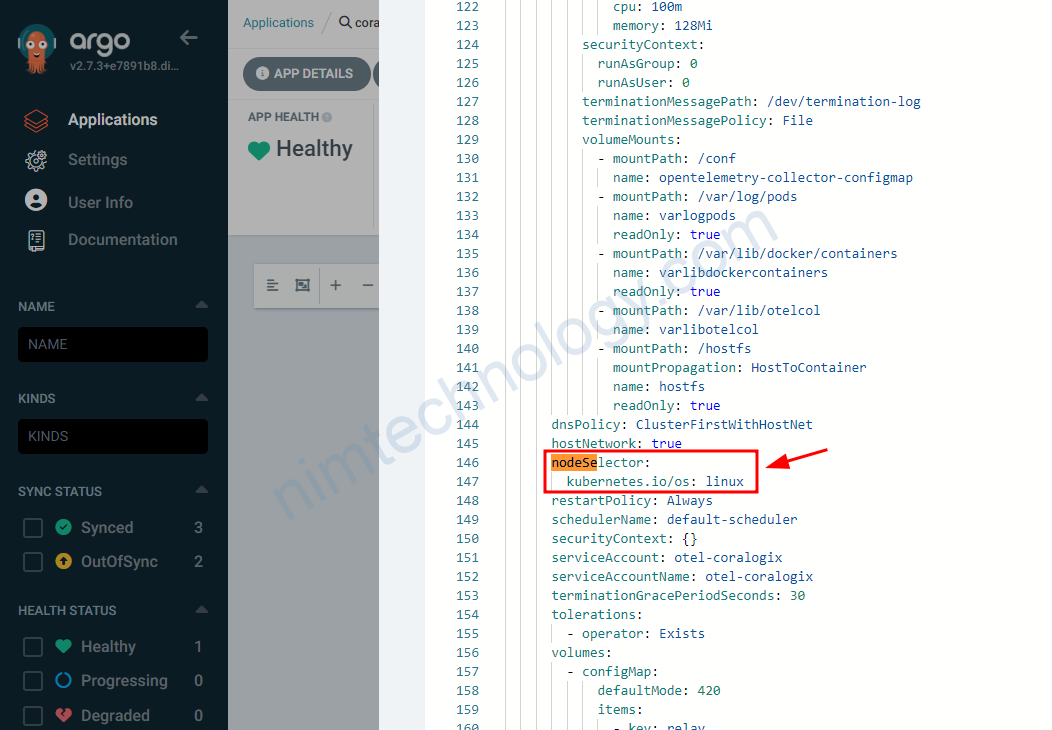
apiVersion: kustomize.config.k8s.io/v1beta1
kind: Kustomization

# resources:
# - ../../base

# helmGlobals:
#   chartHome: chartmuseum_3.9.1/
helmCharts:
- name: opentelemetry-coralogix
  includeCRDs: false
  releaseName: otel-agent
  version: 0.0.25
  repo: https://cgx.jfrog.io/artifactory/coralogix-charts-virtual
  valuesFile: values_helm.yaml
  namespace: coralogix

# generators:
# - ./kops.yaml

patches:
  - path: mergeNodeSelector.yaml
Tiếp đến là file mergeNodeSelector.yaml
mình muốn add nodeSelector vào DaemonSet
apiVersion: apps/v1
kind: DaemonSet
metadata:
  name: otel-coralogix-agent
spec:
  template:
    spec:
      nodeSelector:
        kubernetes.io/os: linux
Còn 1 cách nữa thì minh sưu tầm ở đây:
https://medium.com/@giorgiodevops/kustomize-use-patches-to-add-or-override-resources-48ef65cb634c