1) Creating VPC
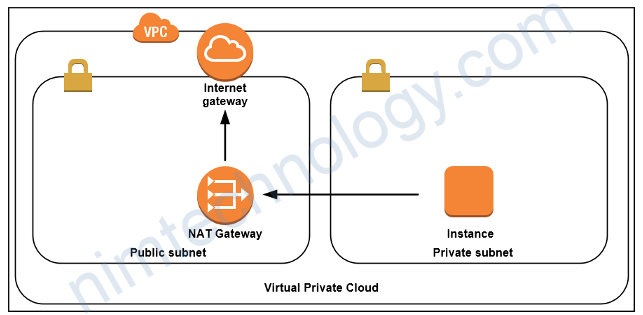
Đầu tiên mình sẽ tạo vpc
>>>>>
>>>>vpc.tf
>>>>>>>>>>>>

data "aws_availability_zones" "available" {}

# Create VPC Terraform Module
module "vpc" {
  source  = "terraform-aws-modules/vpc/aws"
  version = "3.11.0"
  #version = "~> 3.11"

  # VPC Basic Details
  name = local.kafka_cluster_name
  cidr = var.vpc_cidr_block
  azs             = data.aws_availability_zones.available.names
  public_subnets  = var.vpc_public_subnets
  private_subnets = var.vpc_private_subnets

  # NAT Gateways - Outbound Communication
  enable_nat_gateway = var.vpc_enable_nat_gateway
  single_nat_gateway = var.vpc_single_nat_gateway

  # VPC DNS Parameters
  enable_dns_hostnames = true
  enable_dns_support   = true


  tags = local.common_tags
  vpc_tags = local.common_tags

  # Additional Tags to Subnets
  public_subnet_tags = {
    Type = "Public Subnets"
    "kubernetes.io/role/elb" = 1
    "kubernetes.io/cluster/${local.kafka_cluster_name}" = "shared"
  }
  private_subnet_tags = {
    Type = "private-subnets"
    "kubernetes.io/role/internal-elb" = 1
    "kubernetes.io/cluster/${local.kafka_cluster_name}" = "shared"
  }
}
2) Creating Security Group.
# #
# # Security group resources
# #
resource "aws_security_group" "msk-sg" {
  vpc_id = module.vpc.vpc_id

  ingress = [
              {
                "cidr_blocks": [],
                "description": "",
                "from_port": 2181,
                "ipv6_cidr_blocks": [],
                "prefix_list_ids": [],
                "protocol": "tcp",
                "security_groups": [],
                "self": true,
                "to_port": 2181
              },
              {
                "cidr_blocks": [],
                "description": "",
                "from_port": 2182,
                "ipv6_cidr_blocks": [],
                "prefix_list_ids": [],
                "protocol": "tcp",
                "security_groups": [],
                "self": true,
                "to_port": 2182
              },
              {
                "cidr_blocks": [],
                "description": "",
                "from_port": 9092,
                "ipv6_cidr_blocks": [],
                "prefix_list_ids": [],
                "protocol": "tcp",
                "security_groups": [],
                "self": true,
                "to_port": 9092
              },
              {
                "cidr_blocks": ["0.0.0.0/0"],
                "description": "",
                "from_port": 9092,
                "ipv6_cidr_blocks": ["::/0"],
                "prefix_list_ids": [],
                "protocol": "tcp",
                "security_groups": [],
                "self": false,
                "to_port": 9092
              },
              {
                "cidr_blocks": [],
                "description": "",
                "from_port": 9094,
                "ipv6_cidr_blocks": [],
                "prefix_list_ids": [],
                "protocol": "tcp",
                "security_groups": [],
                "self": true,
                "to_port": 9094
              }
            ]


#   egress {
#     from_port   = 0
#     to_port     = 0
#     protocol    = "-1"
#     cidr_blocks = ["0.0.0.0/0"]
#   }

  #https://stackoverflow.com/questions/43980946/define-tags-in-central-section-in-terraform
  tags = merge(
    local.common_tags,
    tomap({
      "Name"      = "sgMSKCluster" ##look into
    })
  )

  # the "map" function was deprecated in Terraform v0.12
  # tags = merge(
  #   local.common_tags,
  #   map(
  #     "Name", "sgCacheCluster",
  #     "Project", var.project,
  #   )
  # )

  lifecycle {
      create_before_destroy = true
  }

}
3) Declare variable and Create Kafka by terraform on AWS
Tiếp đến là tạo msk hay còn gọi là kafka on aws
>>>>>>msk.tf
>>>>>>>

#https://registry.terraform.io/modules/angelabad/msk-cluster/aws/latest
module "msk-cluster" {
  source  = "angelabad/msk-cluster/aws"
  cluster_name    = local.kafka_cluster_name
  instance_type   = "kafka.t3.small"
  number_of_nodes = 2
  kafka_version   = "2.6.2"
  client_subnets = module.vpc.public_subnets
  client_authentication_unauthenticated_enabled = true
  encryption_in_transit_client_broker = "PLAINTEXT"
  extra_security_groups = [aws_security_group.msk-sg.id]
  volume_size = 100
  server_properties = {
    "auto.create.topics.enable"  = "false"
    "delete.topic.enable" = "false"
    "num.partitions" = 2
  }
}
Nếu bạn bị lỗi bên dưới
creating MSK Cluster (nimtechnology-aws-kafka): BadRequestException: Unauthenticated cannot be set to false without enabling any authentication mechanisms.Bạn phải khai báo:client_authentication_unauthenticated_enabled = true
bạn cần chú ý số number_of_nodes nó phải bằng số subnet.
Tiếp theo là variable.tf
# Input Variables
# AWS Region
variable "aws_region" {
  description = "Region in which AWS Resources to be created"
  type = string
  default = "us-east-1"
}

locals {
  name = "nimtechnology"
  common_tags = {
    Component   = "nimtechnology"
    Environment = var.env
  }
  kafka_cluster_name = "${local.name}-${var.cluster_name}"
}

variable "cluster_name" {
  default = "aws-kafka"
}

variable "env" {
  default = "prod"
}

# VPC CIDR Block
variable "vpc_cidr_block" {
  description = "VPC CIDR Block"
  type = string
  default = "10.0.0.0/16"
}

# VPC Public Subnets
variable "vpc_public_subnets" {
  description = "VPC Public Subnets"
  type = list(string)
  default = ["10.0.101.0/24", "10.0.102.0/24"]
}

# VPC Private Subnets
variable "vpc_private_subnets" {
  description = "VPC Private Subnets"
  type = list(string)
  default = ["10.0.1.0/24", "10.0.2.0/24"]
}

# VPC Enable NAT Gateway (True or False)
variable "vpc_enable_nat_gateway" {
  description = "Enable NAT Gateways for Private Subnets Outbound Communication"
  type = bool
  default = true
}

# VPC Single NAT Gateway (True or False)
variable "vpc_single_nat_gateway" {
  description = "Enable only single NAT Gateway in one Availability Zone to save costs during our demos"
  type = bool
  default = true
}


client_subnets = module.vpc.private_subnetsMonitoring MSK by Prometheus.


module "msk-cluster" {
  source  = "angelabad/msk-cluster/aws"
  cluster_name    = local.kafka_cluster_name
  instance_type   = "kafka.t3.small"
 ....
  prometheus_jmx_exporter  = true
  prometheus_node_exporter = true
}
add thêm security group


CLUSTER_ARN=arn:aws:kafka:us-east-1:250887682577:cluster/nimtechnology-aws-kafka/308ce45e-754f-4fc2-bbe5-42c3246c92f5-17
aws kafka list-nodes --cluster-arn $CLUSTER_ARN \
    --query NodeInfoList[*].BrokerNodeInfo.Endpoints[]

>>output
[
    "b-2.nimtechnologyawskafka.rf4h22.c17.kafka.us-east-1.amazonaws.com",
    "b-1.nimtechnologyawskafka.rf4h22.c17.kafka.us-east-1.amazonaws.com"
]
Tạo 1 file: targets.json
[
    {
      "labels": {
        "job": "jmx"
      },
      "targets": [
        "b-2.nimtechnologyawskafka.rf4h22.c17.kafka.us-east-1.amazonaws.com:11001",
        "b-1.nimtechnologyawskafka.rf4h22.c17.kafka.us-east-1.amazonaws.com:11001"
      ]
    },
    {
      "labels": {
        "job": "node"
      },
      "targets": [
        "b-2.nimtechnologyawskafka.rf4h22.c17.kafka.us-east-1.amazonaws.com:11002",
        "b-1.nimtechnologyawskafka.rf4h22.c17.kafka.us-east-1.amazonaws.com:11002"
      ]
    }
  ]
Và bạn cần sửa lại file prometheus.yml
# file: prometheus.yml
# my global config
global:
  scrape_interval:     10s

# A scrape configuration containing exactly one endpoint to scrape:
# Here it's Prometheus itself.
scrape_configs:
# The job name is added as a label `job=<job_name>` to any timeseries scraped from this config.
- job_name: 'prometheus'
  static_configs:
  # 9090 is the prometheus server port
  - targets: ['localhost:9090']
- job_name: 'broker'
  file_sd_configs:
  - files:
    - 'targets.json'
Một số metrics đến lag:
| Name | When visible | Dimensions | Description |
|---|---|---|---|
| EstimatedMaxTimeLag | After consumer group consumes from a topic. | Consumer Group, Topic | Time estimate (in seconds) to drain MaxOffsetLag. |
| EstimatedTimeLag | After consumer group consumes from a topic. | Time estimate (in seconds) to drain the partition offset lag. | |
| MaxOffsetLag | After consumer group consumes from a topic. | Consumer Group, Topic | The maximum offset lag across all partitions in a topic. |
| OffsetLag | After consumer group consumes from a topic. | Partition-level consumer lag in number of offsets. | |
| SumOffsetLag | After consumer group consumes from a topic. | Consumer Group, Topic | The aggregated offset lag for all the partitions in a topic. |
https://github.com/seglo/kafka-lag-exporter
https://www.lightbend.com/blog/monitor-kafka-consumer-group-latency-with-kafka-lag-exporter
https://strimzi.io/blog/2019/10/14/improving-prometheus-metrics/
Comparing the lag metrics value between Cloudwatch and Kafka


Hiểu đơn giản thì lag sẽ là số message trong topic mà chưa được consume
Vậy tổng số lag trên 1 topic là giống nhau (SumOffsetLag)

Aws doesn’t permit to change advertised.listeners of MSK

https://docs.aws.amazon.com/msk/latest/developerguide/supported-kafka-versions.html
Look up configuration:
- offsets.retention.minutes:
- What it does: This setting is like a bookmark that remembers where you stopped reading in a book. In Kafka, it remembers where a message reader (consumer) stopped reading messages in a topic.
- Why it matters: If you come back within the time set by this setting, you can continue reading from where you left off. If you come back after this time, your bookmark is gone, and you might have to start reading from a different place.
- retention.ms:
- What it does: This setting is like a rule for how long a library keeps a book. In Kafka, it decides how long messages are kept in a topic.
- Why it matters: Old messages are removed after this time to make room for new ones. If a message is older than this set time, it’s like the book has been removed from the library.
In short, offsets.retention.minutes is about remembering where each reader stopped reading, while retention.ms is about how long messages (like books in a library) are kept before being removed.
Look into “offsets.retention.minutes” in more detail
Ngoài ra bạn cũng có thể lợi dụng offsets.retention.minutes để delete consumer group cũ đáp ứng đủ 2 tiêu chí:
– không có consumer in the consumer group
– không có message nào trong topic
the offsets.retention.minutes configuration controls the retention period for consumer offsets.
Here’s a breakdown of the offsets.retention.minutes configuration:
- Parameter:
offsets.retention.minutes - Description: This parameter specifies the duration (in minutes) for which Kafka retains consumer offsets.
- Default Value: The default value is
1440minutes (24 hours). - Purpose: The primary purpose of this configuration is to define how long Kafka should keep the offset data for a consumer group that is no longer active. If a consumer group does not commit any new offsets within this retention period, its offset data will be eligible for deletion.
How it Works
- Committing Offsets: Consumers periodically commit their current offsets to the
__consumer_offsetstopic. - Inactive Consumer Groups: If a consumer group becomes inactive and stops committing offsets, the retention timer starts ticking. In this case, with
offsets.retention.minutes=10, if no offsets are committed for 10 minutes, the offsets for that consumer group are marked for deletion. - Deletion of Offsets: After the retention period (10 minutes) elapses without any new offset commits, Kafka will delete the offsets for that consumer group. This means that the information about the last read positions for the partitions will be lost.


Pretty great post. I simply stumbled upon your blog and wished to say that I’ve
truly loved surfing around your weblog posts.
After all I will be subscribing on your feed and I’m hoping you write again soon!
Thank you so much