1) Introduce

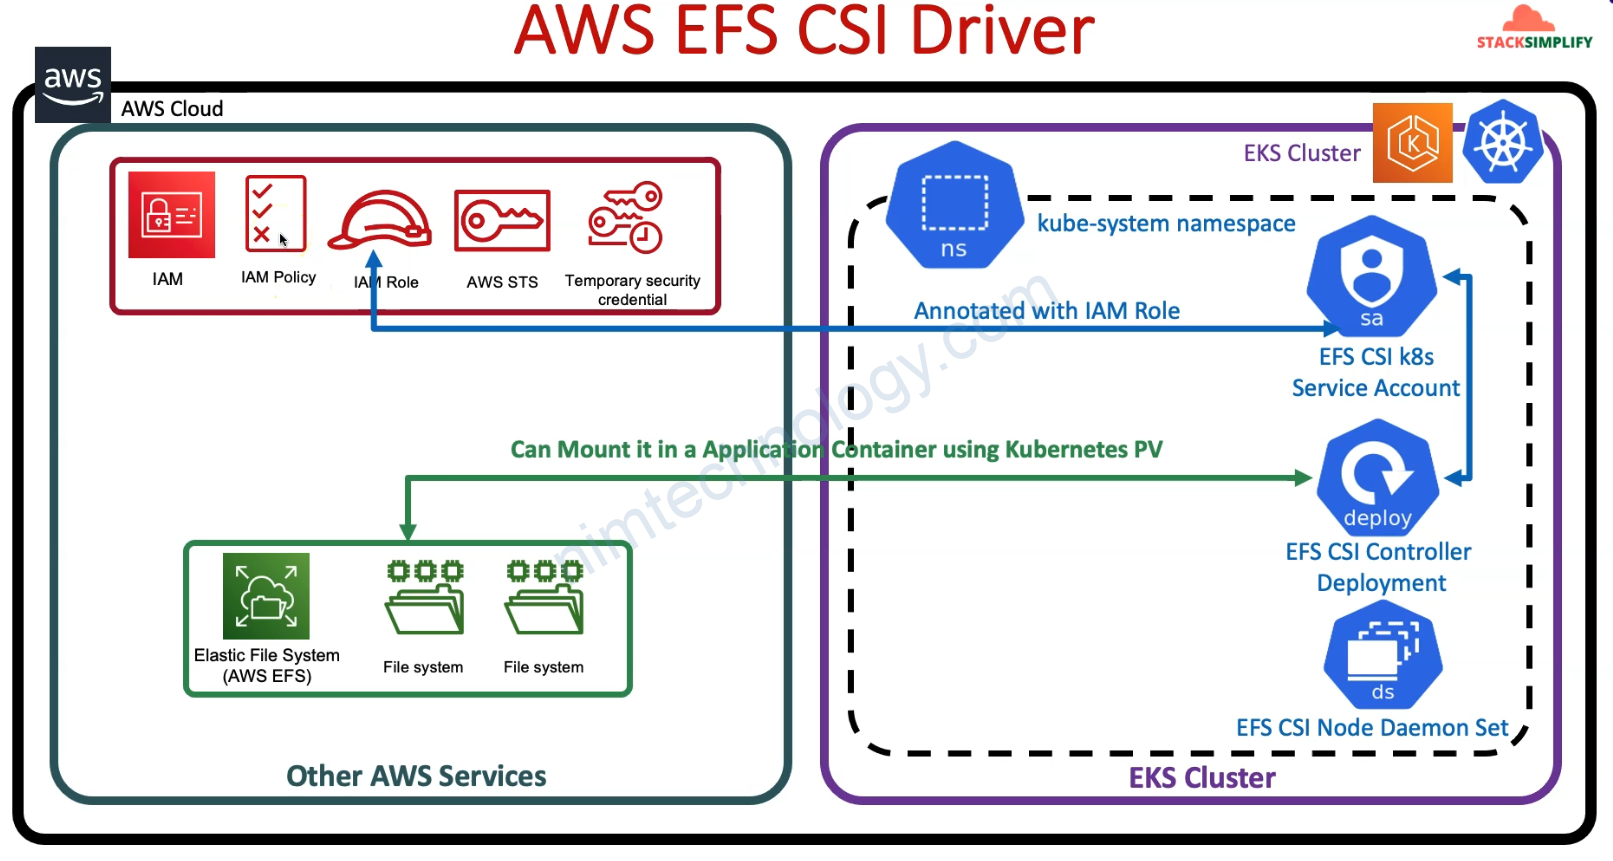
Why do we need to use EFS CSI Driver in EKS Cluster?
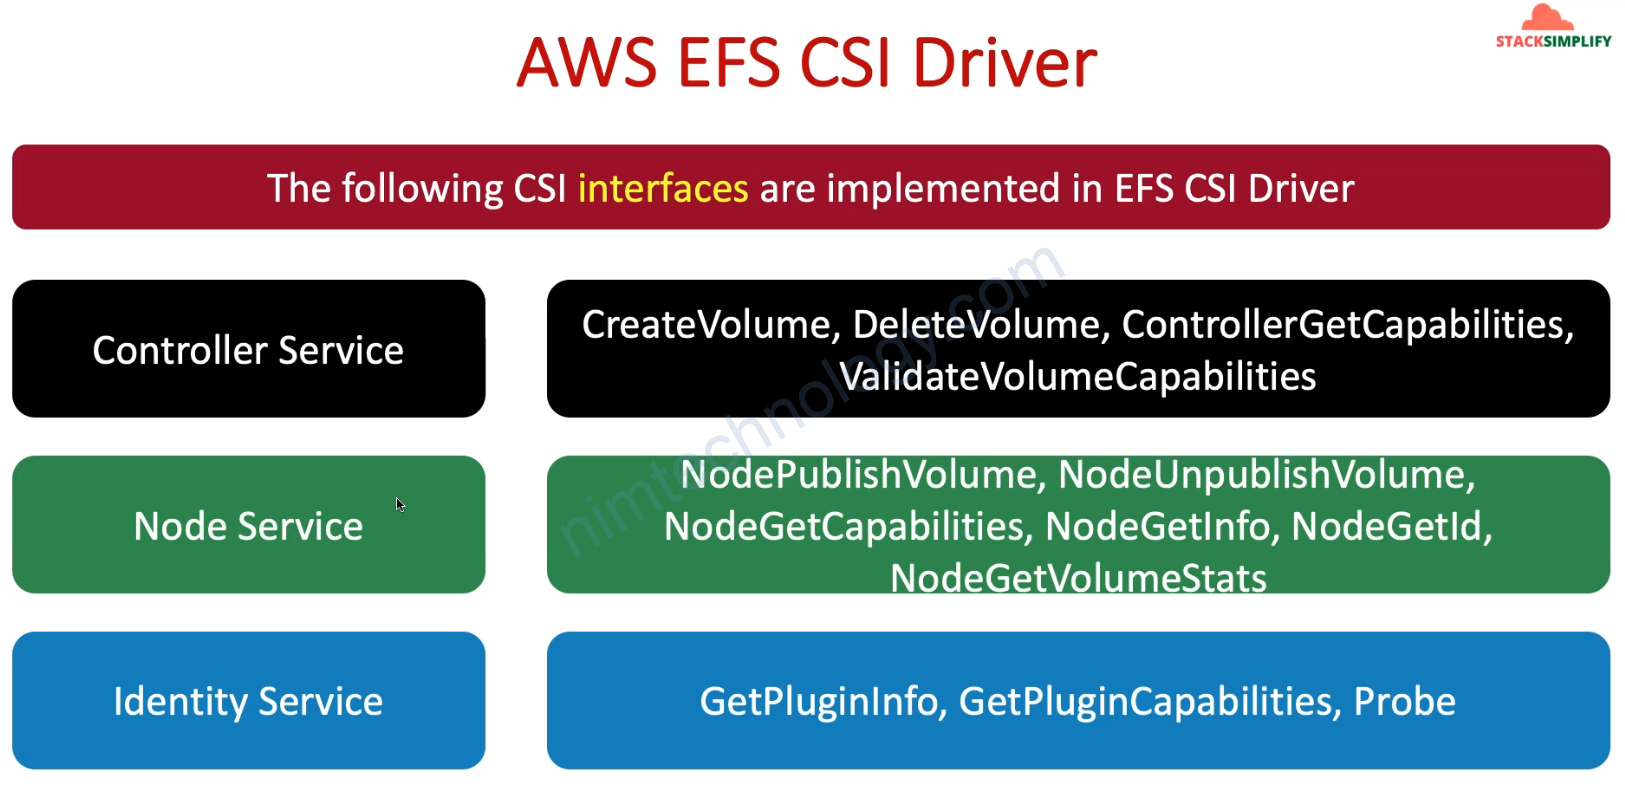
AWS EFS Container Storage Interface (CSI) driver allows EKS clusters to manage the lifecycle of EFS File System in Kubernetes
Needs big size Node Group for EFS CSI Controller to run
# Before Change
  instance_types = ["t3.medium"]
  scaling_config {
    desired_size = 1
    min_size     = 1
    max_size     = 2
  }

# After Change
  instance_types = ["t3.large"]

  scaling_config {
    desired_size = 2
    min_size     = 2
    max_size     = 3
  }
2) Install EKS cluster
Bạn sẽ cần tạo EKS cluster trước.
3) Install aws-efs-csi-driver on EKS
Giờ bạn cần load cài policy dành cho EFS CSI
# Datasource: EFS CSI IAM Policy get from EFS GIT Repo (latest)
data "http" "efs_csi_iam_policy" {
  url = "https://raw.githubusercontent.com/kubernetes-sigs/aws-efs-csi-driver/master/docs/iam-policy-example.json"

  # Optional request headers
  request_headers = {
    Accept = "application/json"
  }
}

output "efs_csi_iam_policy" {
  value = data.http.efs_csi_iam_policy.body
}
Tạo role và policy để workload trong k8s có quyền integrate với EFS CSI trên AWS.
# Resource: Create EFS CSI IAM Policy
resource "aws_iam_policy" "efs_csi_iam_policy" {
  name        = "${local.name}-AmazonEKS_EFS_CSI_Driver_Policy"
  path        = "/"
  description = "EFS CSI IAM Policy"
  policy = data.http.efs_csi_iam_policy.body
}

output "efs_csi_iam_policy_arn" {
  value = aws_iam_policy.efs_csi_iam_policy.arn
}

# Resource: Create IAM Role and associate the EFS IAM Policy to it
resource "aws_iam_role" "efs_csi_iam_role" {
  name = "${local.name}-efs-csi-iam-role"

  # Terraform's "jsonencode" function converts a Terraform expression result to valid JSON syntax.
  assume_role_policy = jsonencode({
    Version = "2012-10-17"
    Statement = [
      {
        Action = "sts:AssumeRoleWithWebIdentity"
        Effect = "Allow"
        Sid    = ""
        Principal = {
          Federated = "${data.terraform_remote_state.eks.outputs.aws_iam_openid_connect_provider_arn}"
        }
        Condition = {
          StringEquals = {
            "${data.terraform_remote_state.eks.outputs.aws_iam_openid_connect_provider_extract_from_arn}:sub": "system:serviceaccount:kube-system:efs-csi-controller-sa"
          }
        }
      },
    ]
  })

  tags = {
    tag-key = "efs-csi"
  }
}

# Associate EFS CSI IAM Policy to EFS CSI IAM Role
resource "aws_iam_role_policy_attachment" "efs_csi_iam_role_policy_attach" {
  policy_arn = aws_iam_policy.efs_csi_iam_policy.arn
  role       = aws_iam_role.efs_csi_iam_role.name
}

output "efs_csi_iam_role_arn" {
  description = "EFS CSI IAM Role ARN"
  value = aws_iam_role.efs_csi_iam_role.arn
}
Cài đặt aws-efs-csi-driver thông Helm lên k8s
# Install EFS CSI Driver using HELM

# Resource: Helm Release
resource "helm_release" "efs_csi_driver" {
  depends_on = [aws_iam_role.efs_csi_iam_role ]
  name       = "aws-efs-csi-driver"

  repository = "https://kubernetes-sigs.github.io/aws-efs-csi-driver"
  chart      = "aws-efs-csi-driver"

  namespace = "kube-system"

  set {
    name = "image.repository"
    value = "602401143452.dkr.ecr.us-east-1.amazonaws.com/eks/aws-efs-csi-driver" # Changes based on Region - This is for us-east-1 Additional Reference: https://docs.aws.amazon.com/eks/latest/userguide/add-ons-images.html
  }

  set {
    name  = "controller.serviceAccount.create"
    value = "true"
  }

  set {
    name  = "controller.serviceAccount.name"
    value = "efs-csi-controller-sa"
  }

  set {
    name  = "controller.serviceAccount.annotations.eks\\.amazonaws\\.com/role-arn"
    value = "${aws_iam_role.efs_csi_iam_role.arn}"
  }

}
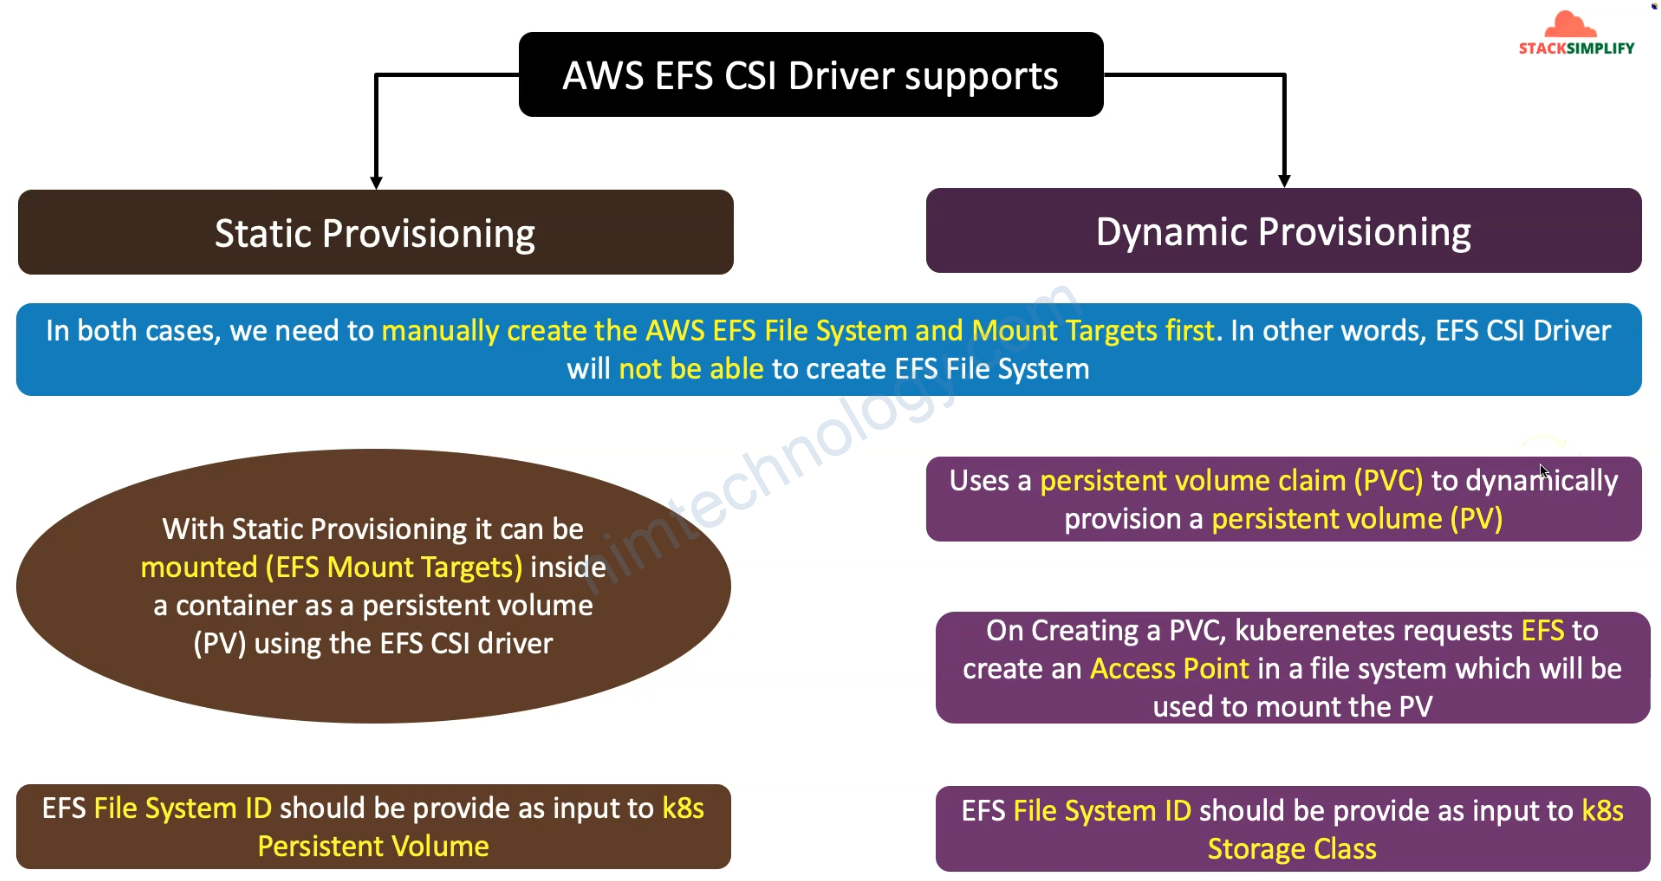
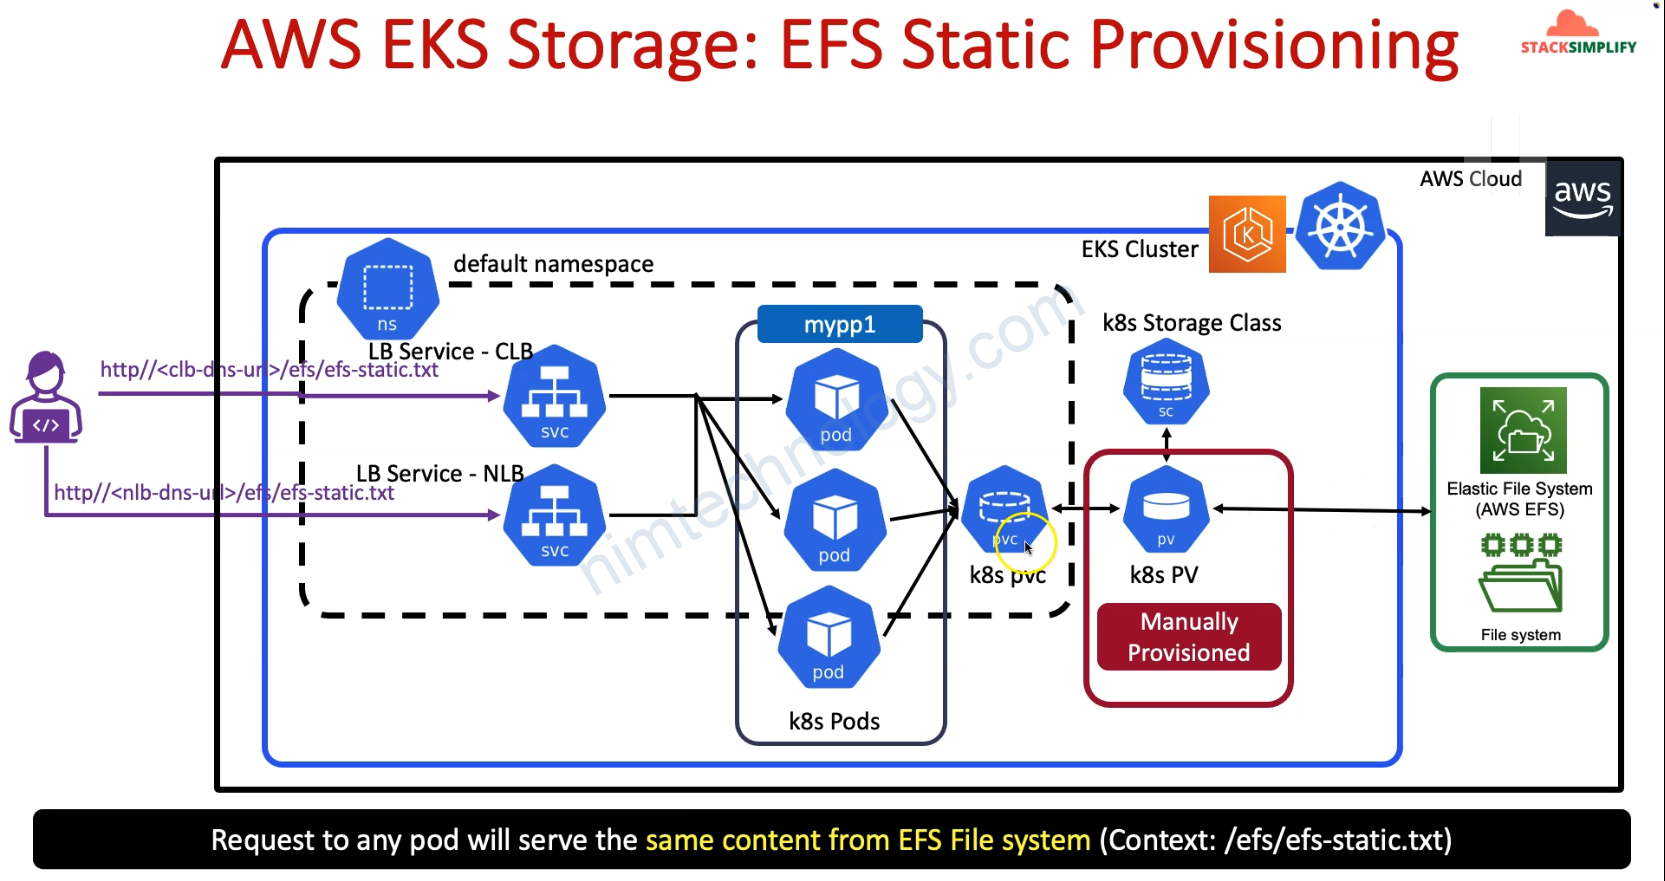
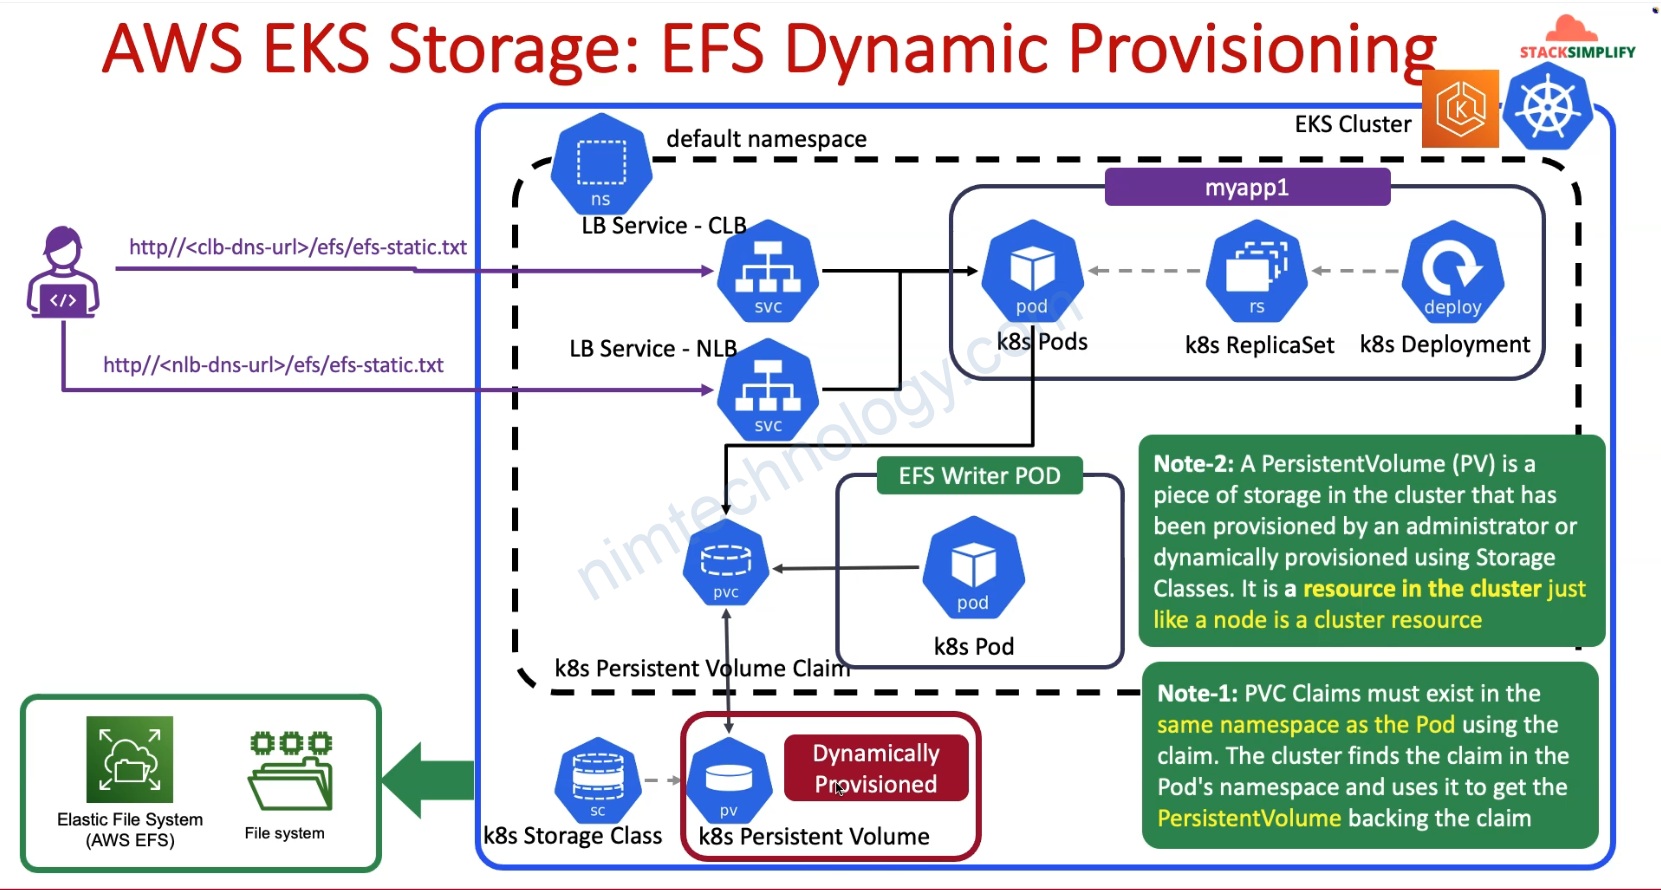
4) AWS EFS Static Provisioning – Automate with Terraform
4.1) Introduction to AWS EFS Static Provisioning
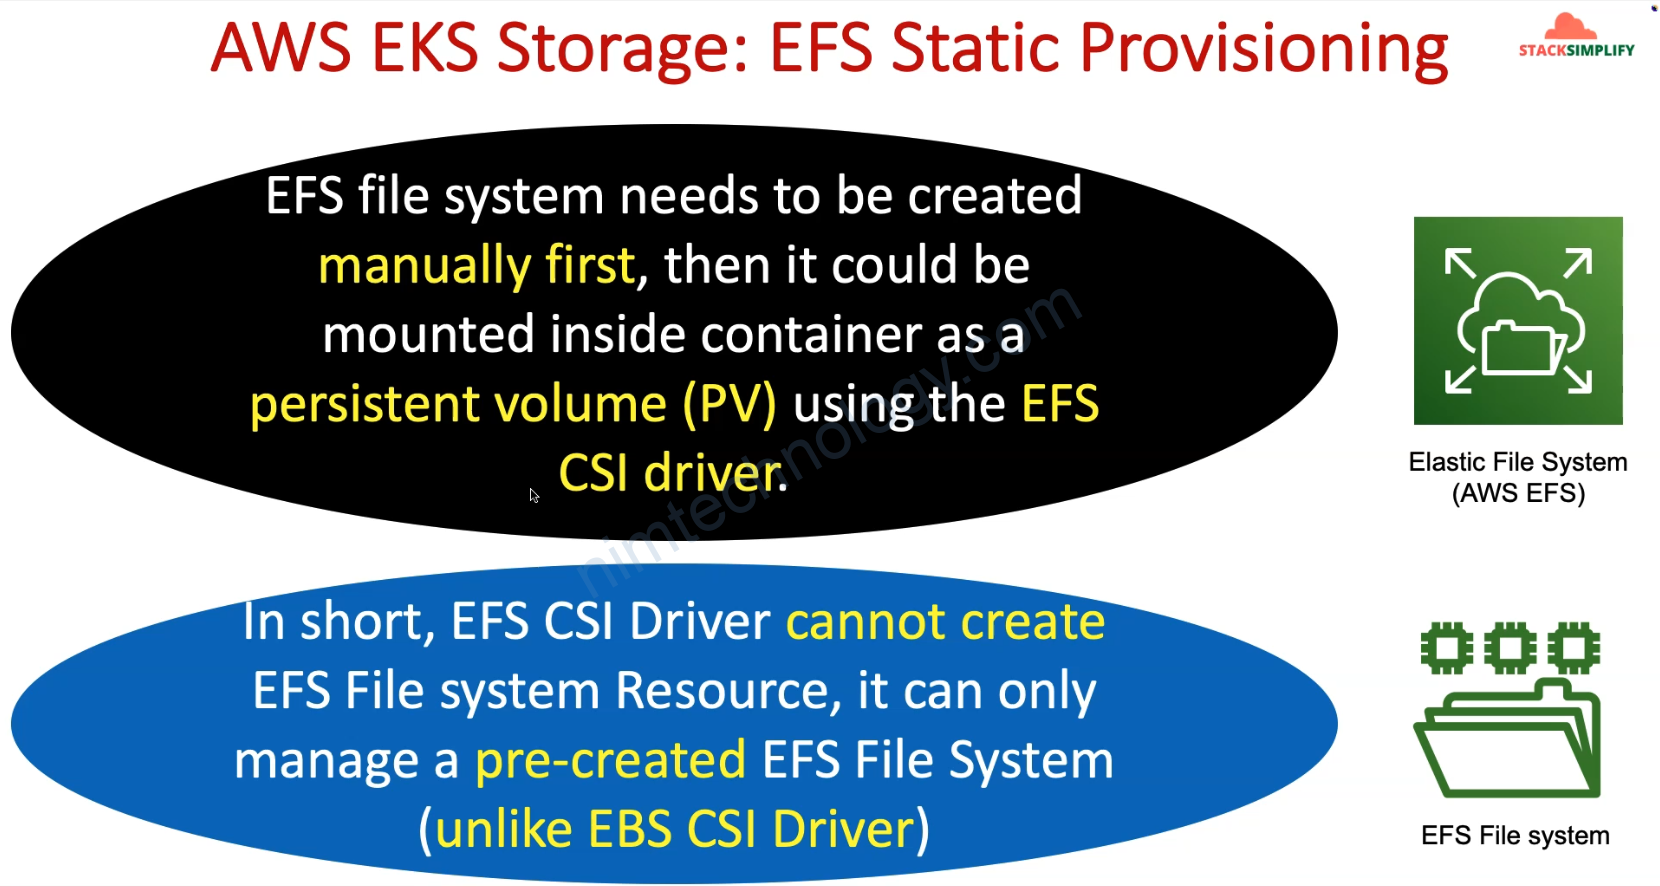
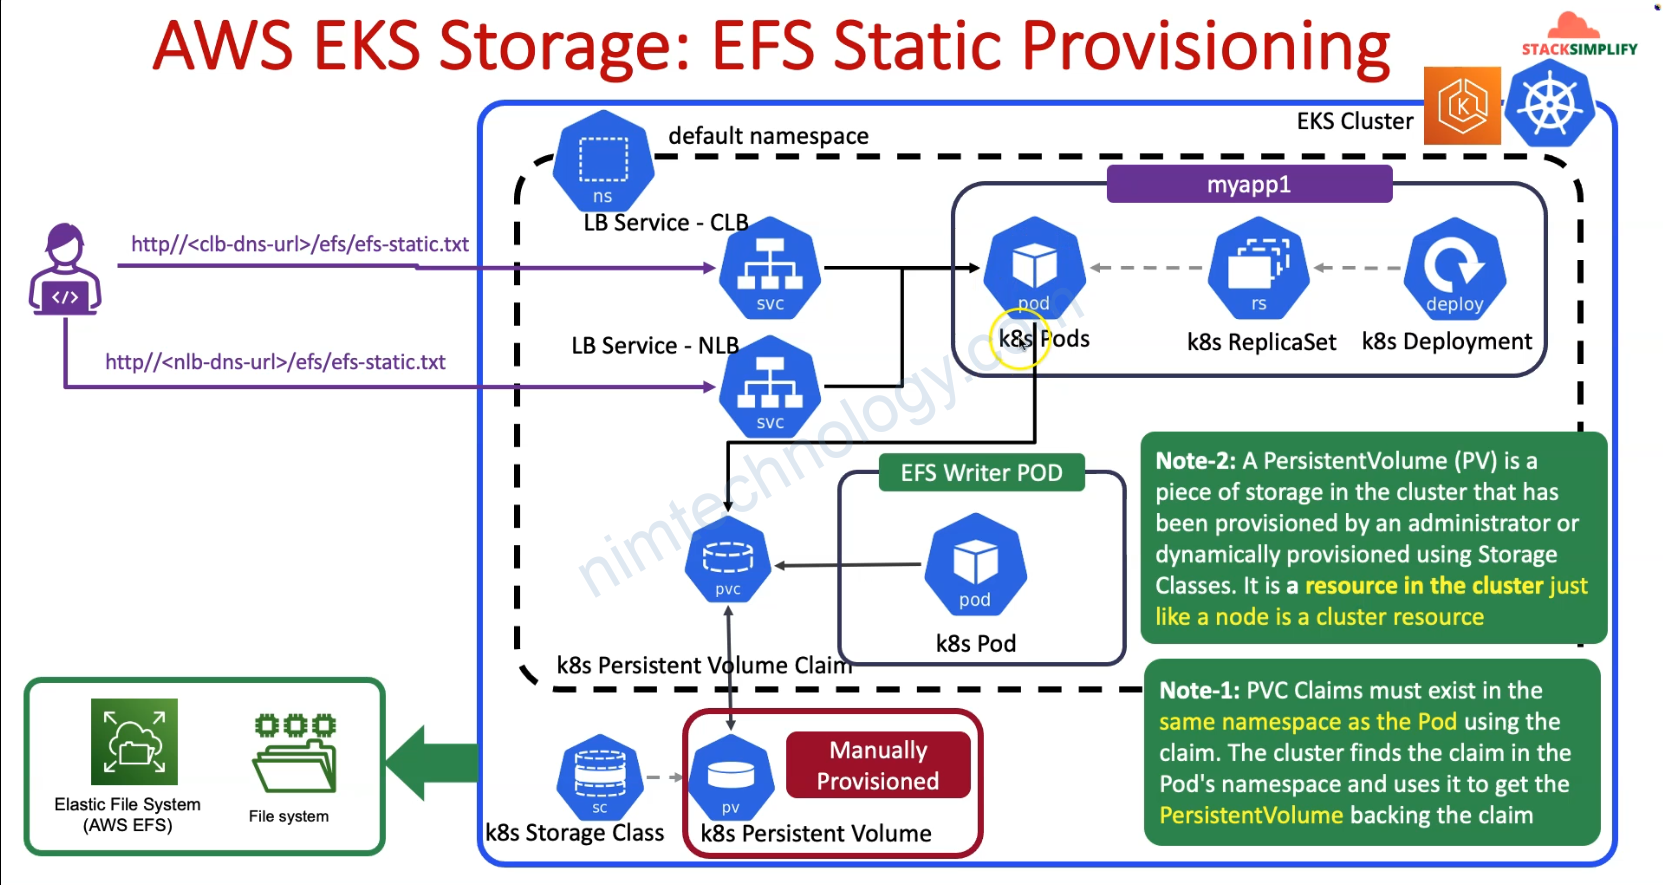
Ở mục Static Provisioning thì chúng ta cần manually create Storage Class and Create PV then PVC
PVC phải cùng ns với PODs, deployments ,…
Mình sẽ tạo 1 pod ghi liên tục vào PVC và tạo 1 web đọc vào PVC đó.
Đầu tiên chúng ta cần tạo policy để EKS cluster access vào EFS
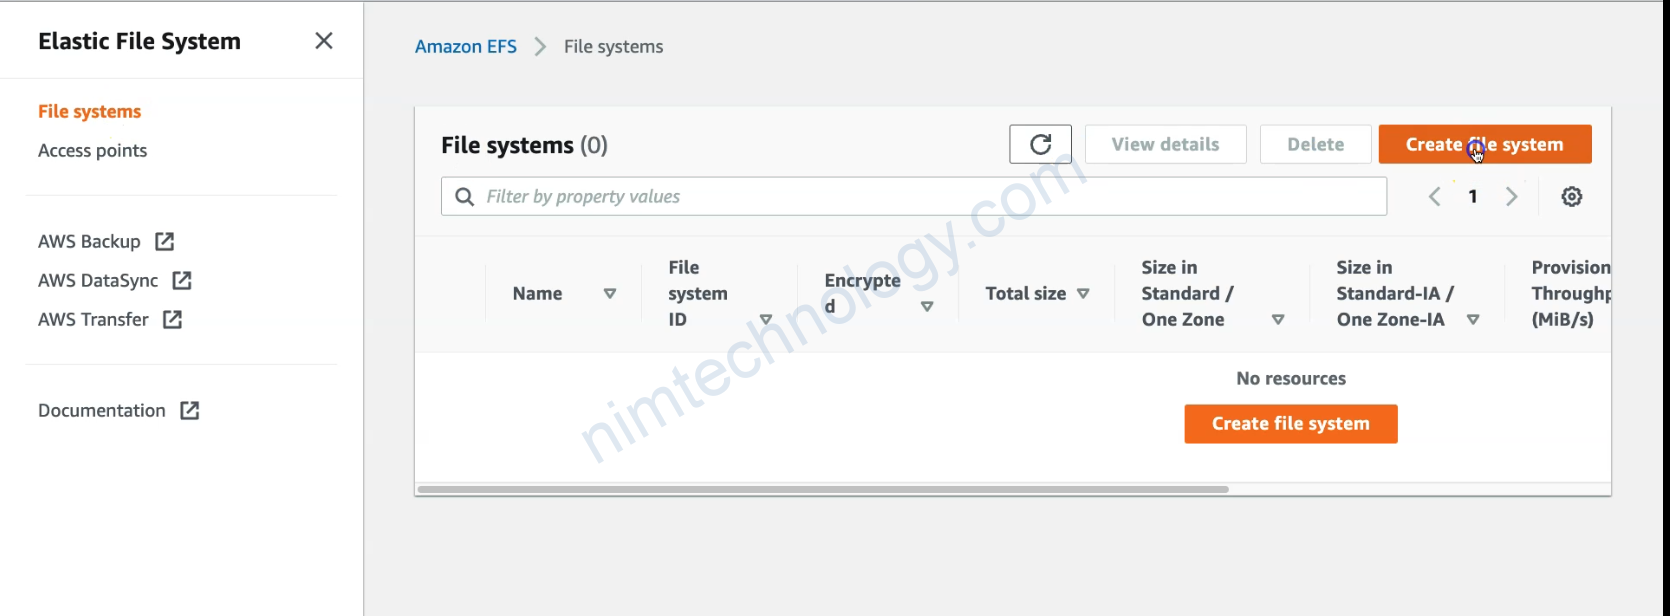
The Resource: aws_efs_file_system: Provides an Elastic File System (EFS) File System resource.
aws_efs_mount_target thì đây là đây là giải thích:
https://stackoverflow.com/questions/69123746/what-is-efs-mount-target-and-why-do-we-create-multiple-mount-targets
EFS mount targets are not “servers”, but elastic network interfaces which expose EFS to your VPC. Your client access EFS by connecting to the mount targets (i.e. ENIs).
But then why all of AWS document and tutorials teach you to create multiple mount targets, one for each subnet?
It’s not about “each subnet” per-se, but for each availability zone (AZs). So if your VPC spans 3 AZs, to ensure high availability of access to your filesystem, a good practice is to create a mount target for each AZ.
Doesn’t the security group of a mount target good enough to control the access to the EFS?
Yes, SGs are usually enough. But you can also control access to your filesystem through IAM policies and permissions.
# Resource: Security Group - Allow Inbound NFS Traffic from EKS VPC CIDR to EFS File System
resource "aws_security_group" "efs_allow_access" {
name = "efs-allow-nfs-from-eks-vpc"
description = "Allow Inbound NFS Traffic from EKS VPC CIDR"
vpc_id = data.terraform_remote_state.eks.outputs.vpc_id
ingress {
description = "Allow Inbound NFS Traffic from EKS VPC CIDR to EFS File System"
from_port = 2049
to_port = 2049
protocol = "tcp"
cidr_blocks = [data.terraform_remote_state.eks.outputs.vpc_cidr_block]
}
egress {
from_port = 0
to_port = 0
protocol = "-1"
cidr_blocks = ["0.0.0.0/0"]
}
tags = {
Name = "allow_nfs_from_eks_vpc"
}
}
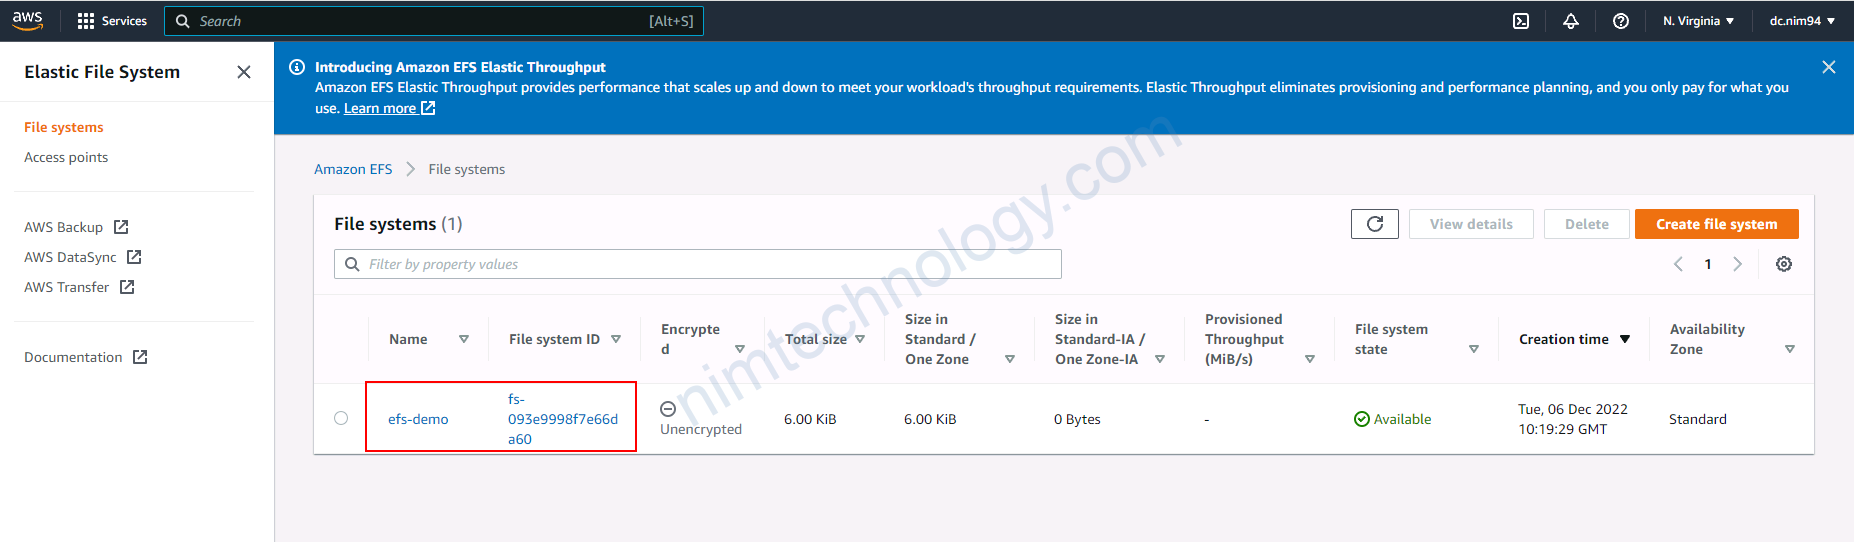
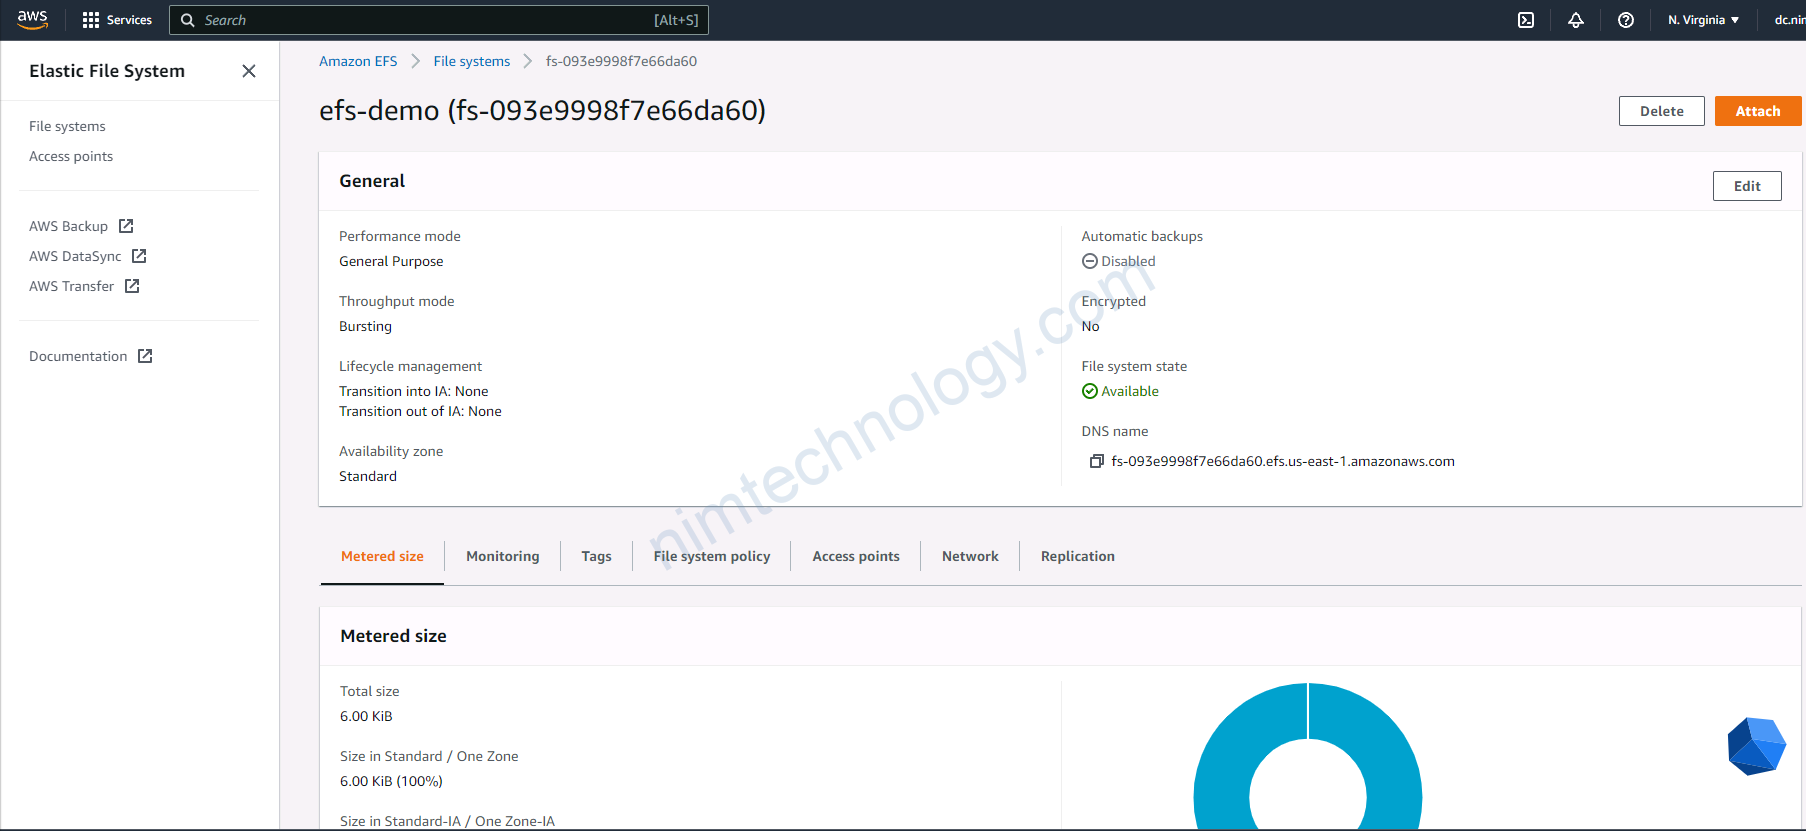
# Resource: EFS File System
resource "aws_efs_file_system" "efs_file_system" {
creation_token = "efs-demo"
tags = {
Name = "efs-demo"
}
}
# Resource: EFS Mount Target
resource "aws_efs_mount_target" "efs_mount_target" {
#for_each = toset(module.vpc.private_subnets)
count = 2
file_system_id = aws_efs_file_system.efs_file_system.id
subnet_id = data.terraform_remote_state.eks.outputs.private_subnets[count.index]
security_groups = [ aws_security_group.efs_allow_access.id ]
}
# EFS File System ID
output "efs_file_system_id" {
description = "EFS File System ID"
value = aws_efs_file_system.efs_file_system.id
}
output "efs_file_system_dns_name" {
description = "EFS File System DNS Name"
value = aws_efs_file_system.efs_file_system.dns_name
}
# EFS Mounts Info
output "efs_mount_target_id" {
description = "EFS File System Mount Target ID"
value = aws_efs_mount_target.efs_mount_target[*].id
}
output "efs_mount_target_dns_name" {
description = "EFS File System Mount Target DNS Name"
value = aws_efs_mount_target.efs_mount_target[*].mount_target_dns_name
}
output "efs_mount_target_availability_zone_name" {
description = "EFS File System Mount Target availability_zone_name"
value = aws_efs_mount_target.efs_mount_target[*].availability_zone_name
}
Đây là so sánh giở EBS và EFS:
https://www.padok.fr/en/blog/filesystem-aws-eks-ebs#AWS
# Resource: Kubernetes Storage Class
resource "kubernetes_storage_class_v1" "efs_sc" {
  metadata {
    name = "efs-sc"
  }
  storage_provisioner = "efs.csi.aws.com"
}
root@LP11-D7891:~# kubectl get storageclass
NAME            PROVISIONER             RECLAIMPOLICY   VOLUMEBINDINGMODE      ALLOWVOLUMEEXPANSION   AGE
efs-sc          efs.csi.aws.com         Delete          Immediate              true                   116s
gp2 (default)   kubernetes.io/aws-ebs   Delete          WaitForFirstConsumer   false                  7h4m
# Resource: Kubernetes Persistent Volume
resource "kubernetes_persistent_volume_v1" "efs_pv" {
  metadata {
    name = "efs-pv"
  }
  spec {
    capacity = {
      storage = "5Gi"
    }
    volume_mode = "Filesystem"
    access_modes = ["ReadWriteMany"]
    persistent_volume_reclaim_policy = "Retain"
    storage_class_name = kubernetes_storage_class_v1.efs_sc.metadata[0].name
    persistent_volume_source {
      csi {
      driver = "efs.csi.aws.com"
      volume_handle = aws_efs_file_system.efs_file_system.id
      }
    }
  }
}

# Storage Size (storage = "5Gi")
## You can specify any size for the persistent volume in the storage field.
## Kubernetes requires this field, but because Amazon EFS is an
## elastic file system, it does not enforce any file system capacity.
root@LP11-D7891:~# kubectl get pv
NAME     CAPACITY   ACCESS MODES   RECLAIM POLICY   STATUS   CLAIM               STORAGECLASS   REASON   AGE
efs-pv   5Gi        RWX            Retain           Bound    default/efs-claim   efs-sc                  29s
# Resource: Persistent Volume Claim
resource "kubernetes_persistent_volume_claim_v1" "efs_pvc" {
  metadata {
    name = "efs-claim"
  }
  spec {
    access_modes = ["ReadWriteMany"]
    storage_class_name = kubernetes_storage_class_v1.efs_sc.metadata[0].name
    resources {
      requests = {
        storage = "5Gi"
      }
    }
  }
}

# Storage Size (storage = "5Gi")
## You can specify any size for the persistent volume in the storage field.
## Kubernetes requires this field, but because Amazon EFS is an
## elastic file system, it does not enforce any file system capacity.
root@LP11-D7891:~# kubectl get pvc
NAME        STATUS   VOLUME   CAPACITY   ACCESS MODES   STORAGECLASS   AGE
efs-claim   Bound    efs-pv   5Gi        RWX            efs-sc         4m42s
# Resource: Kubernetes Pod - Write to EFS Pod
resource "kubernetes_pod_v1" "efs_write_app_pod" {
  depends_on = [ aws_efs_mount_target.efs_mount_target]
  metadata {
    name = "efs-write-app"
  }
  spec {
    container {
      name  = "efs-write-app"
      image = "busybox"
      command = ["/bin/sh"]
      args = ["-c", "while true; do echo EFS Kubernetes Static Provisioning Test $(date -u) >> /data/efs-static.txt; sleep 5; done"]
      volume_mount {
        name = "persistent-storage"
        mount_path = "/data"
      }
  }
  volume {
    name = "persistent-storage"
    persistent_volume_claim {
      claim_name = kubernetes_persistent_volume_claim_v1.efs_pvc.metadata[0].name
    }
  }
}
}
root@LP11-D7891:~# kubectl get all
NAME                READY   STATUS    RESTARTS   AGE
pod/efs-write-app   1/1     Running   0          76s

NAME                 TYPE        CLUSTER-IP   EXTERNAL-IP   PORT(S)   AGE
service/kubernetes   ClusterIP   172.20.0.1   <none>        443/TCP   7h17m
# Resource: UserMgmt WebApp Kubernetes Deployment
resource "kubernetes_deployment_v1" "myapp1" {
  depends_on = [ aws_efs_mount_target.efs_mount_target]
  metadata {
    name = "myapp1"
  }
   spec {
    replicas = 2
    selector {
      match_labels = {
        app = "myapp1"
      }
    }
    template {
      metadata {
        name = "myapp1-pod"
        labels = {
          app = "myapp1"
        }
      }
      spec {
        container {
          name  = "myapp1-container"
          image = "stacksimplify/kubenginx:1.0.0"
          port {
            container_port = 80
          }
          volume_mount {
            name = "persistent-storage"
            mount_path = "/usr/share/nginx/html/efs"
          }
        }
        volume {
          name = "persistent-storage"
          persistent_volume_claim {
          claim_name = kubernetes_persistent_volume_claim_v1.efs_pvc.metadata[0].name
        }
      }
    }
  }
}
}
root@LP11-D7891:~# kubectl get all
NAME                          READY   STATUS    RESTARTS   AGE
pod/efs-write-app             1/1     Running   0          2m25s
pod/myapp1-667d8656cc-9fkwk   1/1     Running   0          6s
pod/myapp1-667d8656cc-j6z59   1/1     Running   0          6s

NAME                 TYPE        CLUSTER-IP   EXTERNAL-IP   PORT(S)   AGE
service/kubernetes   ClusterIP   172.20.0.1   <none>        443/TCP   7h18m

NAME                     READY   UP-TO-DATE   AVAILABLE   AGE
deployment.apps/myapp1   2/2     2            2           10s

NAME                                DESIRED   CURRENT   READY   AGE
replicaset.apps/myapp1-667d8656cc   2         2         2       10s
Giờ anh em tạo service rồi curl vào port web và kiểm tra nhé
5) AWS EFS Dynamic Provisioning – Automate with Terraform
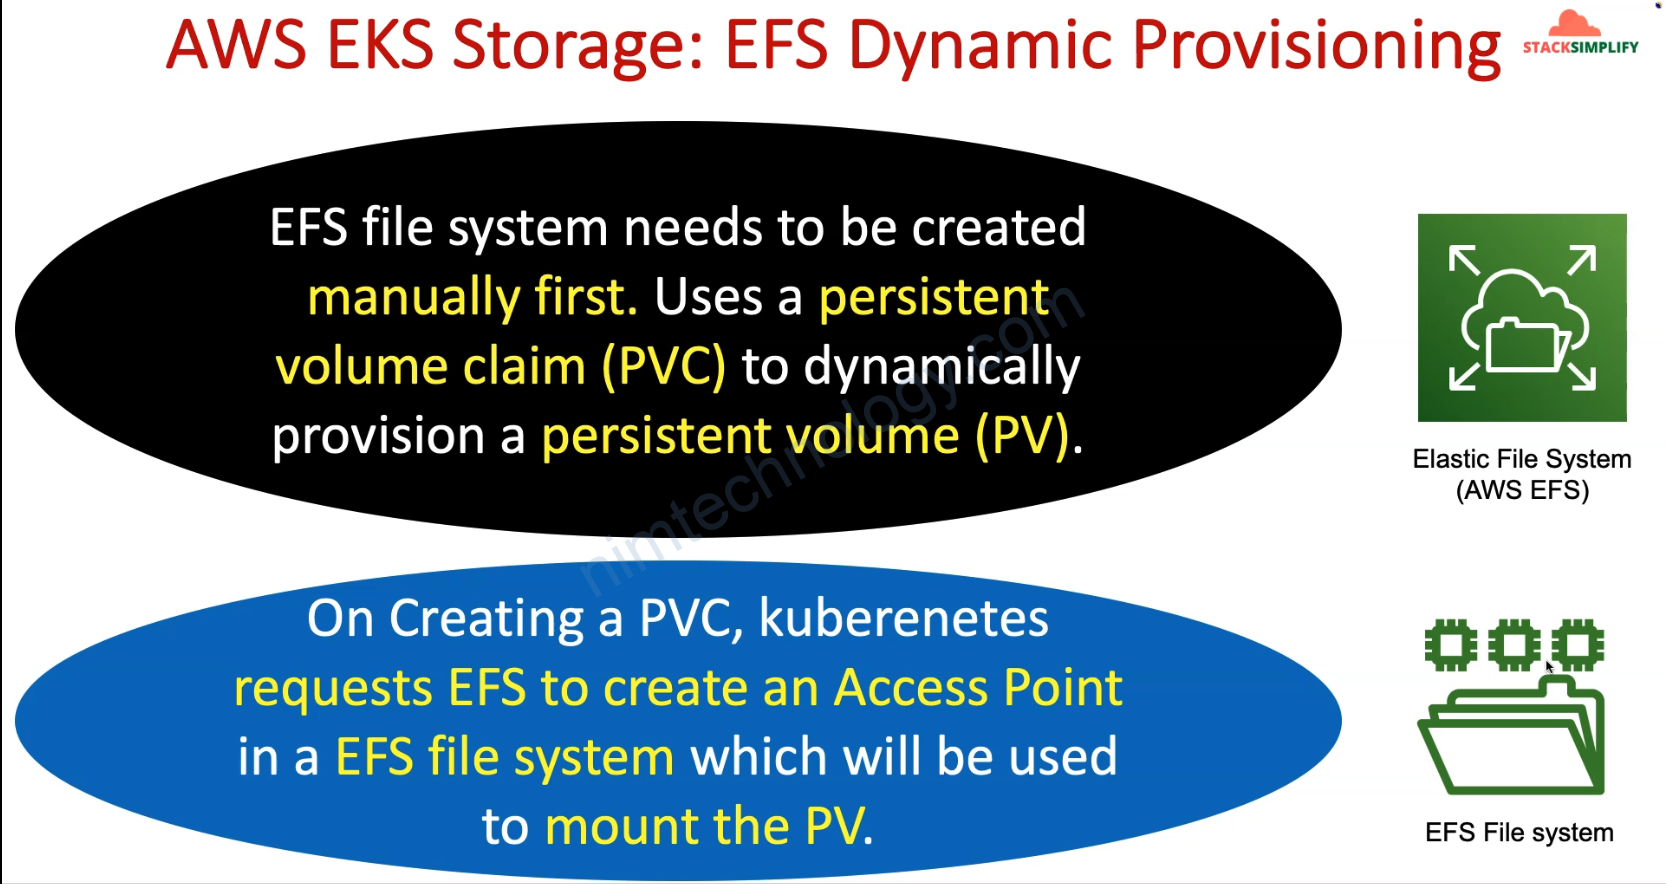
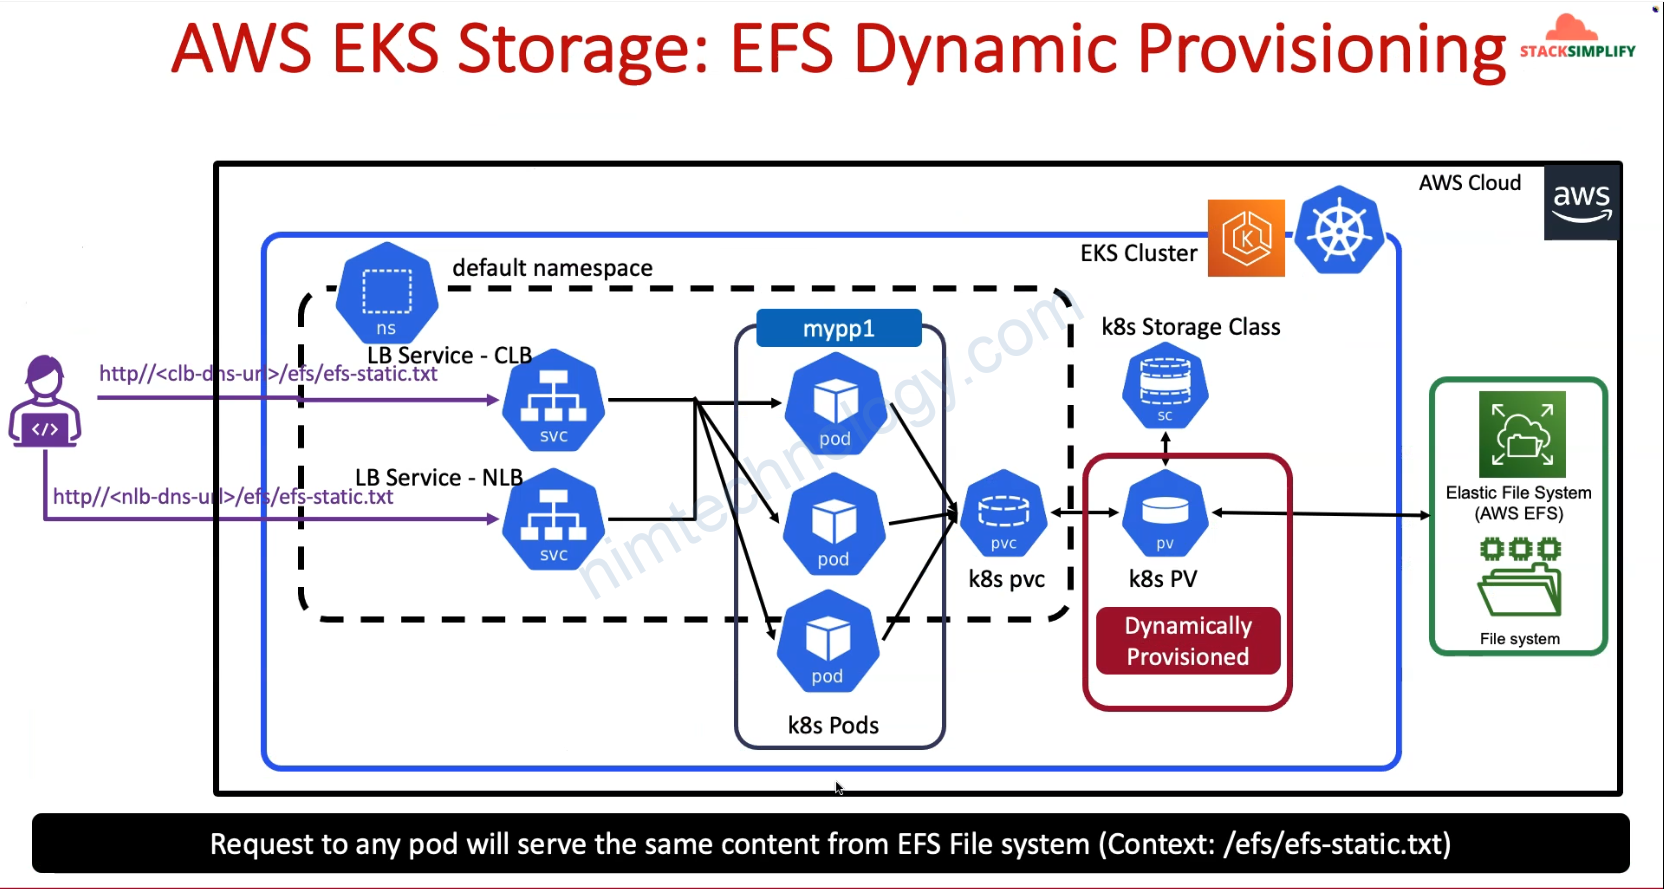
Bạn cũng sẽ thấy giờ chúng ta sẽ không cần apply persistent volume
Chỉ cần bạn tạo PVC linhk đến Storage Class thì k8s auto create PV.
Và ở phần này config của Storage Class cũng sẽ khác hơn 1 chút.
# Resource: Kubernetes Storage Class
resource "kubernetes_storage_class_v1" "efs_sc" {
  metadata {
    name = "efs-sc"
  }
  storage_provisioner = "efs.csi.aws.com"
  parameters = {
    provisioningMode = "efs-ap"
    fileSystemId =  aws_efs_file_system.efs_file_system.id
    directoryPerms = "700"
    gidRangeStart = "1000" # optional
    gidRangeEnd = "2000" # optional
    basePath = "/dynamic_provisioning" # optional
  }
}
Và đầy là phần explain configuration.
https://github.com/kubernetes-sigs/aws-efs-csi-driver/tree/master/examples/kubernetes/dynamic_provisioning
- provisioningMode – The type of volume to be provisioned by efs. Currently, only access point-based provisioning is supported
efs-ap. - fileSystemId – The file system under which Access Point is created.
- directoryPerms – Directory Permissions of the root directory created by Access Point.
- gidRangeStart (Optional) – Starting range of Posix Group ID to be applied onto the root directory of the access point. The default value is 50000.
- gidRangeEnd (Optional) – Ending range of Posix Group ID. The default value is 7000000.
- basePath (Optional) – Path on the file system under which access point root directory is created. If path is not provided, access points root directory are created under the root of the file system.
6) AWS EFS File System Mount for Fargate Workloads


Vậy Fargate là gì?
https://cloudgeeks.net/lua-chon-fargate-hay-ec2-khi-trien-khai-container-tren-aws/
Can’t Run “chown” for folder or file on EFS:
Use case của mình như sau:
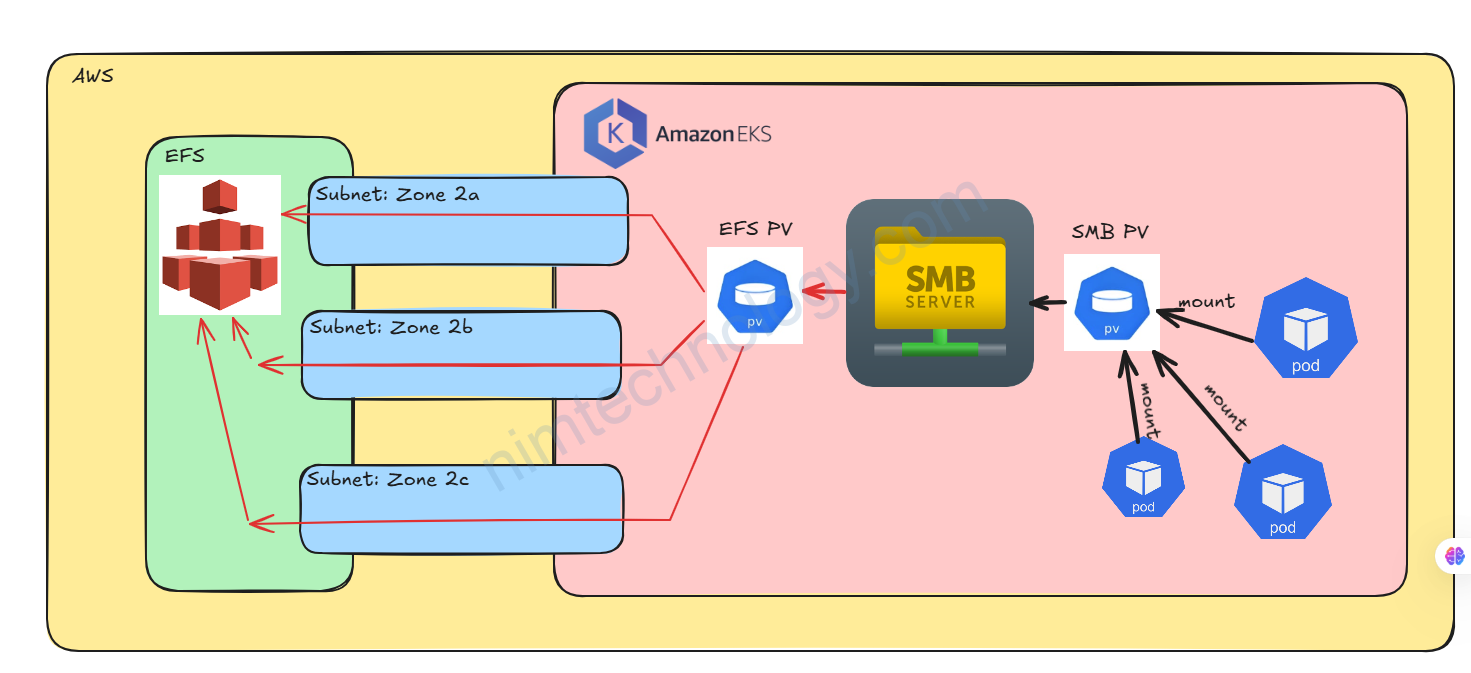
Vì trong K8s của mình có 1 số pods chạy window
Efs thì không support cho windows nên mình sẽ cần dựng thêm SMB để mount vào EFS sau đó nó share tiếp
Ví dụ mình sẽ mount EFS PV vào thư mục /smbshare của Samba Server.
để samba server tiếp tục share folder này đi cho pods
Lúc này Samba sẽ cần run 1 lệnh gần như chown để grant permission trên folder /smbshare
Lúc này hệ thông sẽ báo
chown: changing ownership of `/smbshare': Operation not permittedLúc này bạn cần tìm hiểu là application đó đang muốn phân quyền User nào và Group nào?
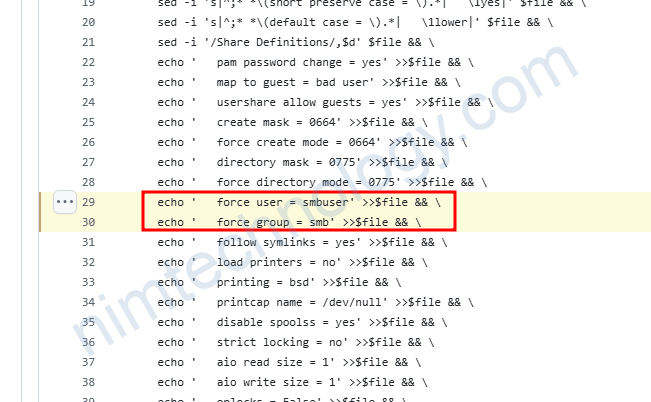
Tiếp theo bạn cần biết uid và gid
smb-server-cffff996d-hwfvs:/# id smbuser
uid=100(smbuser) gid=101(smb) groups=101(smb),101(smb)
sau đó bạn tạo storageclass có cấu hình thêm
allowVolumeExpansion: true
apiVersion: storage.k8s.io/v1
kind: StorageClass
metadata:
  name: efs-sc-nim-staging
parameters:
  basePath: /dynamic_provisioning
  directoryPerms: '777'
  fileSystemId: fs-0ca17XXXXXX5269
  gidRangeEnd: '2000'
  gidRangeStart: '1000'
  provisioningMode: efs-ap
  uid: "100"
  gid: "101"
provisioner: efs.csi.aws.com
reclaimPolicy: Delete
volumeBindingMode: Immediate
refer to:
https://release.com/blog/how-to-solve-aws-efs-operation-not-permitted-errors-in-eks
Summary
bạn có thấy các config terraform hoặc module mình tự viết trong link bên dưới.
https://github.com/mrnim94/terraform-aws/tree/master/efs-csi-install
Đây là module của mình cung cấp
https://registry.terraform.io/modules/mrnim94/eks-efs-csi-driver/aws/latest
https://registry.terraform.io/modules/mrnim94/eks-efs-storageclass/aws/latest