1) Understand FSx Lustre to support EKS.
Amazon FSx for Lustre is designed for high performance and its throughput and IOPS scale with the storage capacity you provision. This means there aren’t fixed maximums like with EFS. Instead, you get more throughput and IOPS as you increase your storage
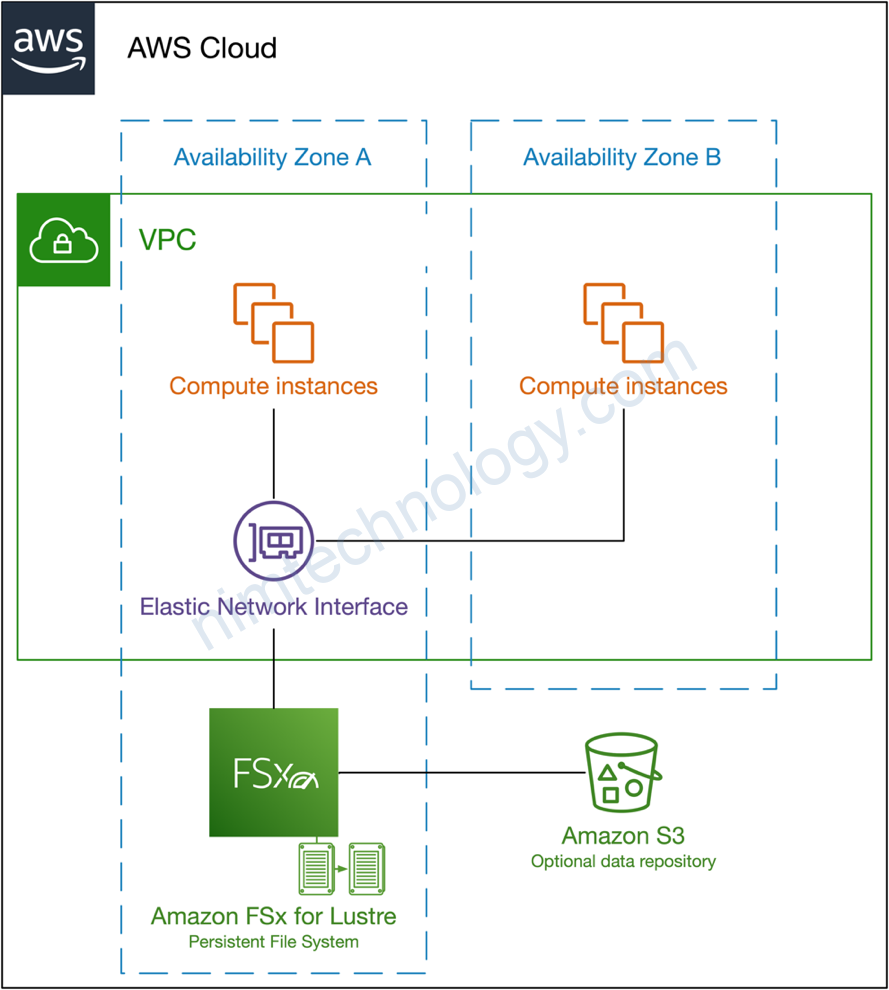
cũng như EFS, FSx Lustre cũng là giải pháp Dynamic Volume Provisioning và Hỗ trợ ReadWriteMany trên EKS.
Bạn cần có sẵn 1 subnet để thực hiện provide cho FSx Lustre.
Tiếp theo bạn cần tạo security Group cho FSx Lustre.
Bạn sẽ cần than khảo ở trang này:
https://docs.aws.amazon.com/fsx/latest/LustreGuide/limit-access-security-groups.html
2) Provision Dynamic Fsx Lustre Volume.
2.1) Install FSx Lustre for EKS by Terraform.
data "aws_vpc" "example" {
  id = var.vpc_id  # replace with your VPC ID
}

resource "aws_security_group" "fsx_sg" {
  count = var.fsx_security_group_ids == "" ? 1 : 0

  name        = "${local.name}fsx-lustre-sg"
  description = "Security group for FSx Lustre file system"
  vpc_id      = var.vpc_id  # Ensure the correct VPC ID is passed
}

# Ingress Rules - Allow FSx Lustre traffic (port 988 and 1018-1023)
resource "aws_security_group_rule" "fsx_ingress" {
  count = var.fsx_security_group_ids == "" ? 1 : 0

  type        = "ingress"
  from_port   = 988
  to_port     = 988
  protocol    = "tcp"
  cidr_blocks = [data.aws_vpc.example.cidr_block]
  security_group_id = aws_security_group.fsx_sg[0].id

  description = "Allow FSx Lustre traffic on port 988"
}

resource "aws_security_group_rule" "fsx_ingress_1018_1023" {
  count = var.fsx_security_group_ids == "" ? 1 : 0

  type        = "ingress"
  from_port   = 1018
  to_port     = 1023
  protocol    = "tcp"
  cidr_blocks = [data.aws_vpc.example.cidr_block]
  security_group_id = aws_security_group.fsx_sg[0].id

  description = "Allow FSx Lustre traffic on ports 1018-1023"
}

# Default Egress Rule - Allow all outbound traffic (recommended for most use cases)
resource "aws_security_group_rule" "fsx_egress" {
  count = var.fsx_security_group_ids == "" ? 1 : 0

  type        = "egress"
  from_port   = 0
  to_port     = 0
  protocol    = "-1"
  cidr_blocks = ["0.0.0.0/0"]
  security_group_id = aws_security_group.fsx_sg[0].id

  description = "Allow all outbound traffic"
}
Tiếp theo thì bạn cần tạo 1 cài IAM Role để cung cấp cho FSx Lustre controller trên EKS.
resource "aws_iam_role" "fsx_csi_driver_role" {
  name = "${local.name}-fsx-lustre-csi-iam-role"

  # Terraform's "jsonencode" function converts a Terraform expression result to valid JSON syntax.
  assume_role_policy = jsonencode({
    Version = "2012-10-17"
    Statement = [
      {
        Action = "sts:AssumeRoleWithWebIdentity"
        Effect = "Allow"
        Sid    = ""
        Principal = {
          Federated = "arn:aws:iam::1111111111111:oidc-provider/oidc.eks.us-west-2.amazonaws.com/id/0AF3F4F3F1111111102737E3"
        }
        Condition = {
          StringEquals = {
            "oidc.eks.us-west-2.amazonaws.com/id/0AF3F4F3F1111111102737E3:sub": "system:serviceaccount:kube-system:fsx-csi-controller-sa"
          }
        }

      },
    ]
  })
}

resource "aws_iam_policy_attachment" "fsx_full_access" {
  name       = "fsx-full-access"
  policy_arn = "arn:aws:iam::aws:policy/AmazonFSxFullAccess"
  roles      = [aws_iam_role.fsx_csi_driver_role.name]
}

output "fsx_lustre_csi_iam_role_arn" {
  description = "EBS CSI IAM Role ARN"
  value = aws_iam_role.fsx_csi_driver_role.arn
}
Bạn sẽ thấy chúng ta cấu hình IRSA để cấp quyền cho deployment có service account là fsx-csi-controller-sa trong namespace kube-system sẽ có quyền là AmazonFSxFullAccess
-> Mục đích là khi bạn tạo 1 PVC thì fsx controller sẽ tạo cho bạn 1 FSx clustre storage và mount nó vào pod cho bạn.
Tiếp đến là bạn thực hiện cái FSx lustre thông qua helm chart:
# Install EBS CSI Driver using HELM
# Resource: Helm Release
resource "helm_release" "fsx_lustre_csi_driver" {
  depends_on = [aws_iam_role.fsx_csi_driver_role]
  name       = "fsx-csi-driver-role"
  repository = "https://kubernetes-sigs.github.io/aws-fsx-csi-driver"
  chart      = "aws-fsx-csi-driver"
  namespace = "kube-system"

  set {
    name  = "controller.serviceAccount.annotations.eks\\.amazonaws\\.com/role-arn"
    value = "${aws_iam_role.fsx_csi_driver_role.arn}"
  }
}
Bạn cần chú ý là bạn cần khai bào role name mà bạn đã tạo ở bước trước đó.
sau khi bài cài đặt thành công bạn sẽ thấy 2 thành phần chính đó là
FSx lustre Controller
Và FSX lustre CSI drive
Bược tiếp theo bạn cần apply storage class
kind: StorageClass
apiVersion: storage.k8s.io/v1
metadata:
  name: fsx-sc
provisioner: fsx.csi.aws.com
parameters:
  subnetId: subnet-0dba56be4dbe20f22
  securityGroupIds: sg-09d12a22b71cb7af5
  deploymentType: PERSISTENT_2
  automaticBackupRetentionDays: "1"
  dailyAutomaticBackupStartTime: "00:00"
  copyTagsToBackups: "true"
  perUnitStorageThroughput: "1000"
  dataCompressionType: "NONE"
  weeklyMaintenanceStartTime: "7:09:00"
  fileSystemTypeVersion: "2.15"
  extraTags: "Service=FSX-Lustre"
mountOptions:
  - flock
Chúng ta cần tìm hiểu 1 số option cần quan trọng trong parameters:
deploymentType: Defines the type of file system deployment. Options include:
PERSISTENT_1orPERSISTENT_2: Persistent storage for longer-term use with data replication.SCRATCH_1orSCRATCH_2: Temporary storage for high-performance, short-term use.
Bạn có thể tham khảo thêm tài liệu ở đây:
https://docs.aws.amazon.com/fsx/latest/LustreGuide/using-fsx-lustre.html
automaticBackupRetentionDays: Specifies the number of days automatic backups should be retained.
Nếu bạn không muốn backup thì để value là 0
copyTagsToBackups: Determines whether the file system’s tags are copied to its backups
– true: Tags are copied.
– false: Tags are not copied
perUnitStorageThroughput: Specifies the throughput in MB/s per TiB of storage. Options are typically 125, 250, 500, 1000 MB/s per TiB.
Điều này có nghĩa là nếu minimum storage sẽ là 1 TiB
nếu bạn muốn tăng tốc độ của storage thì bạn nhất định phải tăng volume size!
dataCompressionType: Specifies the compression type for data stored in the file system. Options:
NONE: No compression.LZ4: Lightweight LZ4 compression.
Tiếp theo bạn cần tạo 1 Persistent Volume Claim:
apiVersion: v1
kind: PersistentVolumeClaim
metadata:
  name: fsx-claim
  namespace: default
spec:
  accessModes:
    - ReadWriteMany  # Or your desired access mode
  resources:
    requests:
      storage: 1000Gi  # The storage size you're requesting
  storageClassName: fsx-sc
Tiếp đến bạn có thể tạo 1 pod để kiểm tra PersistentVolumeClaim được tạo trên k8s có work được với FSx Lustre hay không?
apiVersion: v1
kind: Pod
metadata:
  name: fsx-lustre-write-app
spec:
  containers:
    - name: fsx-lustre-write-app
      image: busybox
      command:
        - "/bin/sh"
      args:
        - "-c"
        - "while true; do echo EFS Kubernetes Static Provisioning Test $(date -u) >> /data/fsx-lustre-static.txt; sleep 5; done"
      volumeMounts:
        - name: persistent-storage
          mountPath: /data
  volumes:
    - name: persistent-storage
      persistentVolumeClaim:
        claimName: fsx-claim
2.2) Install FSx Lustre by Terraform module:
Để đơn giản cho việc deploy FSx Lustre bạn có thể sử dụng terraform module như ví dụ bên dưới:
data "aws_eks_cluster" "eks" {
  name = var.cluster_id
}

data "aws_vpc" "selected" {
  tags = {
    Name = "vpc_name" # Replace with your VPC's tag name
  }
}

data "aws_subnets" "private_networks" {
  filter {
    name   = "vpc-id"
    values = [data.aws_vpc.selected.id]
  }

  filter {
    name   = "tag:Name"
    values = ["staging-nim-engine-private-us-west-2a"]
  }
}

module "eks-fsx-lustre-csi" {
  source  = "aws-terraform-module/eks-fsx-lustre-csi/aws"
  version = "0.0.1"
  aws_region = var.aws_region
  environment = var.environment
  vpc_id = data.aws_vpc.selected.id
  fsx_subnet_id = data.aws_subnets.private_networks.ids[0]
  product_name  = var.product_name
  eks_cluster_certificate_authority_data = data.aws_eks_cluster.eks.certificate_authority[0].data
  eks_cluster_endpoint = data.aws_eks_cluster.eks.endpoint
  eks_cluster_name  = var.cluster_id
  aws_iam_openid_connect_provider_arn = "arn:aws:iam::${element(split(":", "${data.aws_eks_cluster.eks.arn}"), 4)}:oidc-provider/${element(split("//", "${data.aws_eks_cluster.eks.identity[0].oidc[0].issuer}"), 1)}"
}
Predict Cost
To estimate the cost of running an FSx Lustre file system with 1 TiB of storage and 1000 MB/s throughput, you need to consider two key cost components:
- Storage cost
- Throughput cost
1. Storage Cost
Amazon FSx Lustre charges for storage based on the amount of data stored. Pricing for FSx Lustre storage is typically per TiB/month.
- FSx Lustre storage cost (persistent storage): As of the most recent data, Amazon charges approximately $0.13 per GB/month for persistent storage (PERSISTENT_2 deployment type).
- 1 TiB = 1024 GiB = 1024 * 1024 MB
So, for 1 TiB: 1 TiB=1024 GiB=1024×1024 MB=1048576 MB1 \text{ TiB} = 1024 \text{ GiB} = 1024 \times 1024 \text{ MB} = 1048576 \text{ MB}
The storage cost for 1 TiB: Storage cost=1024 GiB×0.13 USD/GB=1024×0.13=133.12 USD/month\text{Storage cost} = 1024 \text{ GiB} \times 0.13 \text{ USD/GB} = 1024 \times 0.13 = 133.12 \text{ USD/month}
2. Throughput Cost
Amazon FSx Lustre also charges for throughput provisioned. In this case, you are requesting 1000 MB/s throughput.
- The cost for throughput capacity is typically around $0.30 per MB/s/day.
Cost for 1000 MB/s throughput:
Throughput cost/day=1000 MB/s×0.30 USD/MB/s/day=300 USD/day\text{Throughput cost/day} = 1000 \text{ MB/s} \times 0.30 \text{ USD/MB/s/day} = 300 \text{ USD/day}
Since there are approximately 30 days in a month: Throughput cost/month=300 USD/day×30=9000 USD/month\text{Throughput cost/month} = 300 \text{ USD/day} \times 30 = 9000 \text{ USD/month}
Total Monthly Cost
Adding up both the storage and throughput costs:
- Storage cost: $133.12 per month
- Throughput cost: $9000 per month
Thus, the total estimated monthly cost would be: Total cost/month=133.12 USD+9000 USD=9133.12 USD/month\text{Total cost/month} = 133.12 \text{ USD} + 9000 \text{ USD} = 9133.12 \text{ USD/month}
Key Notes:
- These are rough estimates based on standard pricing; actual costs can vary depending on factors like region, discounts, or specific pricing agreements with AWS.
- FSx Lustre’s pricing might change over time, so always check the AWS FSx Pricing page for the latest rates.
How do we increase the throughput?
FSx for Lustre offers 1000 MB/s throughput trên 1TiB
Điều này nghĩa là khi bạn muốn tăng throughput của FSx Lustre bạn phải mua thêm storages
dưới đây là monitor khi mình mua 1TiB storage FSx Lustre
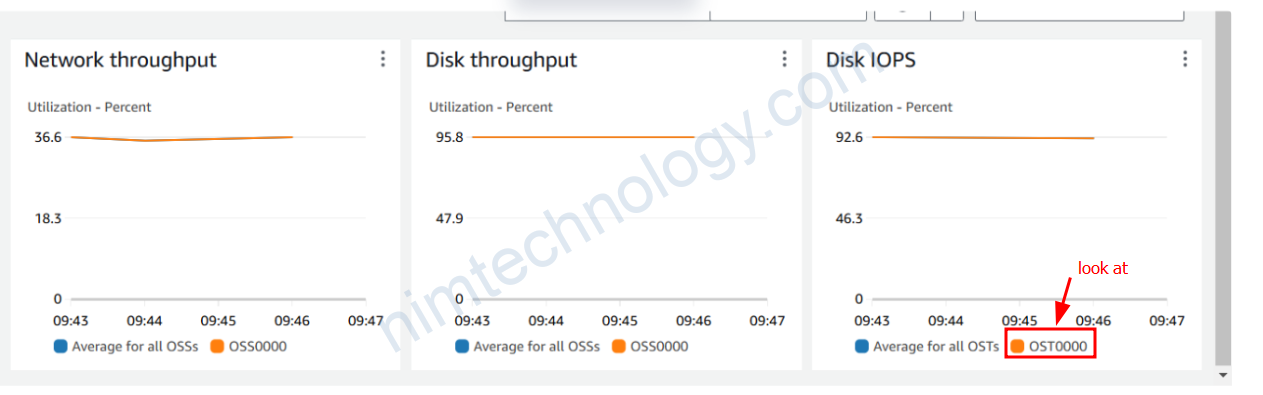
Và đây là sau khi mình mua 2TiB storage FSx Lustre
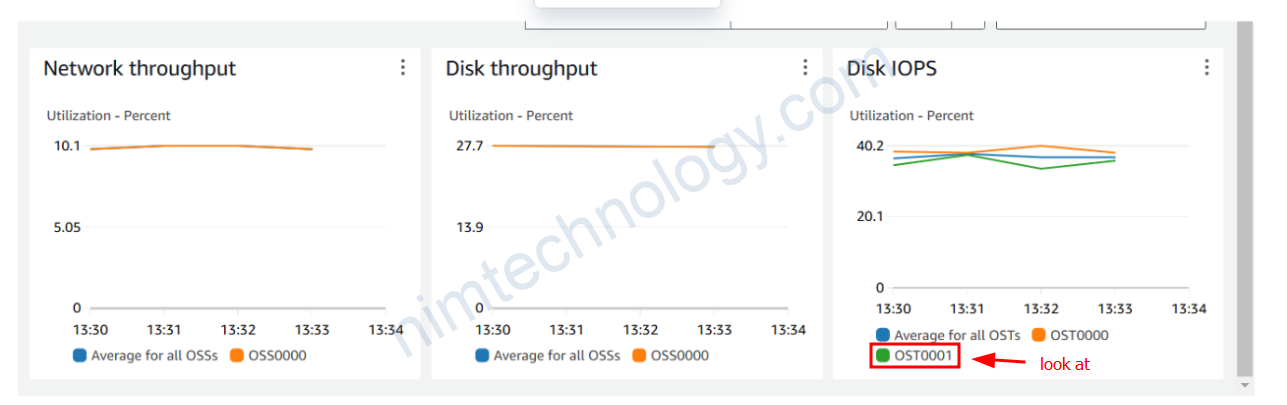
Từ đây chúng ta có thể assume rằng FSx Lustre đã gắn thêm 1 ổ đĩa nữa để tăng performance cho FSx Lustre.