refer to install:
https://github.com/awslabs/mountpoint-s3/blob/main/doc/CONFIGURATION.md
Mountpoint for Amazon S3 is optimized for applications that need high read throughput to large objects, potentially from many clients at once, and to write new objects sequentially from a single client at a time.
==> S3 Mountpoint này sẽ hỗ trợ cho việc ghi file mới và đọc file từ nhiều client cùng 1 lúc
Mountpoint for Amazon S3 does not implement all the features of a POSIX file system, and there are some differences that may affect compatibility with your application.
Chúng ta tìm hiểu 1 chút về POSIX file system.
Các yếu tố cơ bản của hệ thống tệp POSIX:
- Cấu trúc thư mục: POSIX sử dụng một cấu trúc thư mục kiểu cây, bắt đầu từ thư mục gốc
/. Mọi thứ đều được coi là tệp tin, bao gồm các thiết bị phần cứng, thư mục, và các tệp thông thường. - Các loại tệp:
- Regular files: Các tệp thông thường lưu trữ dữ liệu, chẳng hạn như văn bản, hình ảnh, âm thanh.
- Directories: Thư mục lưu trữ thông tin về các tệp và thư mục con.
- Symbolic links: Liên kết tượng trưng giúp tạo ra các tên tệp thay thế cho tệp gốc.
- Special files: Những tệp này đại diện cho thiết bị phần cứng như ổ đĩa, máy in.
- Quyền truy cập tệp: POSIX sử dụng hệ thống quyền truy cập dựa trên ba loại người dùng:
- User (owner): Chủ sở hữu tệp.
- Group: Nhóm người dùng có quyền truy cập chung.
- Others: Những người dùng còn lại.
read (r),write (w), vàexecute (x), và có thể được thiết lập cho từng loại người dùng này. - System calls: POSIX cung cấp nhiều hệ thống gọi (system calls) để xử lý tệp, ví dụ như:
open(): Mở tệp.read(): Đọc dữ liệu từ tệp.write(): Ghi dữ liệu vào tệp.close(): Đóng tệp.mkdir(): Tạo thư mục.unlink(): Xóa tệp.
- File descriptors: Trong hệ thống POSIX, khi một tệp được mở, một “file descriptor” (mã số tệp) được cấp cho tệp đó. File descriptor là một số nguyên được sử dụng để tham chiếu tệp khi thực hiện các thao tác như đọc và ghi.
- Tệp đặc biệt:
- FIFO (First In, First Out): Tệp này là một loại tệp đặc biệt dùng để giao tiếp giữa các tiến trình.
- Sockets: Sockets trong POSIX cho phép các tiến trình giao tiếp qua mạng.
Đây là một số thông số mà chúng tôi đo được giữa s3-mountpoint với S3 và S3 mount point
Compare the Download Speed of s3-express-one-zone and s3 standard.
| S3 type | s3 standard | s3-express-one-zone |
| File Size | 200MB | |
| Number of pods | 200 | |
| Max Speed | 255 MiB/s | 234 MiB/s |
| Min Speed | 24.1 MiB/s | 18.8 MiB/s |
| Cost | 4.84 $ | 74.86 $ |
Chúng tôi test 200 pod thì total banwidth khá khủng:

Bạn có thể tham khảo link này để cài:
https://github.com/awslabs/mountpoint-s3/blob/main/doc/CONFIGURATION.md
Hoặc sửa dụng terraform module sau:
variable "aws_region" {
  description = "The AWS region where the infrastructure will be deployed. This should be the region closest to your users or where you prefer to host your resources. Example: 'us-east-1', 'eu-central-1'."
  type        = string
  default     = "eu-central-1"
}

# Terraform Remote State Datasource - Remote Backend AWS S3
data "terraform_remote_state" "eks" {
  backend = "s3"
  config = {
    bucket = "private-windows-nim-eks-tf-lock"
    key    = "private-windows-eks.tfstate"
    region = "us-east-1"
  }
}


module "eks-s3-mount-point" {
  source  = "aws-terraform-module/eks-s3-mount-point/aws"
  version = "0.0.6"
  aws_region = var.aws_region
  s3-bucket-name = "s3-bucket-nimtechnology"
  eks_cluster_certificate_authority_data = data.terraform_remote_state.eks.outputs.cluster_certificate_authority_data
  eks_cluster_endpoint = data.terraform_remote_state.eks.outputs.cluster_endpoint
  eks_cluster_name = data.terraform_remote_state.eks.outputs.cluster_name
  aws_iam_openid_connect_provider_arn = data.terraform_remote_state.eks.outputs.oidc_provider_arn

}
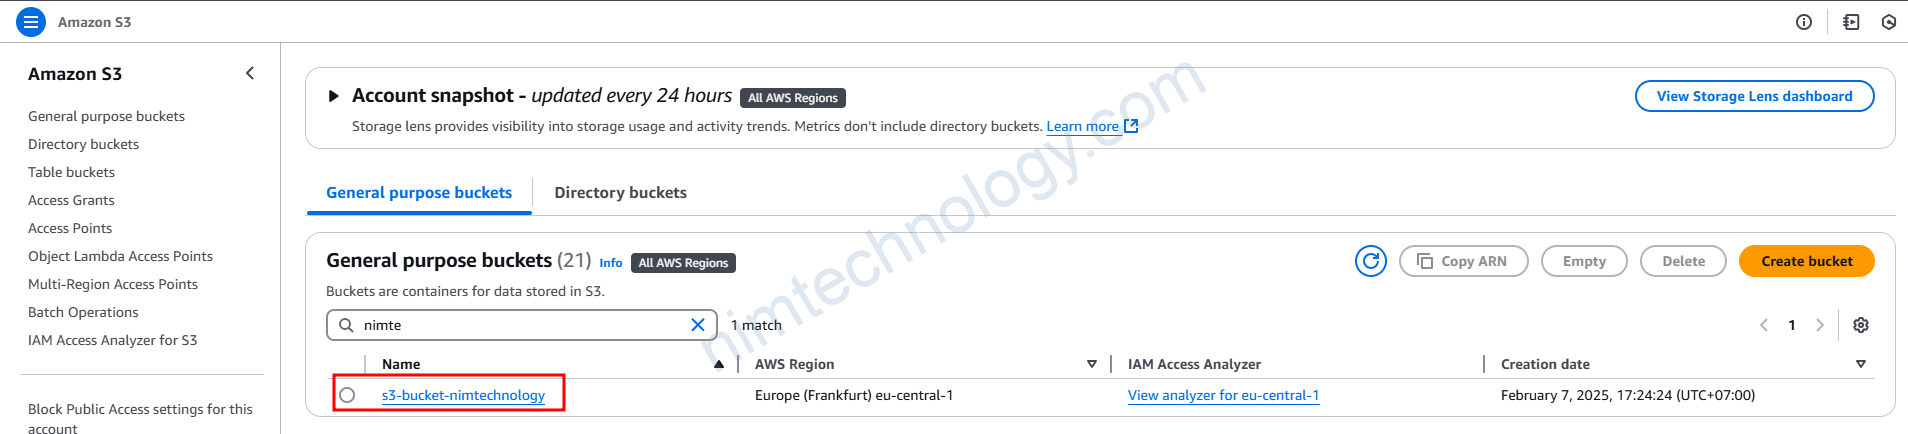
Nó sẽ tạo 1 S3 là s3-bucket-nimtechnology
Đâu tiên Module sẽ tạo role:
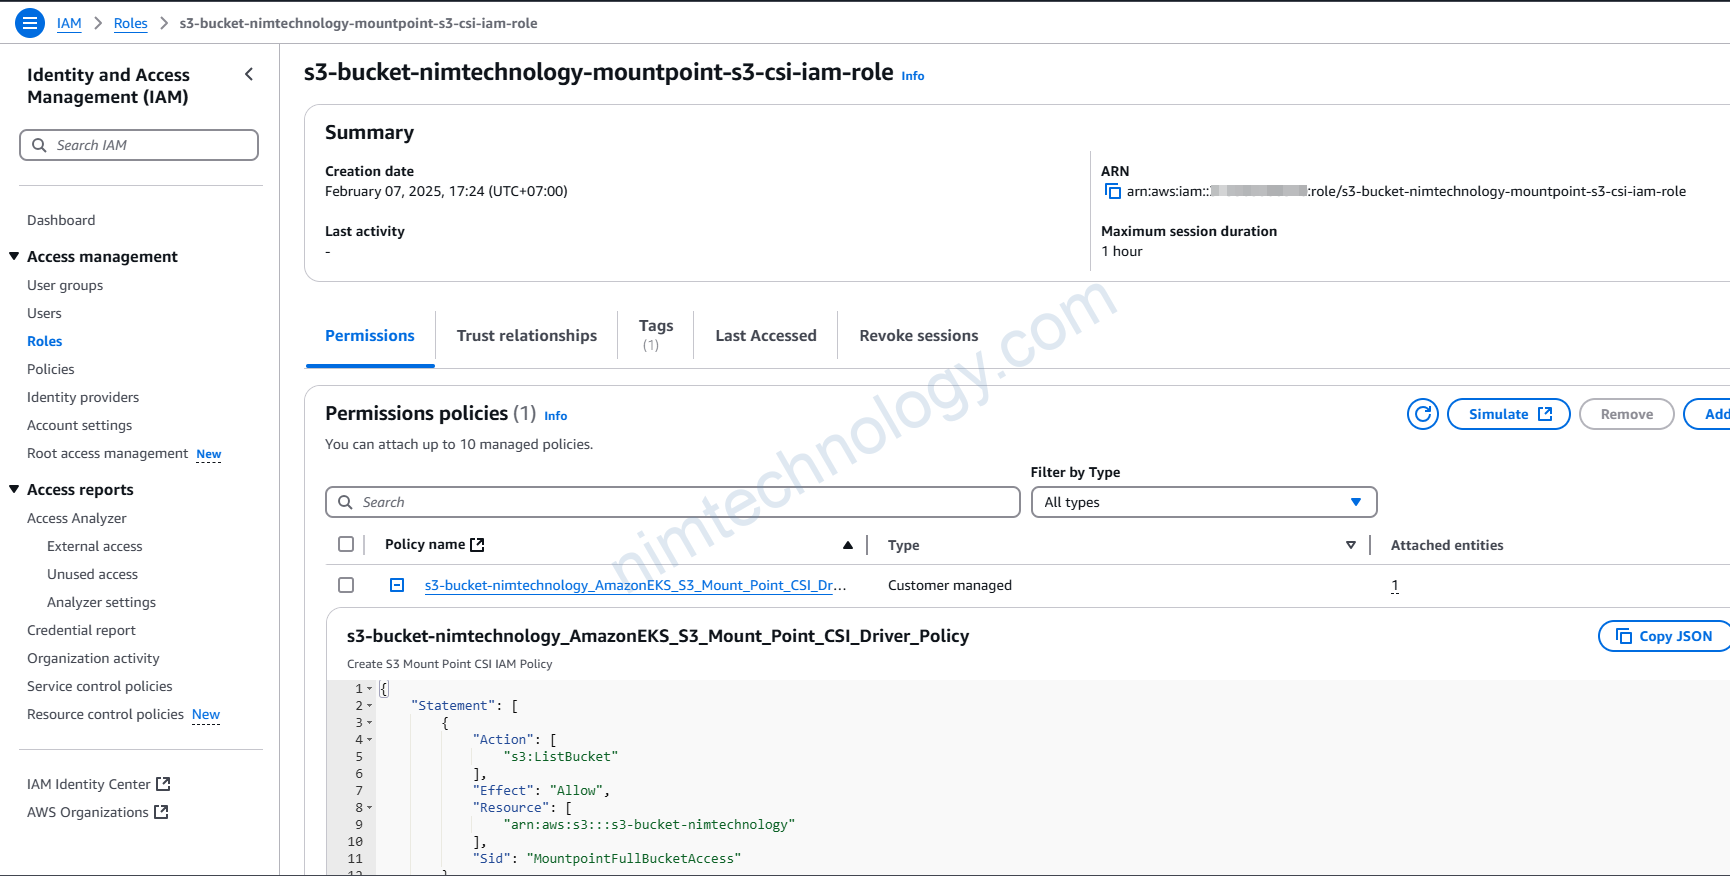
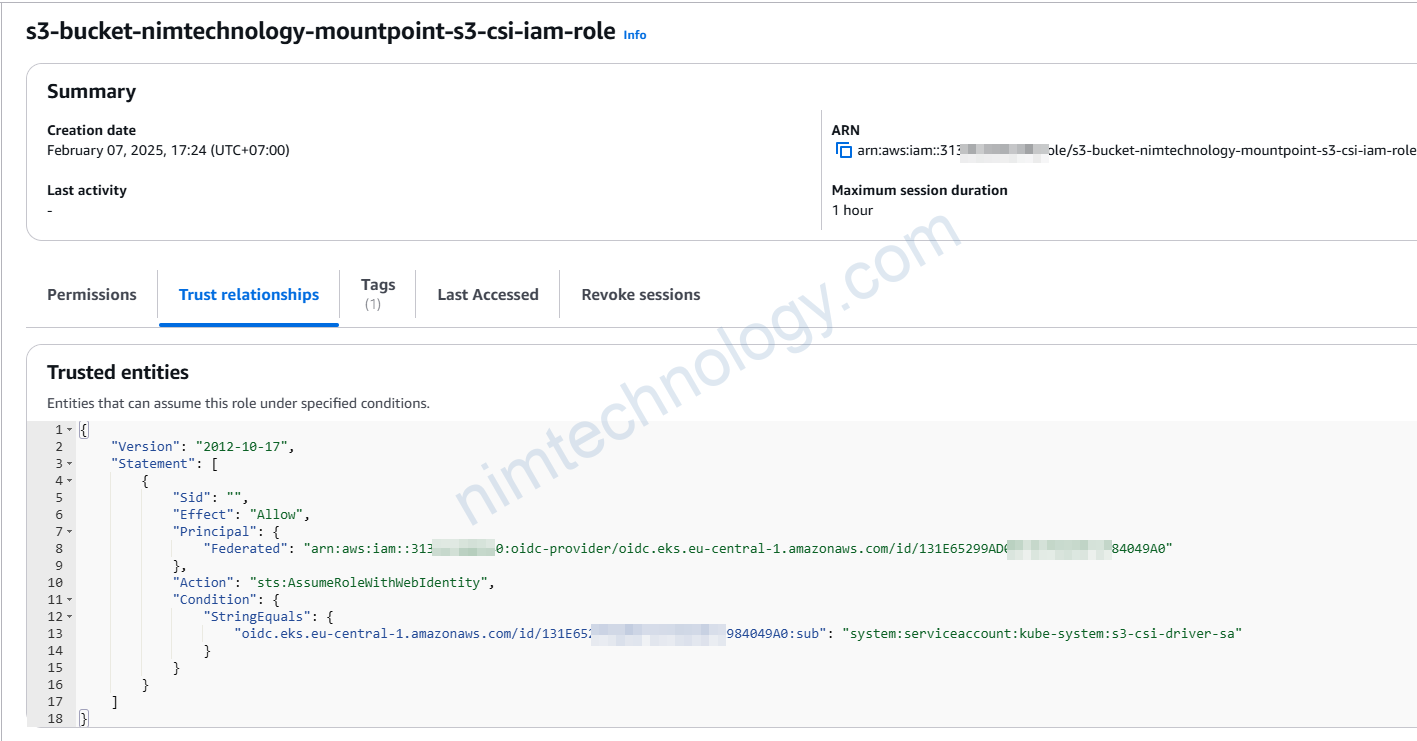
Role này cấp quyền cho s3-csi-driver-sa service account trong namespace kube-system có thể acces vào S3: s3-bucket-nimtechnology
Tiếp đến nó cái s3-csi-node driver:

Tiếp theo bạn cài pv và pvc, pod để kiểm tra
apiVersion: v1
kind: PersistentVolume
metadata:
  name: s3-pv
spec:
  capacity:
    storage: 1200Gi # ignored, required
  accessModes:
    - ReadWriteMany
  storageClassName: "" # Required for static provisioning
  claimRef: # To ensure no other PVCs can claim this PV
    namespace: default # Namespace is required even though it's in "default" namespace.
    name: s3-pvc # Name of your PVC
  mountOptions:
    - allow-delete # If you want to allow file deletion, use the --allow-delete flag at mount time. Delete operations immediately delete the object from S3, even if the file is being read from.
    - region eu-central-1 # The AWS region where the bucket is located.
    - uid=100
    - gid=101
    - dir-mode=0777
    - file-mode=0777
    - allow-other
    - allow-overwrite
  csi:
    driver: s3.csi.aws.com # required
    volumeHandle: s3-bucket-nimtechnology-volume
    volumeAttributes:
      bucketName: s3-bucket-nimtechnology # The name of the S3 bucket.
      #authenticationSource: pod # To configure the Mountpoint CSI Driver to use Pod-Level Credentials, configure your PV using authenticationSource: pod in the volumeAttributes section

---
apiVersion: v1
kind: PersistentVolumeClaim
metadata:
  name: s3-pvc
spec:
  accessModes:
    - ReadWriteMany # Supported options: ReadWriteMany / ReadOnlyMany
  storageClassName: "" # Required for static provisioning
  resources:
    requests:
      storage: 1200Gi # Ignored, required
  volumeName: s3-pv # Name of your PV

---
apiVersion: apps/v1
kind: Deployment
metadata:
  name: s3-app
  labels:
    app: s3-app
spec:
  replicas: 3
  selector:
    matchLabels:
      app: s3-app
  template:
    metadata:
      labels:
        app: s3-app
    spec:
      containers:
      - name: s3-app
        image: centos
        command: ["/bin/sh"]
        args: ["-c", "echo 'Hello from the container!' >> /data/$(date -u).txt; tail -f /dev/null"]
        volumeMounts:
        - name: persistent-storage
          mountPath: /data
        ports:
        - containerPort: 80
      nodeSelector:
        kubernetes.io/os: linux
      volumes:
      - name: persistent-storage
        persistentVolumeClaim:
          claimName: s3-pvc
root@work-space-u20:~/eks/windows-19/irsa-s3-mountpoint# kubectl get pod
NAME                                  READY   STATUS    RESTARTS   AGE
csi-smb-controller-6d9cc98ff4-gdnxs   4/4     Running   0          19h
csi-smb-node-jq94p                    3/3     Running   0          6h18m
csi-smb-node-rrqr7                    3/3     Running   0          6h18m
csi-smb-node-tsmtp                    3/3     Running   0          6h18m
s3-app-68bf58b7d-9hlrx                1/1     Running   0          9s
s3-app-68bf58b7d-j5gc6                1/1     Running   0          9s
s3-app-68bf58b7d-s4qfq                1/1     Running   0          9s
samba-server-7d7696fb6d-rkbhp         1/1     Running   0          19h
root@work-space-u20:~/eks/windows-19/irsa-s3-mountpoint# kubectl exec -it s3-app-68bf58b7d-j5gc6 -- sh
sh-4.4# ls -la
total 32
drwxr-xr-x.   1 root root    29 Feb  7 11:00 .
drwxr-xr-x.   1 root root    29 Feb  7 11:00 ..
lrwxrwxrwx.   1 root root     7 Nov  3  2020 bin -> usr/bin
drwxrwxrwx.   2  100  101     0 Feb  7 10:59 data
drwxr-xr-x.   5 root root   360 Feb  7 11:00 dev
drwxr-xr-x.  55 root root 16384 Sep 15  2021 etc
drwxr-xr-x.   2 root root     6 Nov  3  2020 home
sh-4.4# df -h
Filesystem      Size  Used Avail Use% Mounted on
overlay         100G  4.2G   96G   5% /
tmpfs            64M     0   64M   0% /dev
mountpoint-s3   8.0E     0  8.0E   0% /data
/dev/nvme0n1p1  100G  4.2G   96G   5% /etc/hosts
shm              64M     0   64M   0% /dev/shm
tmpfs            31G   12K   31G   1% /run/secrets/kubernetes.io/serviceaccount
tmpfs            16G     0   16G   0% /proc/acpi
tmpfs            16G     0   16G   0% /sys/firmware
Sau đó mình thực hành kiểm tra folder data đã được mount với S3
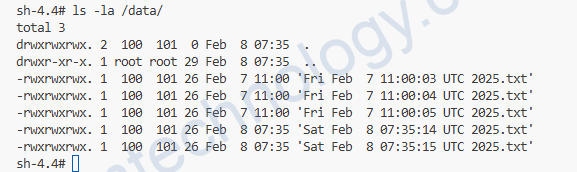
Giờ bạn kiêm tra S3.
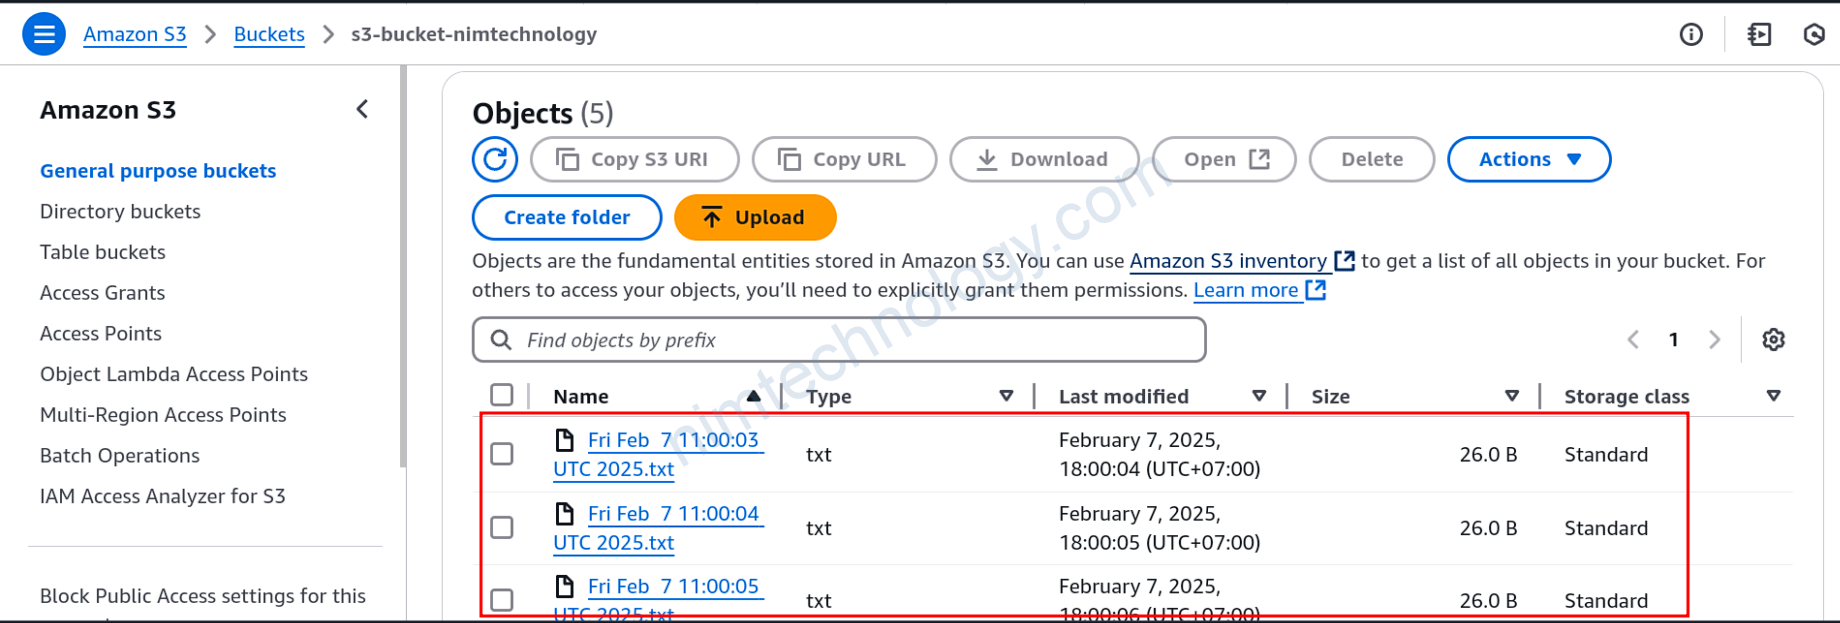
Như thế này là ok rồi he!


