Yah. Tình hình 1 project mình tham gia thì có 1 số deployment họ sử dụng các container windows
Sau nhiều ngày tìm hiểu thì mình thấy là có 2 cách để provisioning cluster k8s windows trên AWS.
1) Using eks-cli to provisioning eks windows.
Cách này thì bạn sẽ rất dễ thấy trên mạng
mình có nhờ 1 bạn tên là: Anh T. Bui (Site Reliability Engineer Intern) – Bạn làm cho 1 công ty Cyber Security của Mỹ
https://github.com/mrnim94/terraform-aws/tree/master/eks/EKS-CLI
2) Using terraform to provisioning eks windows.
Bạn có thể thao khao 2 link bên dưới nhé
https://aws.amazon.com/vi/blogs/containers/running-windows-workloads-on-a-private-eks-cluster/
https://github.com/aws-samples/private-eks-for-windows-workloads-with-terraform.git
Bước đầu clone code của họ xuống:
git clone https://github.com/aws-samples/private-eks-for-windows-workloads-with-terraform.gitnếu được bạn nên đọc qua readme của ảnh đó trước nhé!
Tiếp theo bạn tạo S3 và dynamoDB “private-windows-eks-tf-lock” để cho việc sử dụng remote state
Bạn change các chỗ có S3 là DOC-EXAMPLE-BUCKET sang thành s3 của bạn|
Bên dưới là lênh tìm chứ trên
grep -rH "DOC-EXAMPLE-BUCKET" .
change DOC-EXAMPLE-BUCKET -> <your_s3>
Bạn đổi thành region của bạn
grep -rH "eu-central-1" .
change "eu-central-1" ---> <your-region>
2.1) Create VPC and Bastion Host
Việc đầu tiền là bạn sẽ cần tạo VPC.
Bược này anh tấy sẽ tạo thêm còn VM ubuntu để anh em có thê kết nối vào k8s thông qua private enpoint controller.
Bạn nhờ đẩy lên aws 1 cài key-pair nhé vì bước bên dưới chúng ta sẽ cần nó.
cd network
terraform init
terraform apply -var-file main-input.tfvars

Acquiring state lock. This may take a few moments...
var.node_host_key_name
  Please enter the name of the SSH key pair that should be assigned to the worker nodes of the cluster

  Enter a value: eks-terraform-key

var.ssh_bastion_cidr
  Please enter a list of CIDR range(s) that are allowed to access the Bastion Host - Usually these are your corporate CIDR ranges - You can also restrict access to only your IP address by using /32 as prefix e.g. ["192.168.10.10/32"] - ["0.0.0.0/0"] allows access from all IPv4 adresses but is not recommended

  Enter a value: ["0.0.0.0/0"]

Do you want to perform these actions?
  Terraform will perform the actions described above.
  Only 'yes' will be accepted to approve.

  Enter a value: yes

terraform apply -var-file main-input.tfvars -auto-approve


aws eks --region <region_name> update-kubeconfig --name <eks_cluster_name>
aws eks --region us-east-1 update-kubeconfig --name sample-cluster-01
2.1.1) Dive deep into the VPC configurations
Ở chúng ta sẽ tạo public subnet và private subnet.
module "private_vpc" {
  source               = "terraform-aws-modules/vpc/aws"
  name                 = "sample-repo-vpc-private"
  cidr                 = var.vpc_private_cidr
  azs                  = var.azs_private
  private_subnets      = var.private_subnets
  public_subnets       = var.private_public_subnets
  enable_dns_hostnames = true
  create_igw           = true
  enable_nat_gateway   = true
  enable_vpn_gateway   = false
}
module "public_vpc" {
  source                 = "terraform-aws-modules/vpc/aws"
  name                   = "sample-repo-vpc-public"
  cidr                   = var.vpc_public_cidr
  create_egress_only_igw = false
  create_igw             = true
  azs                    = var.azs_public
  public_subnets         = var.public_subnets
  enable_dns_hostnames   = true
  enable_nat_gateway     = false
  enable_vpn_gateway     = false
}
Sau đó chúng ta apply là 1 số security group cho vpc
resource "aws_security_group" "allow_ssh" {
  name        = "allow_ssh"
  description = "Allow SSH inbound traffic"
  vpc_id      = module.public_vpc.vpc_id

  ingress {
    description     = "SSH from VPC"
    from_port       = 22
    to_port         = 22
    protocol        = "tcp"
    cidr_blocks     = var.ssh_bastion_cidr
  }

  egress {
    description = "Allow egress"
    from_port   = 0
    to_port     = 0
    protocol    = "-1"
    cidr_blocks = ["0.0.0.0/0"]
  }
}
2.2) Create Windows and Linux eks cluster
Nếu bạn đang lab thì để giảm bớt độ phức tạp thì bạn chỉnh chỗ này để enpoint controller nó public luôn đỡ phải access vào bastion host
cd ..
sudo apt install jq -y
terraform init
terraform apply -var-file main-input.tfvars -auto-approve

Acquiring state lock. This may take a few moments...
var.node_host_key_name
  Please enter the name of the SSH key pair that should be assigned to the worker nodes of the cluster
  Enter a value: eks-terraform-key

terraform destroy -auto-approve -var-file main-input.tfvars
aws eks --region <region_name> update-kubeconfig --name <eks_cluster_name>
aws eks --region us-east-1 update-kubeconfig --name sample-cluster-01
sau đó get node và cảm nhận

3) Issues
3.1) Failed to pull image
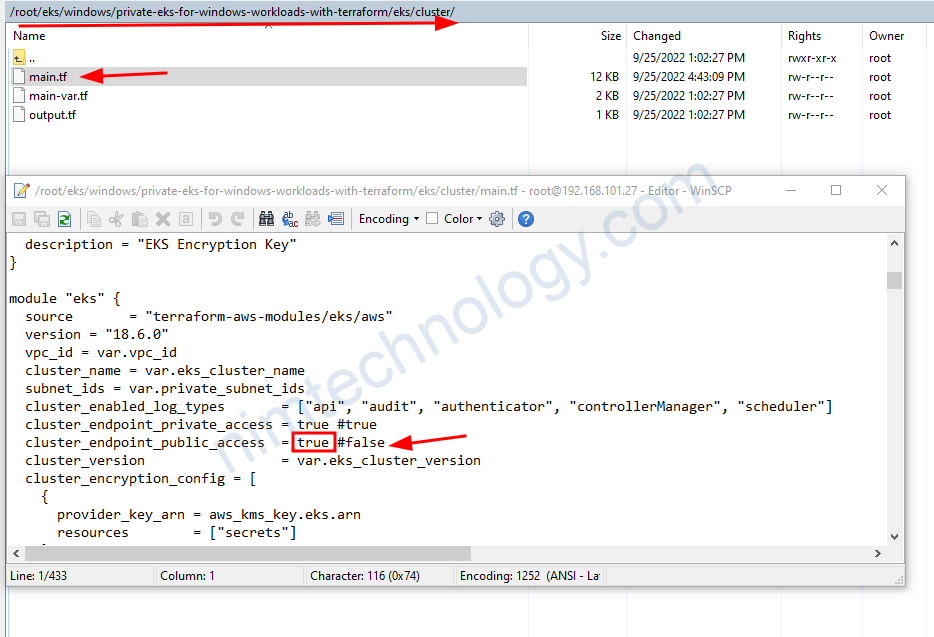
failed to pull image "": rpc error: code = unknown desc = error response from daemon: get "https://registry-1.docker.io/v2/": dial tcp 34.205.13.154:443: i/o timeoutBạn chỉnh 2 thanh niên dưới thành true
https://github.com/aws-samples/private-eks-for-windows-workloads-with-terraform/blob/main/network/main.tf#L28-L29
module "private_vpc" {
  source               = "terraform-aws-modules/vpc/aws"
  name                 = "sample-repo-vpc-private"
  cidr                 = var.vpc_private_cidr
  azs                  = var.azs_private
  private_subnets      = var.private_subnets
  enable_dns_hostnames = true
  create_igw           = true #change it
  enable_nat_gateway   = true #change it
  enable_vpn_gateway   = false
}
4) Upgrade EKS – Self-managed
4.1) Investigate EKS – Self-managed
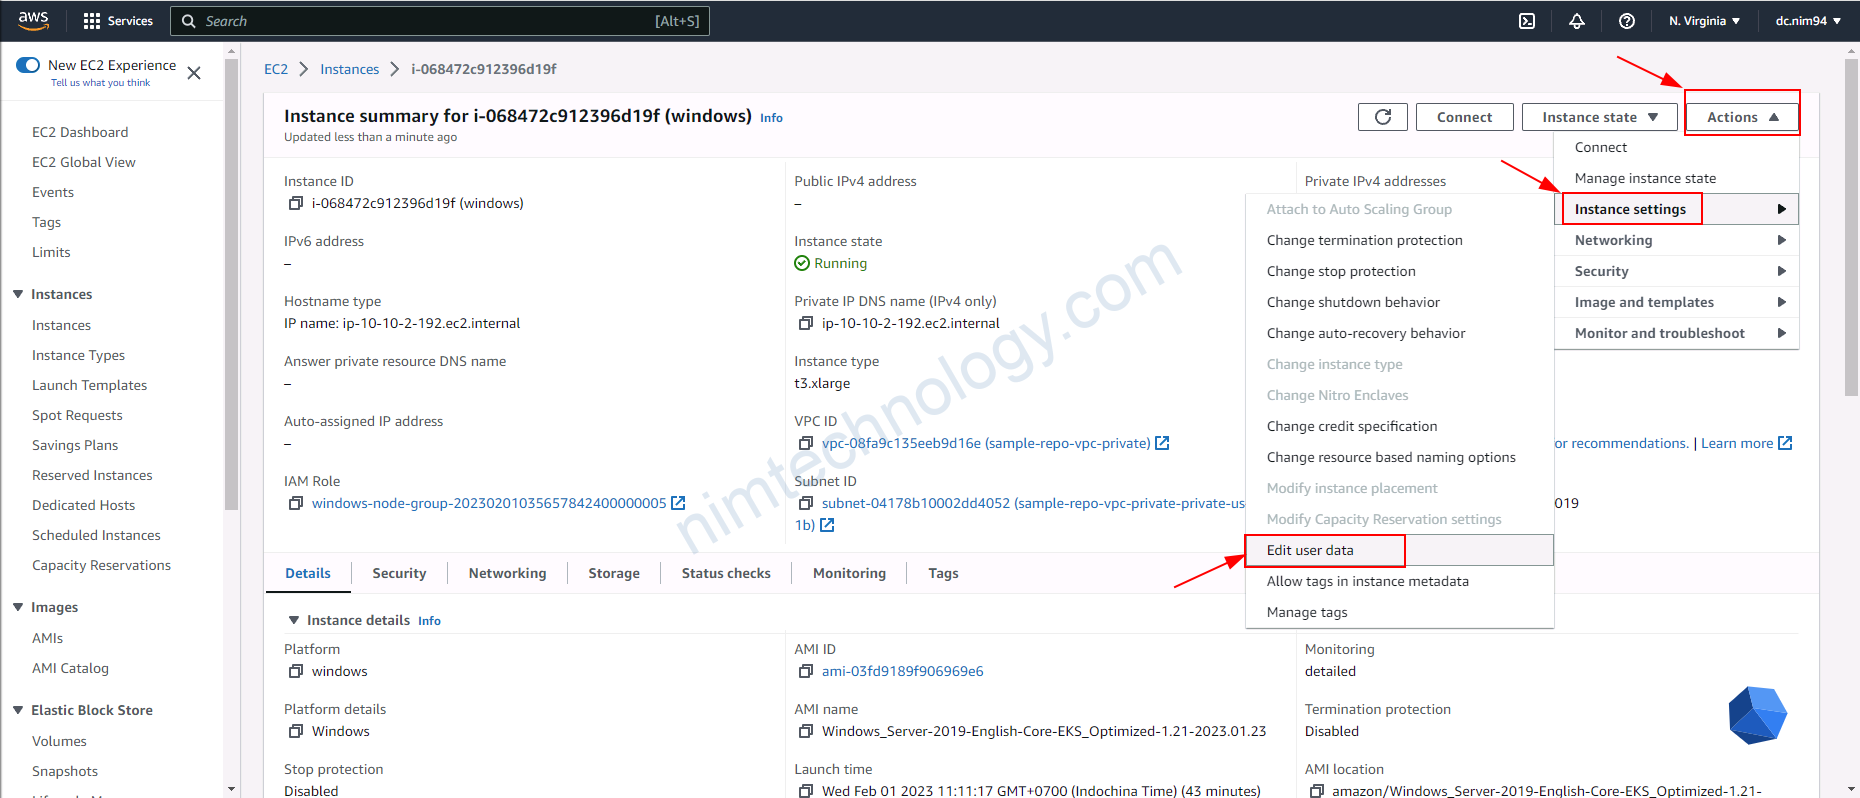
Với cách trên thì bạn sẽ thấy là eks tạo 1 controller.
Sau đó nó tạo 1 con EC2 và add user-data để con k8s worker có thể kết nối đến controller
Giờ chúng ta khám phá instance windows
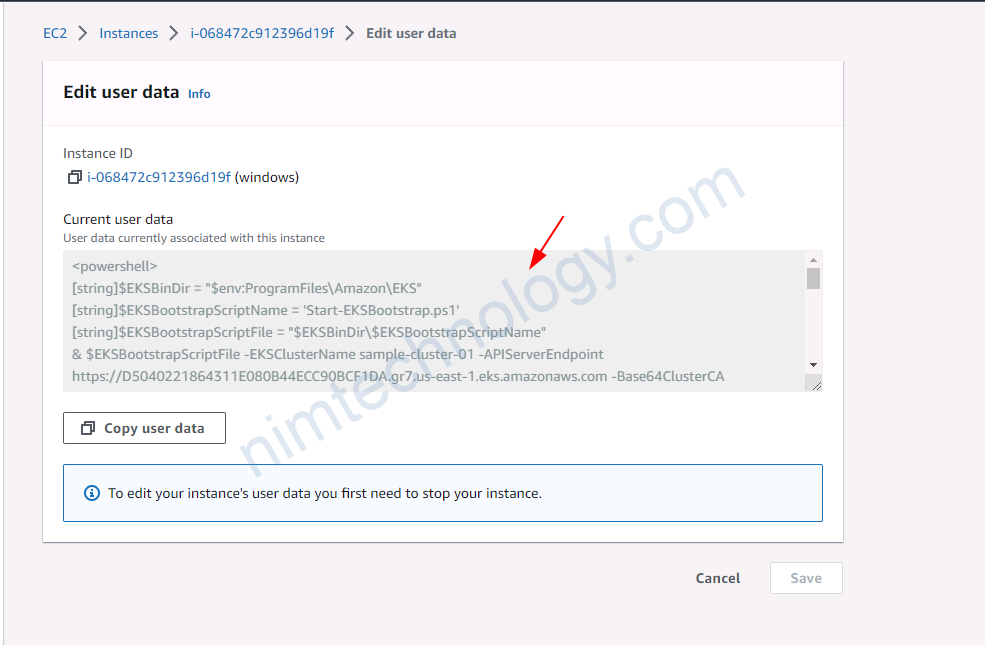
<powershell>
[string]$EKSBinDir = "$env:ProgramFiles\Amazon\EKS"
[string]$EKSBootstrapScriptName = 'Start-EKSBootstrap.ps1'
[string]$EKSBootstrapScriptFile = "$EKSBinDir\$EKSBootstrapScriptName"
& $EKSBootstrapScriptFile -EKSClusterName sample-cluster-01 -APIServerEndpoint https://D5040221864311E080B44ECC90BCF1DA.gr7.us-east-1.eks.amazonaws.com -Base64ClusterCA LS0tLS1CRUdJTiBDRVJUSUZJQ0FURS0tLS0tCk1JSUM1ekNDQWMrZ0F3SUJBZ0lCQURBTkJna3Foa2lHOXcwQkFRc0ZBREFWTVJNd0VRWURWUVFERXdwcmRXSmwKY201bGRHVnpNQjRYRFRJek1ESXdNVEEwTURVeE5Gb1hEVE16TURFeU9UQTBNRFV4TkZvd0ZURVRNQkVHQTFVRQpBeE1LYTNWaVpYSnVaWFJsY3pDQ0FTSXdEUVlKS29aSWh2Y05BUUVCQlFBRGdnRVBBRENDQVFvQ2dnRUJBTWQ4CnFqb0xkODRCQXhpdENoY0UwYlpZWGhZZUwrbklsQ1NHSTJ1S3NTemVYQjdydE85aDhLeUNxeTA1K3JWblFxYXkKajUvc21pSmpzZHRNdmsxb2IwNThOZ0V0bUlnRHkzMHlLVUtERjRaWHRLR0YwVUJJSGNFN1luWWxOWEZUSXlGMApwbU5IdExoMmNrYUloWkZmNmxBTHFmSzdvdUU2am9JbFZBUXB0M1VsSmhDYTZma2xvR1lLSmphS3h6NGdCSjdOCmhrZk5ieDBTMUxEUjhTenl5cjJobmhOS3NrbldlblVNWjZIaWhYajdnV1BCaXM3YWRNV1RacGQxUkpPV2liQzYKaGpLbUpXWStTK0NpU05NUFhDdTBOdG9UaUhTY3pYcHBWcnxxxxNIMxxxxQxSVhLam11TkRTN0ltNApTVHJvVVlvU2pWcldETFRBWDVFQ0F3RUFBYU5DTUVBd0RnWURWUjBQQVFIL0JBUURBZ0trTUE4R0ExVWRFd0VCCi93UUZNQU1CQWY4d0hRWURWUjBPQkJZRUZQNTMybE5SYXVxT1VLcnpNZFdJOFR6cWp4MExNQTBHQ1NxR1NJYjMKRFFFQkN3VUFBNElCQVFBUW5LaFlueVZoK3VxNGNOc1Z4Y2ZJVytNMVJFV2pWZjJDVFJvSHp0V2w0M0l0SGZLLwpWMkQvNExlZU0ybjlkcURTdzg2N0dtS2xxZThjalJSUk4vNHZXeXoxdUJGSGt2UUQxUEd4VnQ1ZnU2TFJsa24wCld6dlNkdTBXdFNsZ05VYzhlaUIzUFBoVkVCdjMydkpMUGEybzQ5UHNtNlpSSjA5dE5aUUlYNDJkb2g5dERWak8KOHJhRktUWTZqYVhmU2hva09teXIweHpMMmhTZXJ5bmV2OVpEWHIvTG4xWVE5Z3lXRWNicG4zWHV2eDY2L0k5ZQo5aC93UFZHTlZEZkhVYXVNdWp2QTVrSC9sRE1Ua1g0UjUyaHo1OUxKMGVMMStlT1VkZEgzQW0yWTZuY29SVis3CktPV20vZHNWdG01WkdMQkMvRnV5SEI1Um1kUk01MWNhalFJMgotLS0tLUVORCBDRVJUSUZJQ0FURS0tLS0tCg==  3>&1 4>&1 5>&1 6>&1
$LastError = if ($?) { 0 } else { $Error[0].Exception.HResult }
</powershell>
Còn User Data của linux
#!/bin/bash
set -e
B64_CLUSTER_CA=LS0tLS1CRUdJTiBDRVJUSUZJQ0FURS0tLS0tCk1JSUM1ekNDQWMrZ0F3SUJBZ0lCQURBTkJna3Foa2lHOXcwQkFRc0ZBREFWTVJNd0VRWURWUVFERXdwcmRXSmwKY201bGRHVnpNQjRYRFRJek1ESXdNVEEwTURVeE5Gb1hEVE16TURFeU9UQTBNRFV4TkZvd0ZURVRNQkVHQTFVRQpBeE1LYTNWaVpYSnVaWFJsY3pDQ0FTSXdEUVlKS29aSWh2Y05BUUVCQlFBRGdnRVBBRENDQVFvQ2dnRUJBTWQ4CnFqb0xkODRCQXhpdENoY0UwYlpZWGhZZUwrbklsQ1NHSTJ1S3NTemVYQjdydE85aDhLeUNxeTA1K3JWblFxYXkKajUvc21pSmpzZHRNdmsxb2IwNThOZ0V0bUlnRHkzMHlLVUtERjRaWHRLR0YwVUJJSGNFN1xxxNIMxxxpwbU5IdExoMmNrYUloWkZmNmxBTHFmSzdvdUU2am9JbFZBUXB0M1VsSmhDYTZma2xvR1lLSmphS3h6NGdCSjdOCmhrZk5ieDBTMUxEUjhTenl5cjJobmhOS3NrbldlblVNWjZIaWhYajdnV1BCaXM3YWRNV1RacGQxUkpPV2liQzYKaGpLbUpXWStTK0NpU05NUFhDdTBOdG9UaUhTY3pYcHBWcnN1ZUt0cVpGbjVjVWdSQTQxSVhLam11TkRTN0ltNApTVHJvVVlvU2pWcldETFRBWDVFQ0F3RUFBYU5DTUVBd0RnWURWUjBQQVFIL0JBUURBZ0trTUE4R0ExVWRFd0VCCi93UUZNQU1CQWY4d0hRWURWUjBPQkJZRUZQNTMybE5SYXVxT1VLcnpNZFdJOFR6cWp4MExNQTBHQ1NxR1NJYjMKRFFFQkN3VUFBNElCQVFBUW5LaFlueVZoK3VxNGNOc1Z4Y2ZJVytNMVJFV2pWZjJDVFJvSHp0V2w0M0l0SGZLLwpWMkQvNExlZU0ybjlkcURTdzg2N0dtS2xxZThjalJSUk4vNHZXeXoxdUJGSGt2UUQxUEd4VnQ1ZnU2TFJsa24wCld6dlNkdTBXdFNsZ05VYzhlaUIzUFBoVkVCdjMydkpMUGEybzQ5UHNtNlpSSjA5dE5aUUlYNDJkb2g5dERWak8KOHJhRktUWTZqYVhmU2hva09teXIweHpMMmhTZXJ5bmV2OVpEWHIvTG4xWVE5Z3lXRWNicG4zWHV2eDY2L0k5ZQo5aC93UFZHTlZEZkhVYXVNdWp2QTVrSC9sRE1Ua1g0UjUyaHo1OUxKMGVMMStlT1VkZEgzQW0yWTZuY29SVis3CktPV20vZHNWdG01WkdMQkMvRnV5SEI1Um1kUk01MWNhalFJMgotLS0tLUVORCBDRVJUSUZJQ0FURS0tLS0tCg==
API_SERVER_URL=https://D5040221864311E080B44ECC90BCF1DA.gr7.us-east-1.eks.amazonaws.com
/etc/eks/bootstrap.sh sample-cluster-01  --b64-cluster-ca $B64_CLUSTER_CA --apiserver-endpoint $API_SERVER_URL
4.2) upgrade version for eks controller
Để upgrade eks controller thì bạn có thể sử dụng eksclt
eksctl upgrade cluster --name devops-catalog \
--region us-east-2  \
--version 1.22 \
--approve
4.3) upgrade version for eks node group
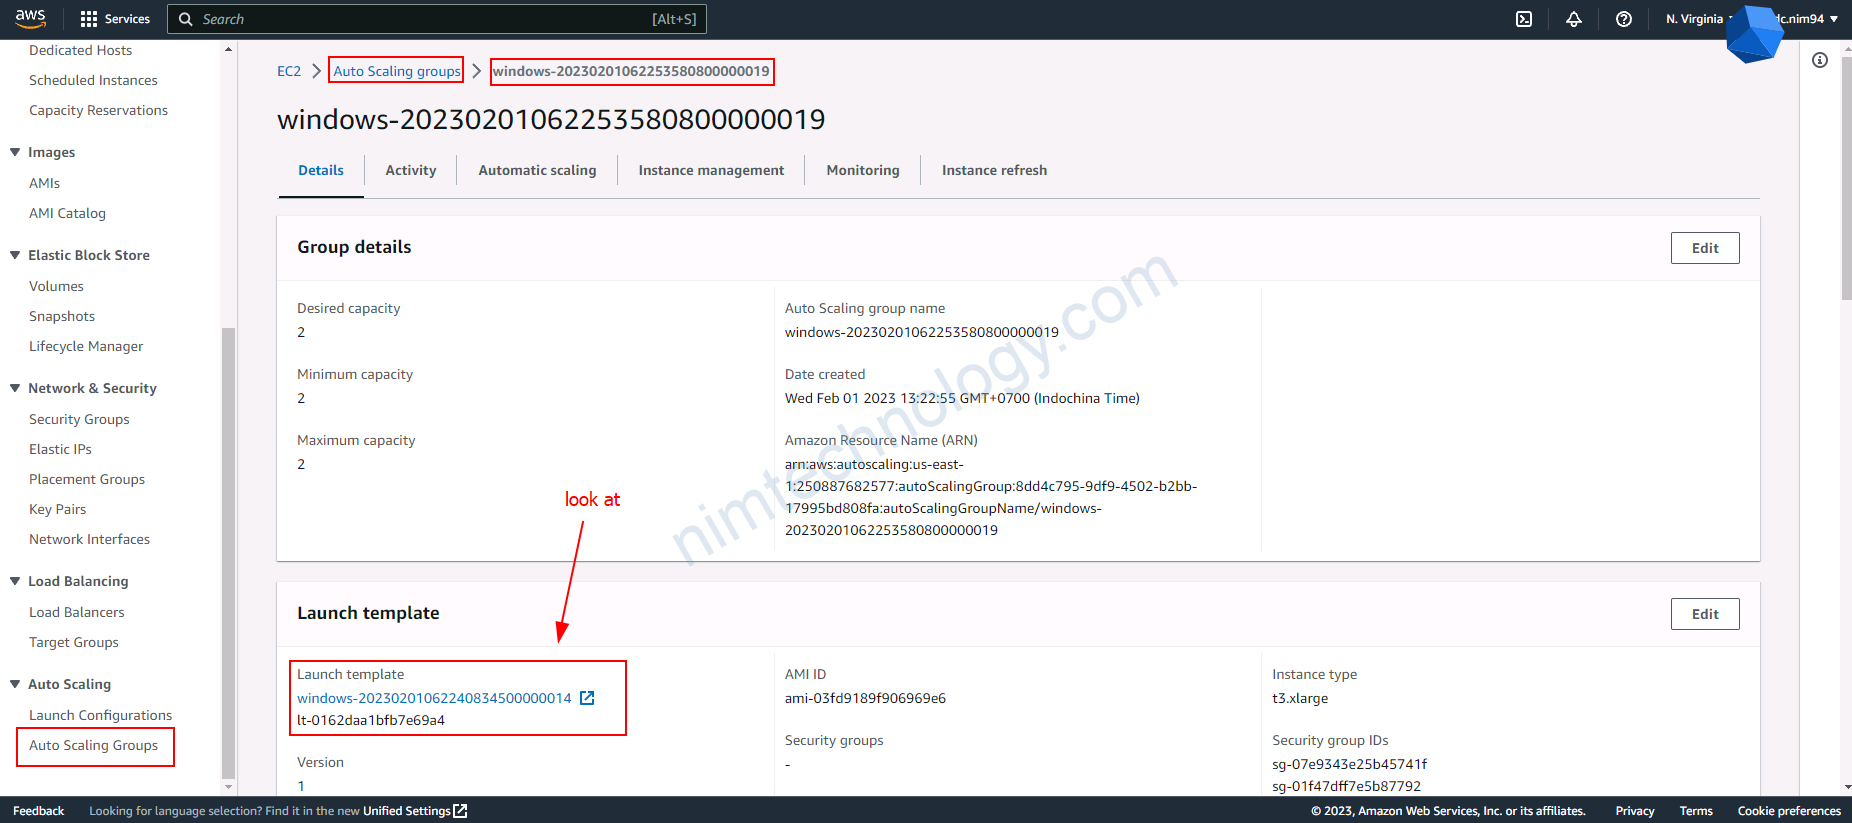
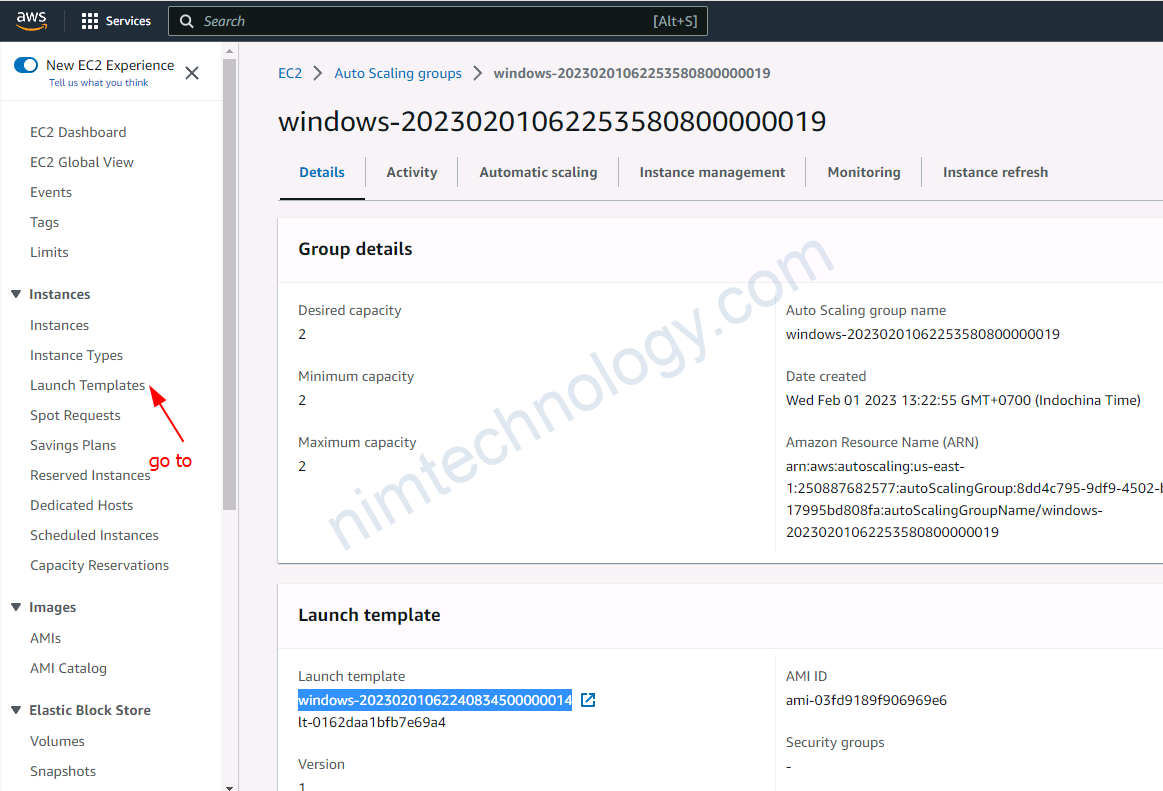
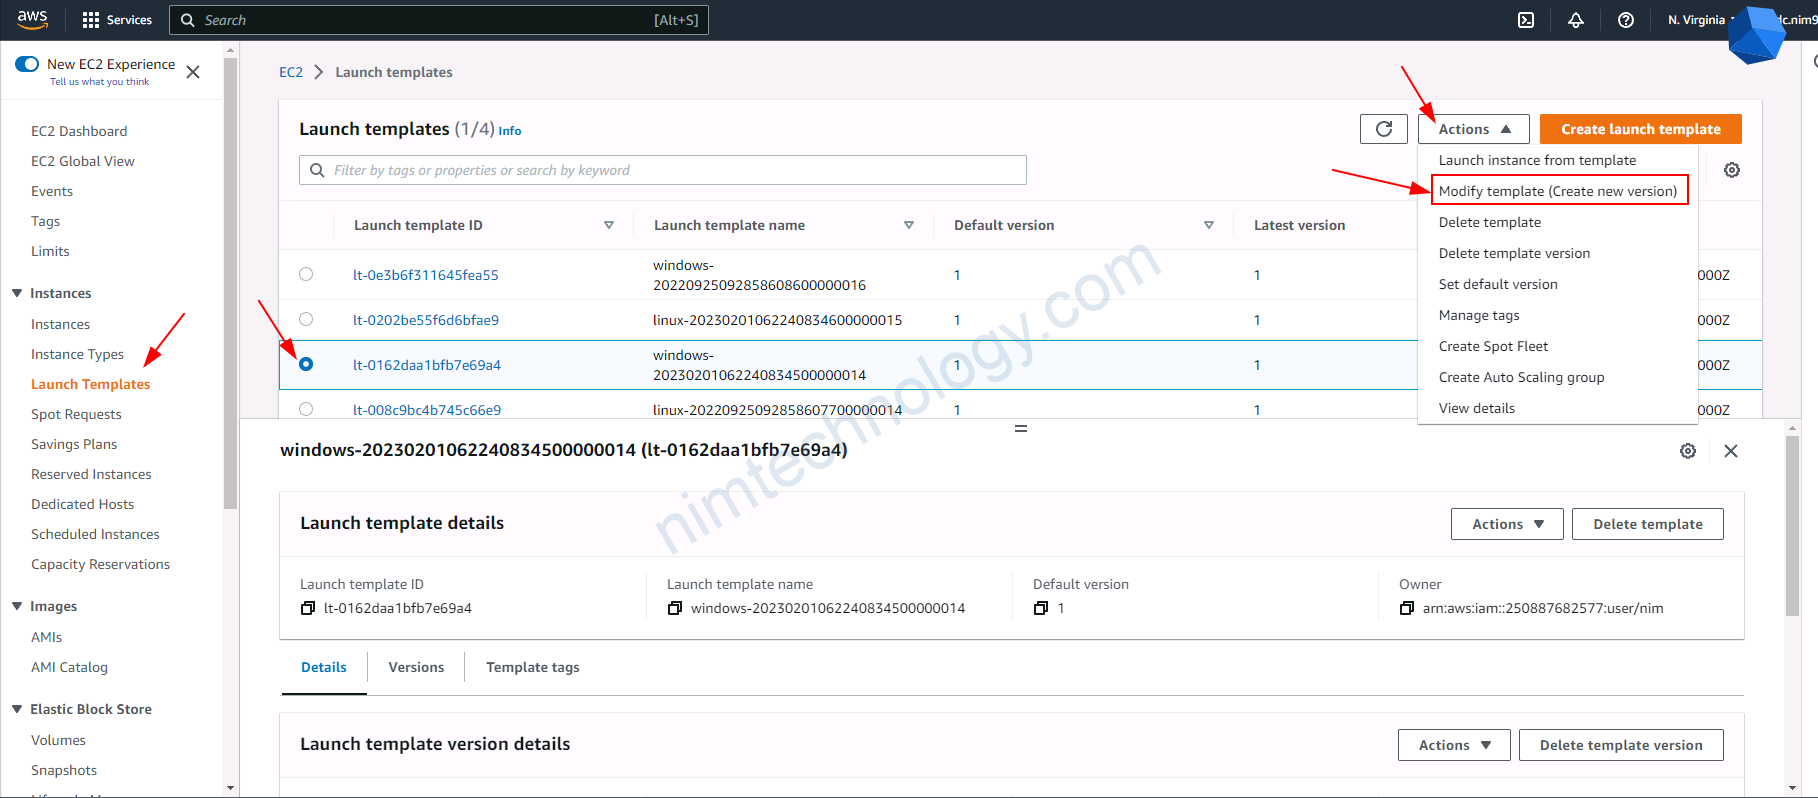

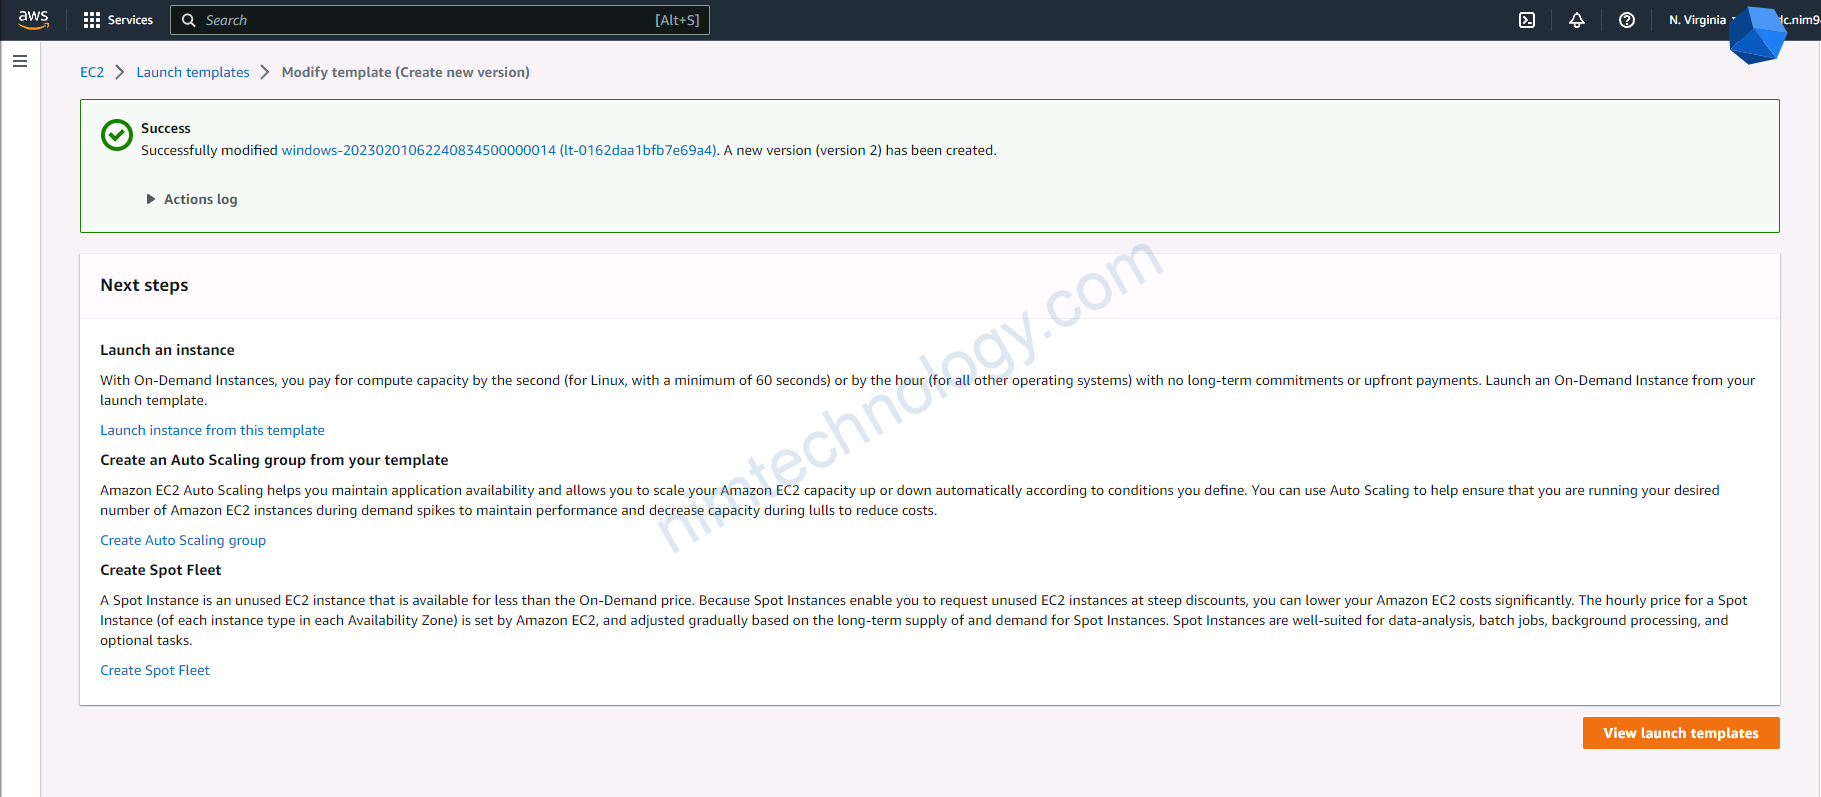
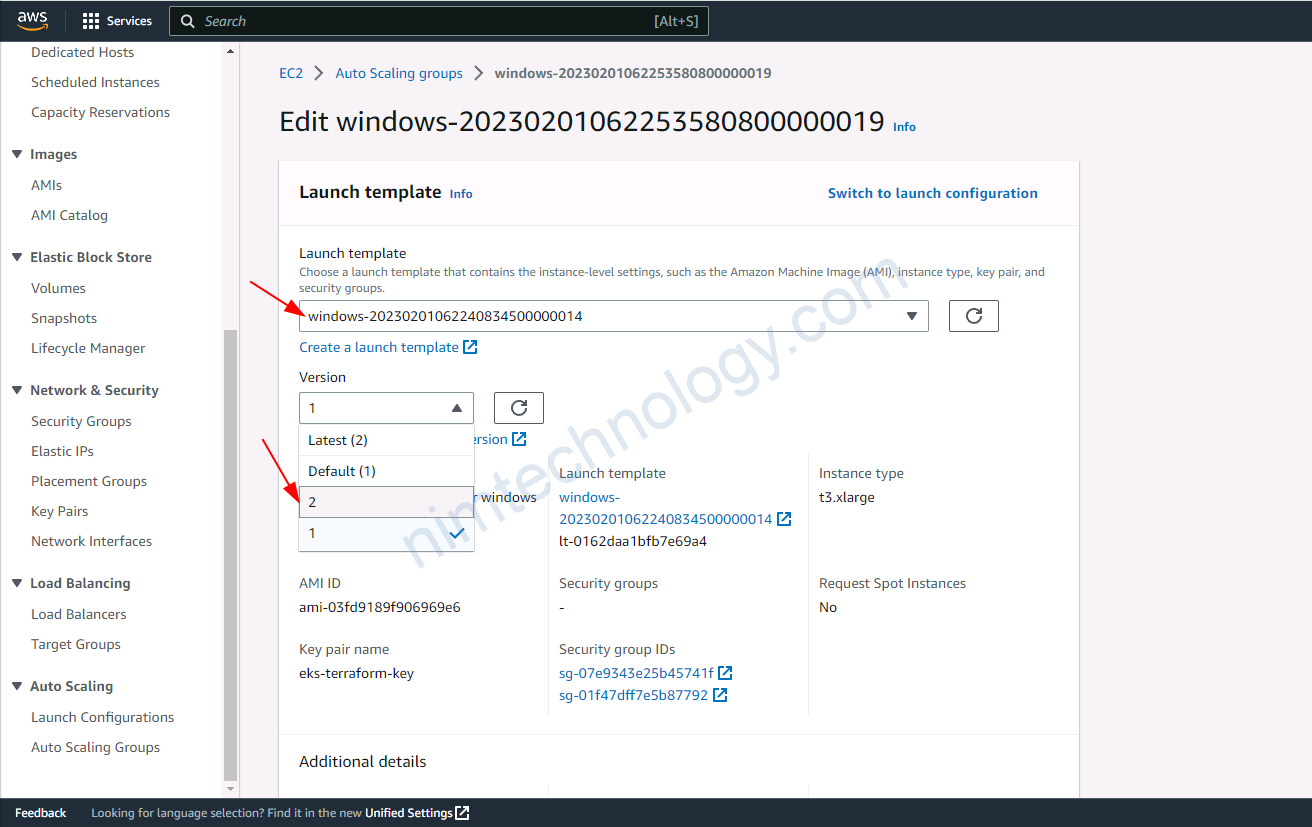
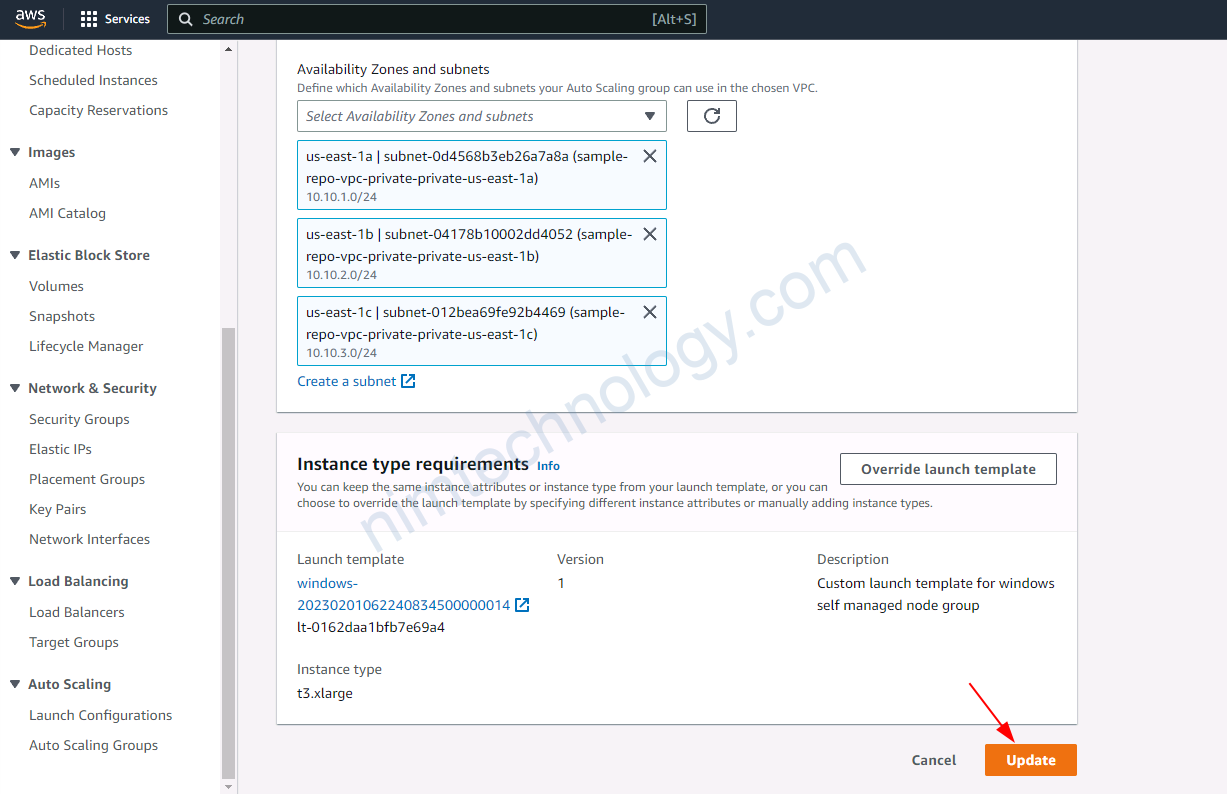

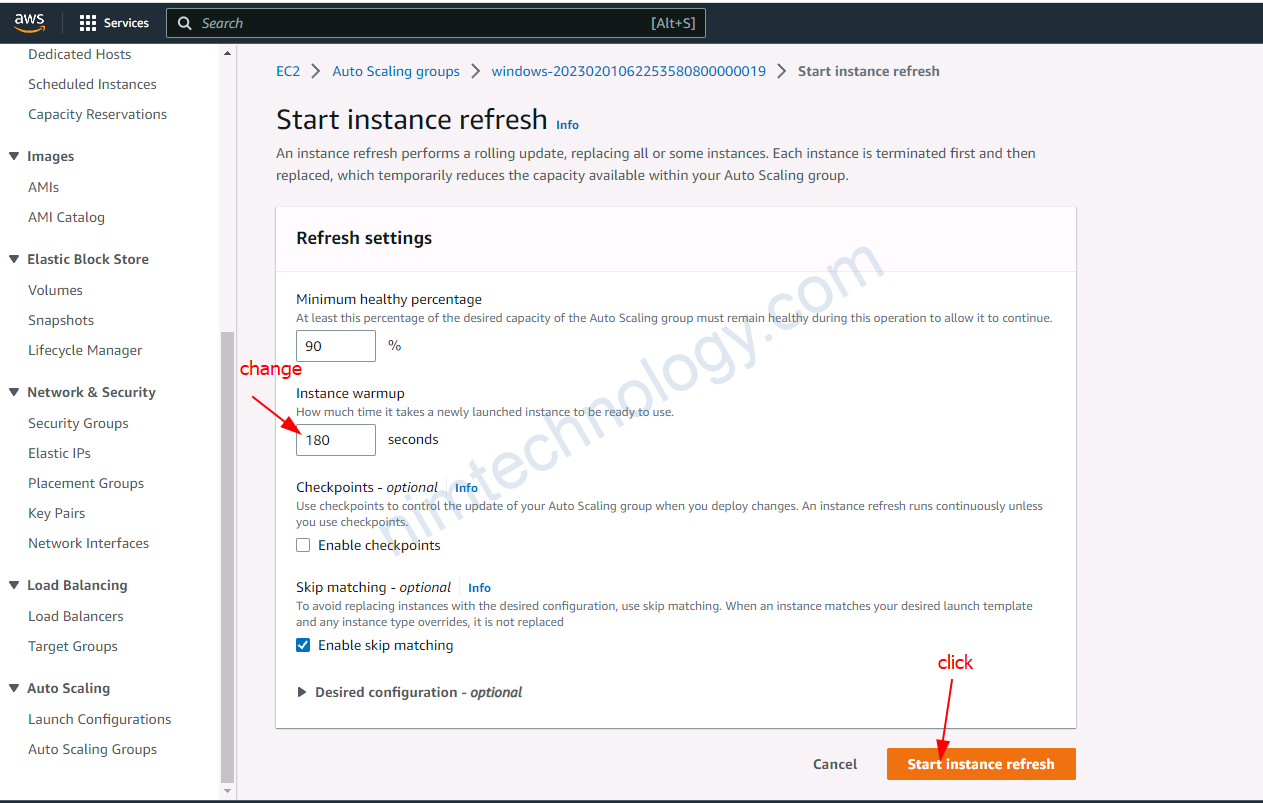
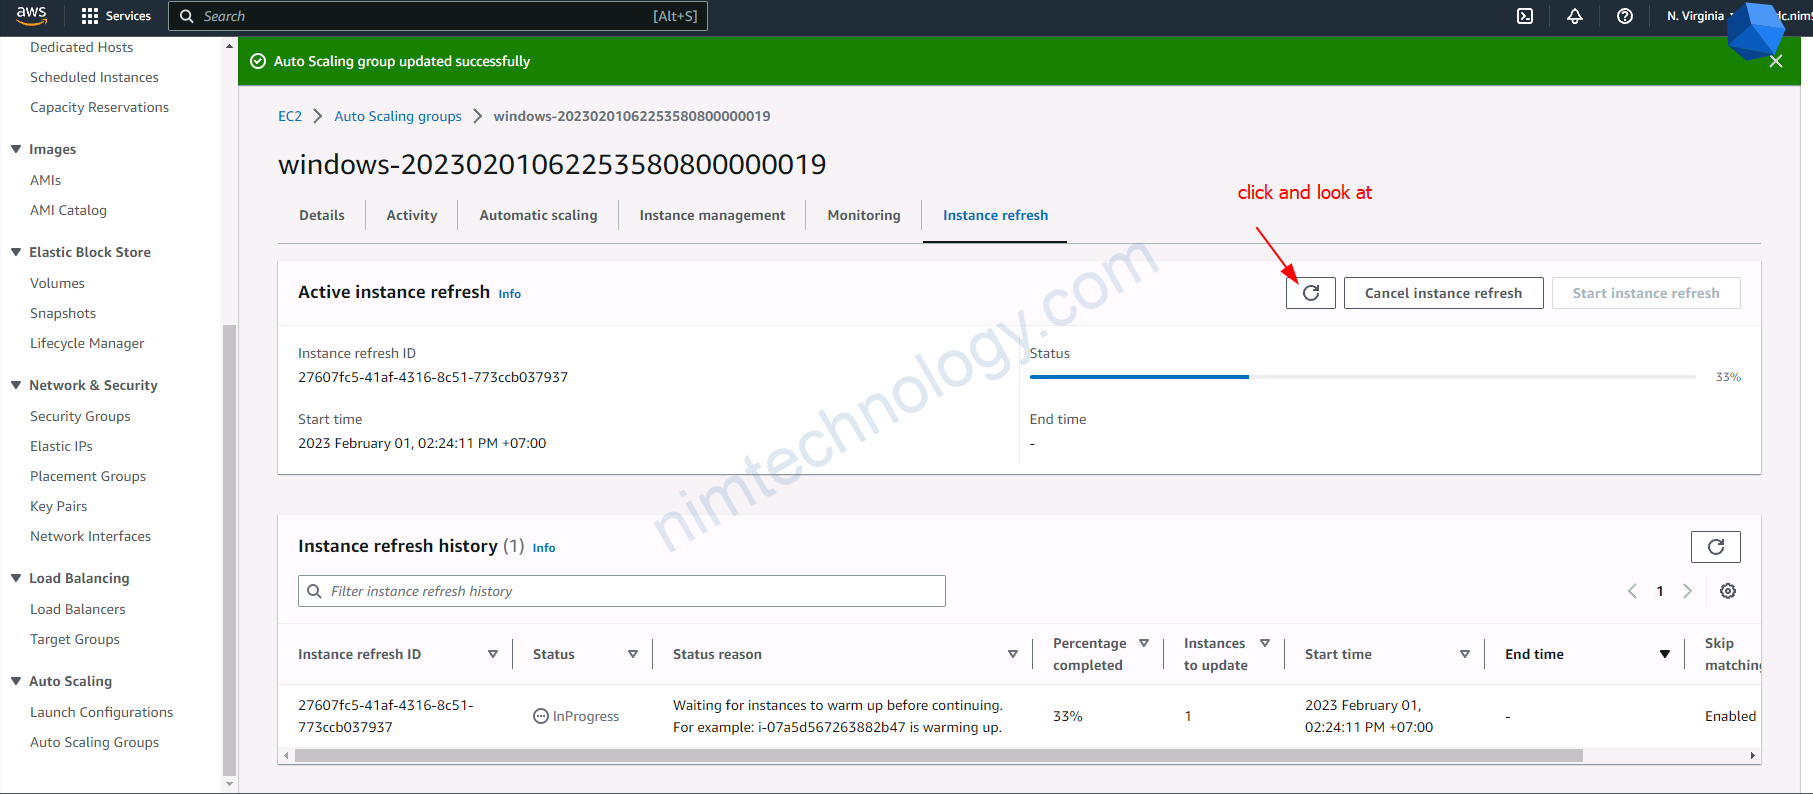

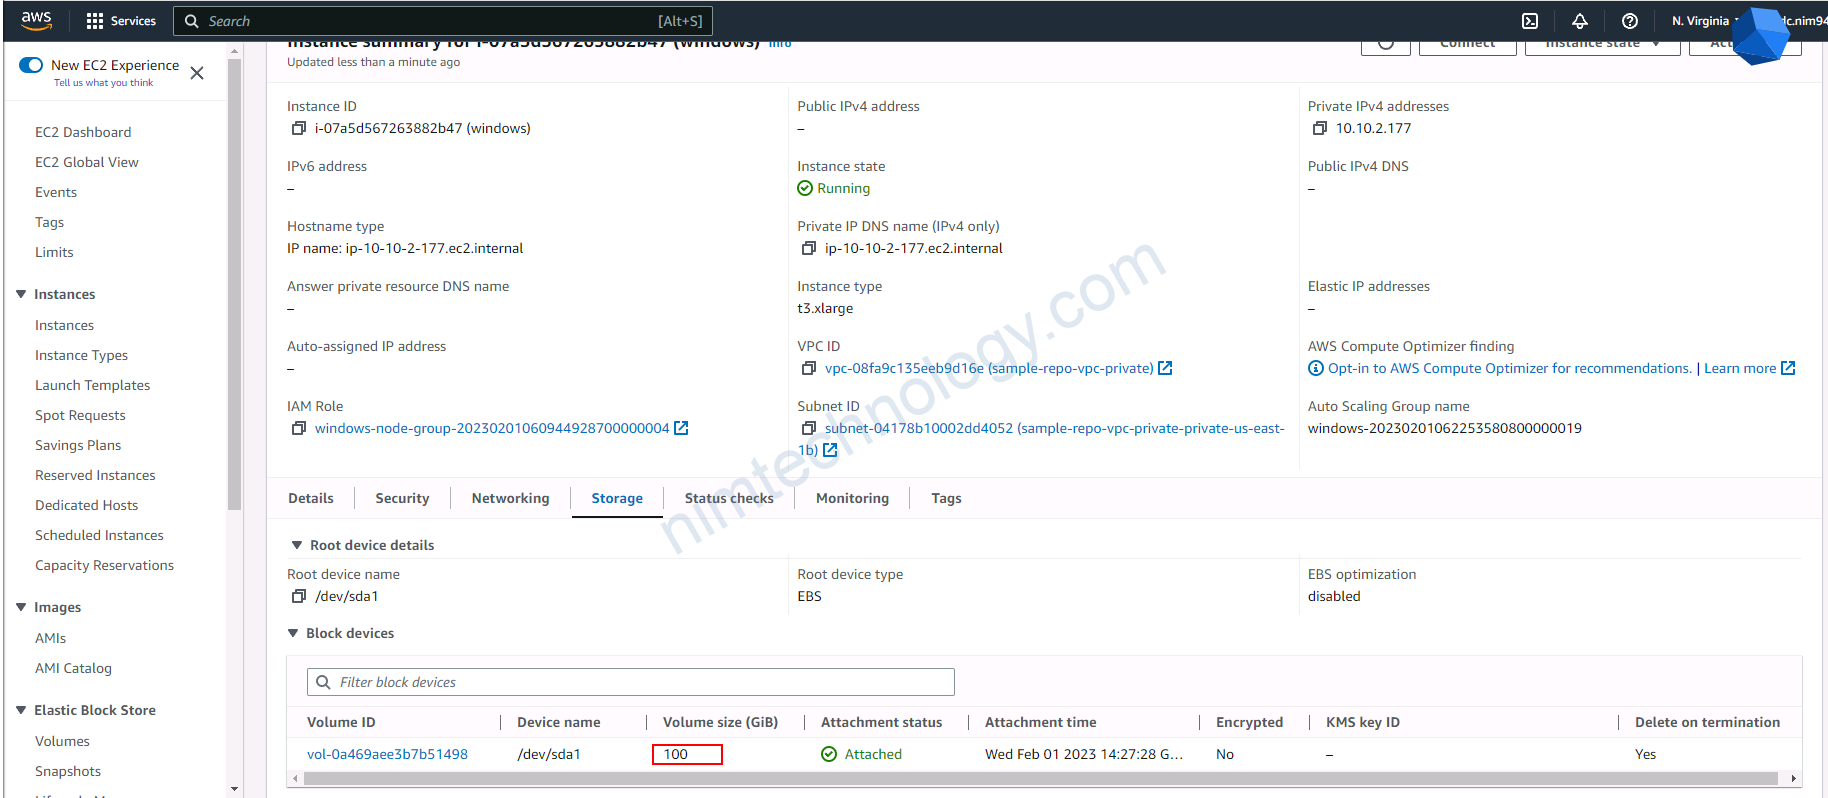
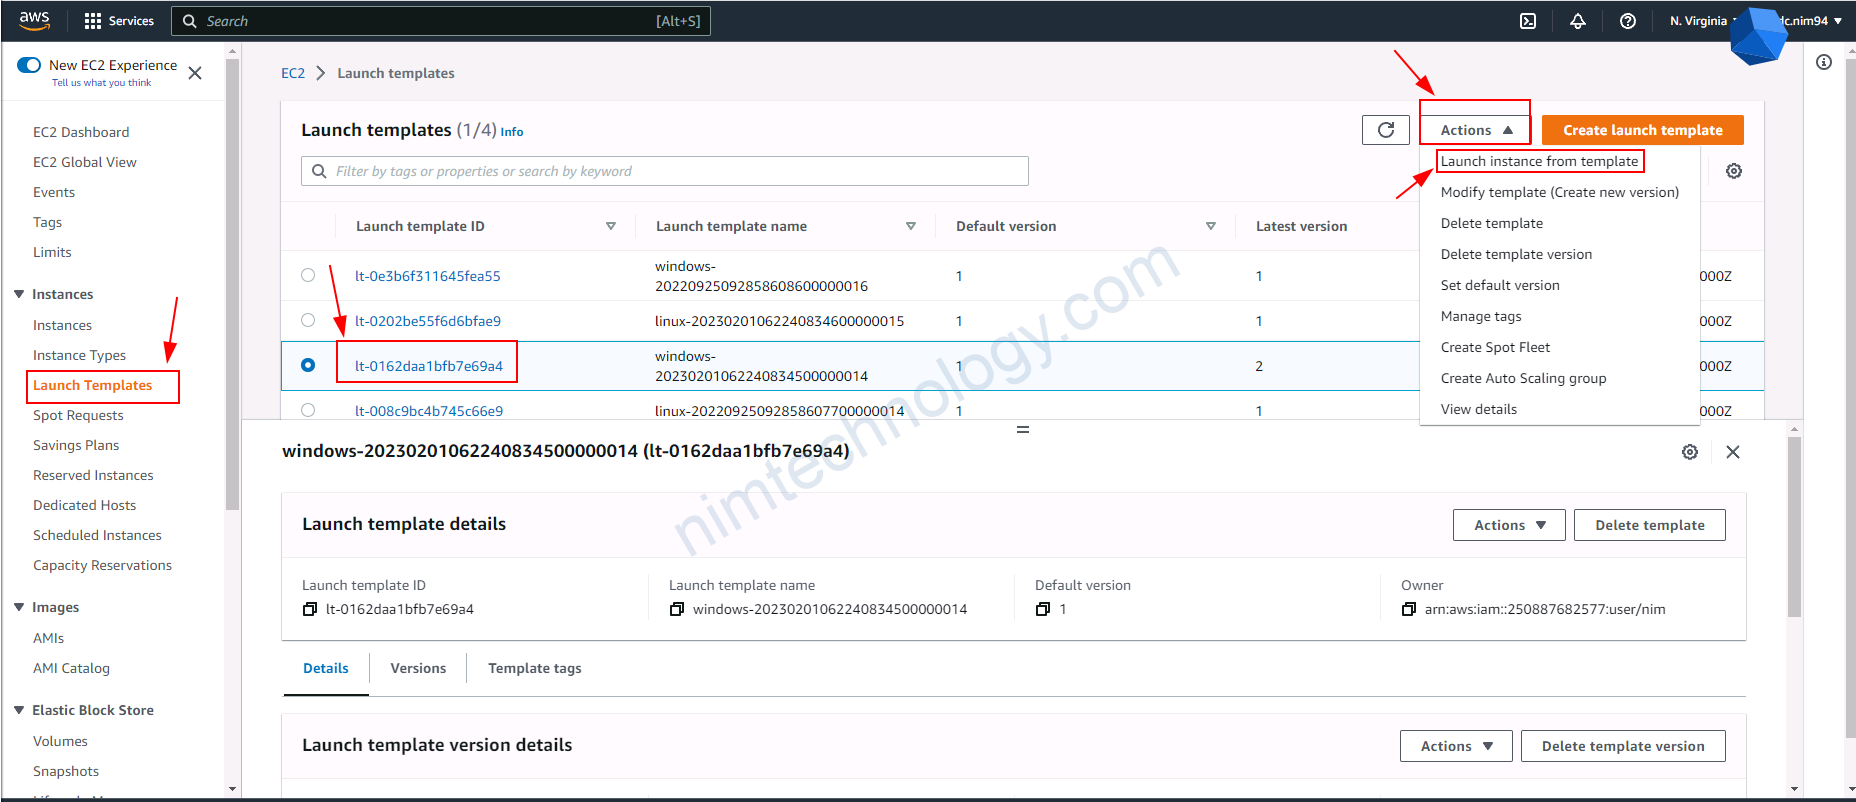
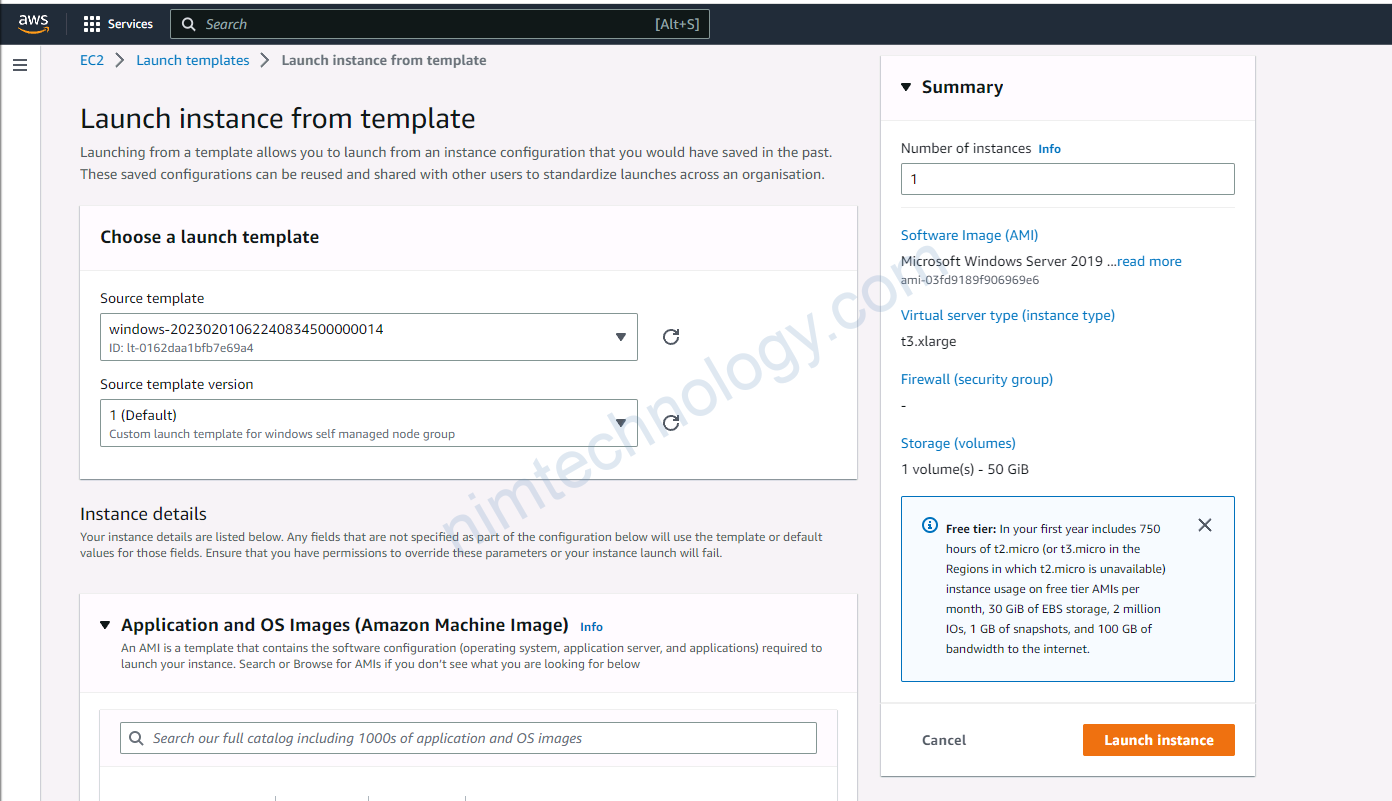
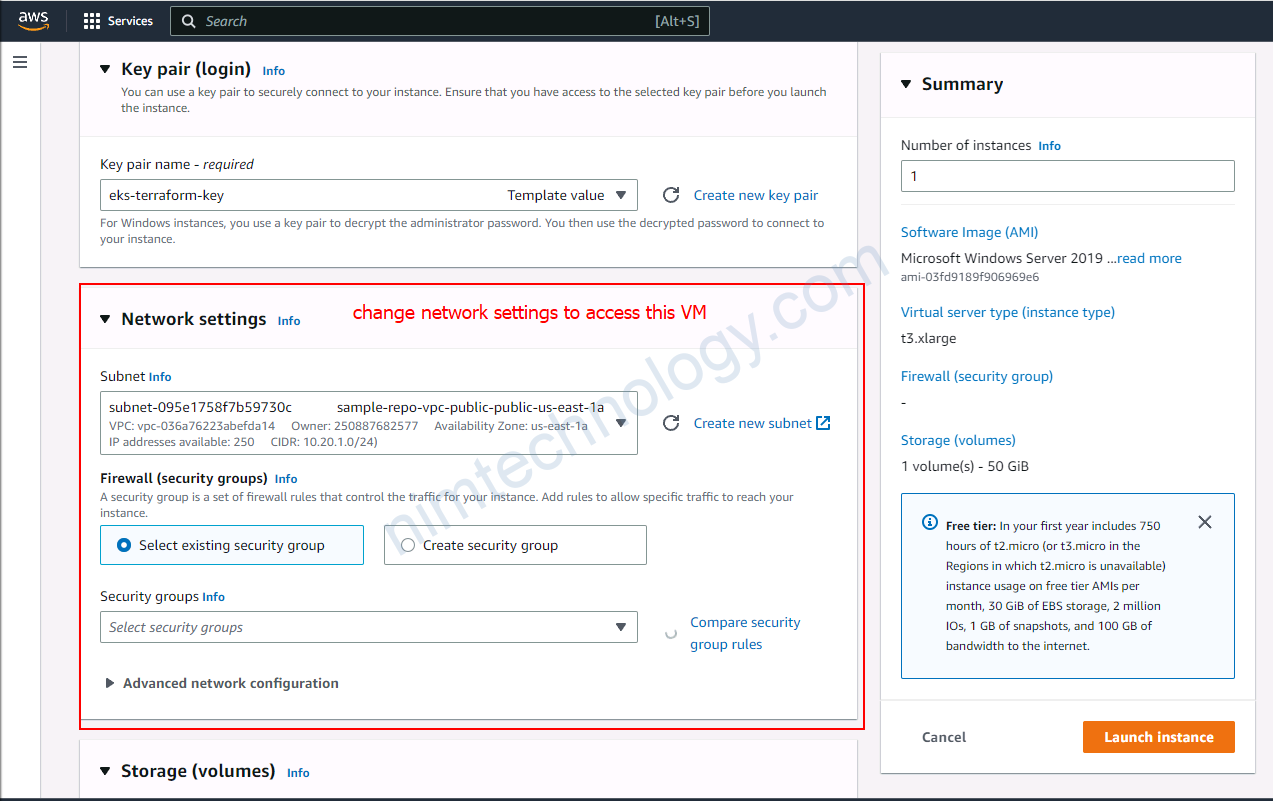
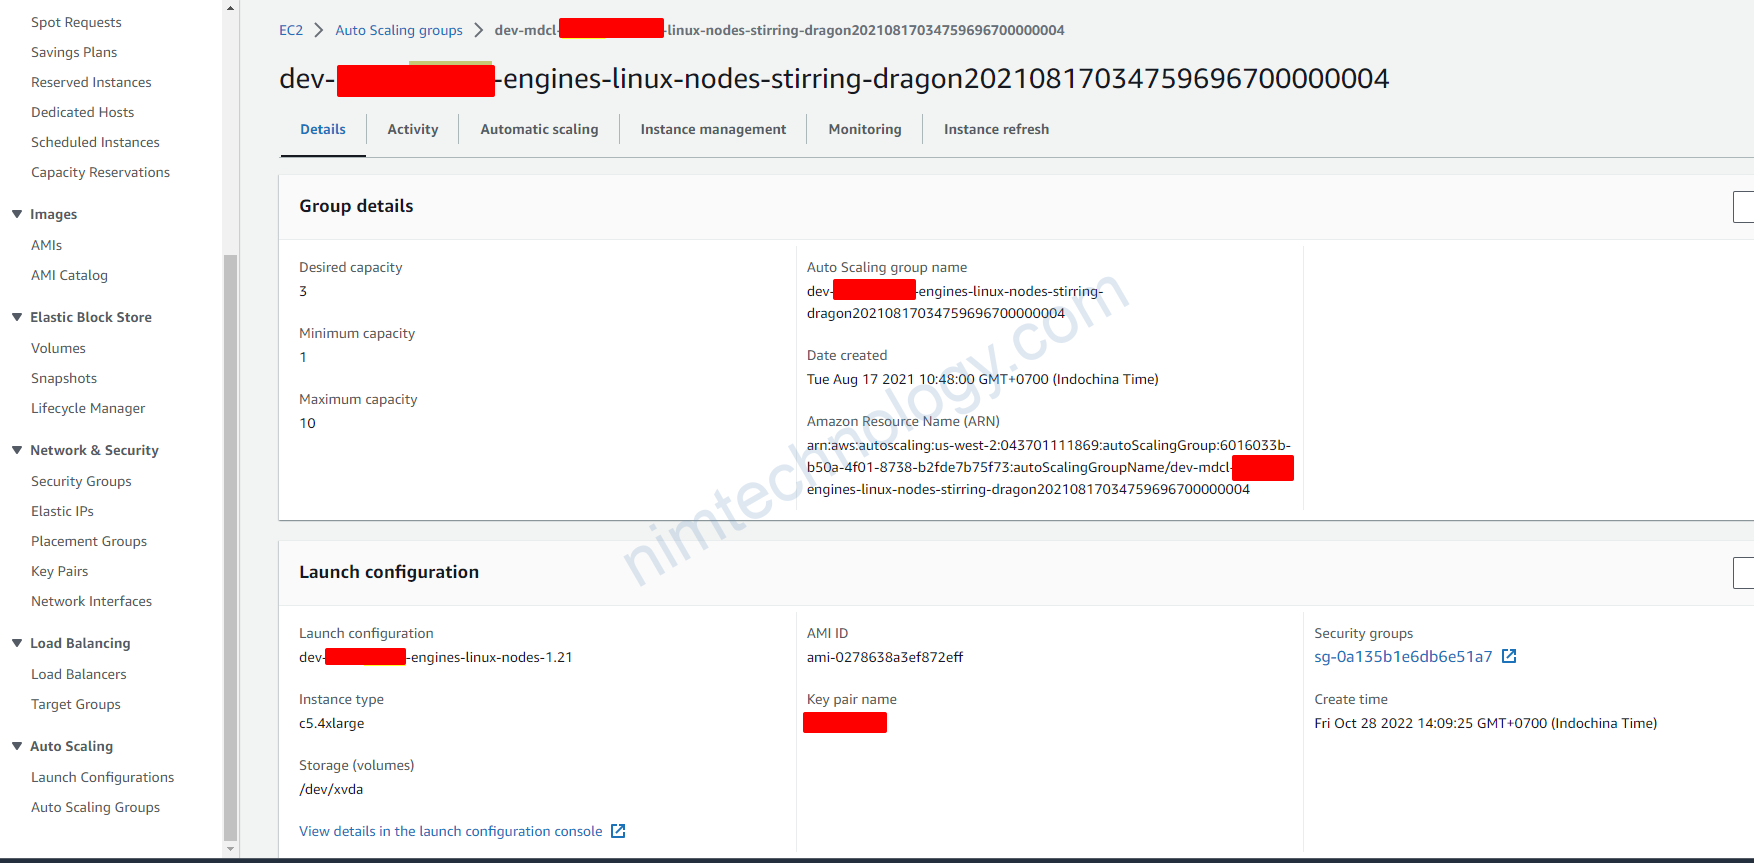
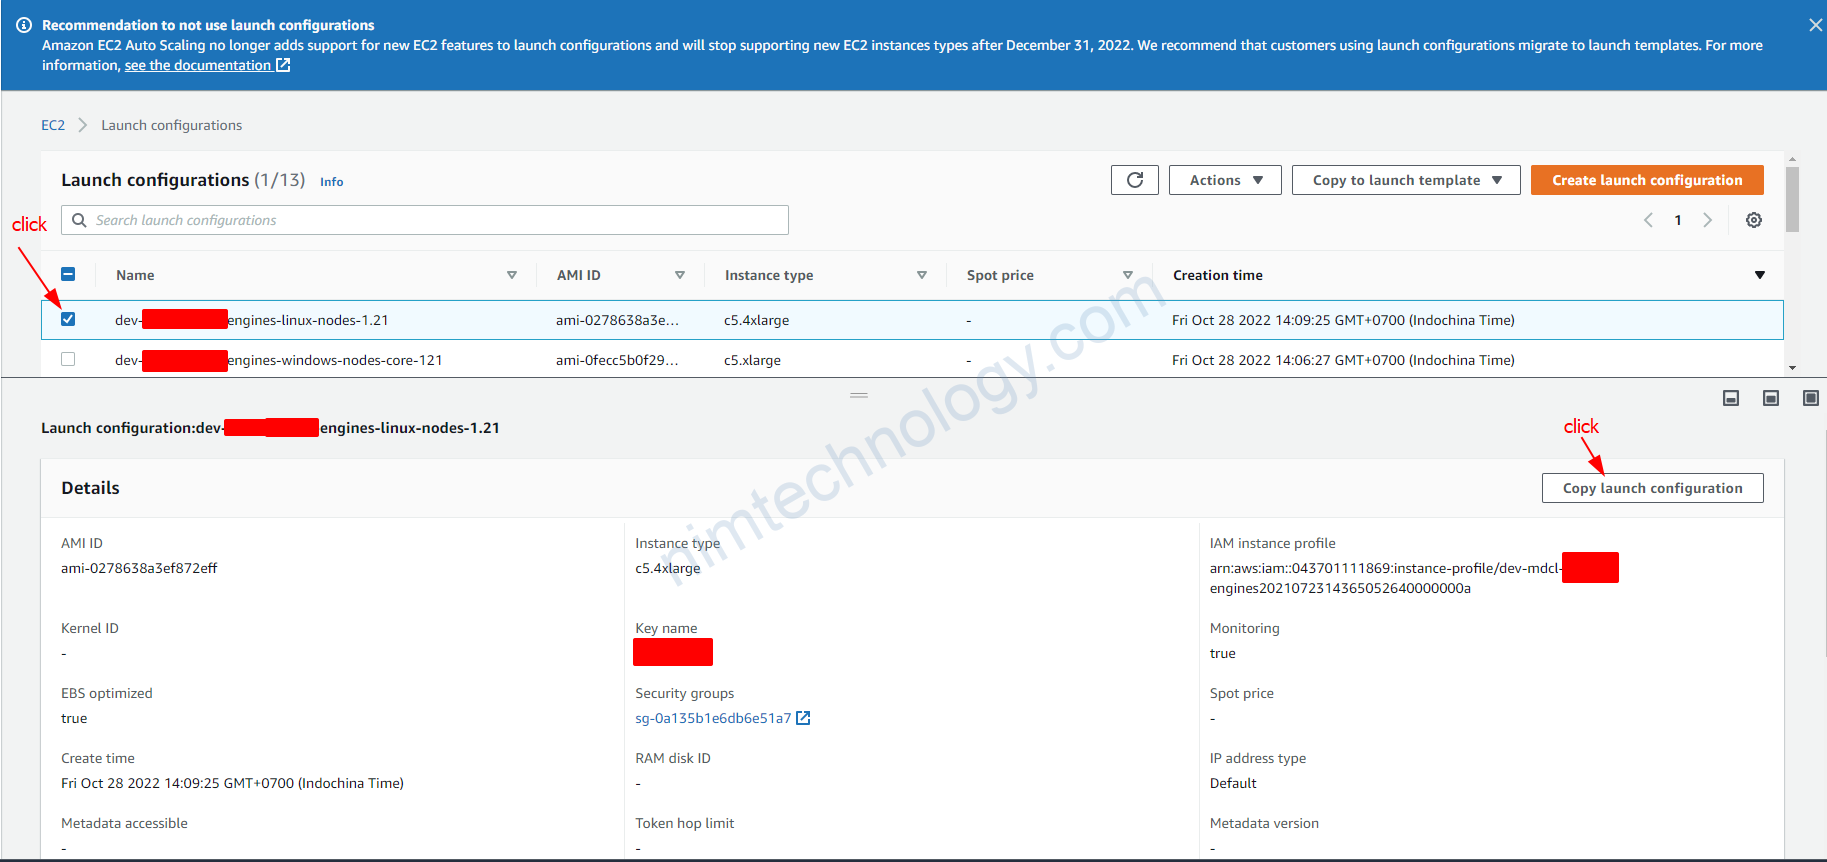
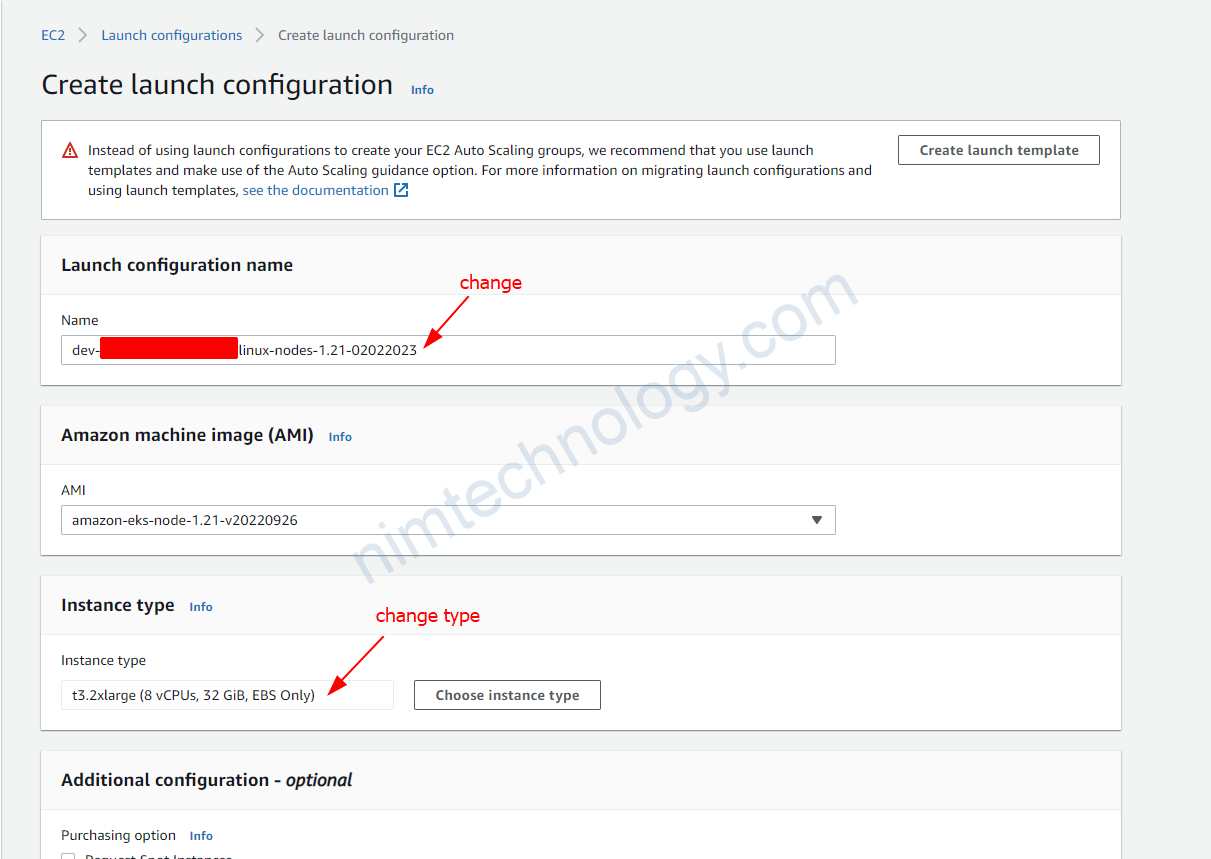
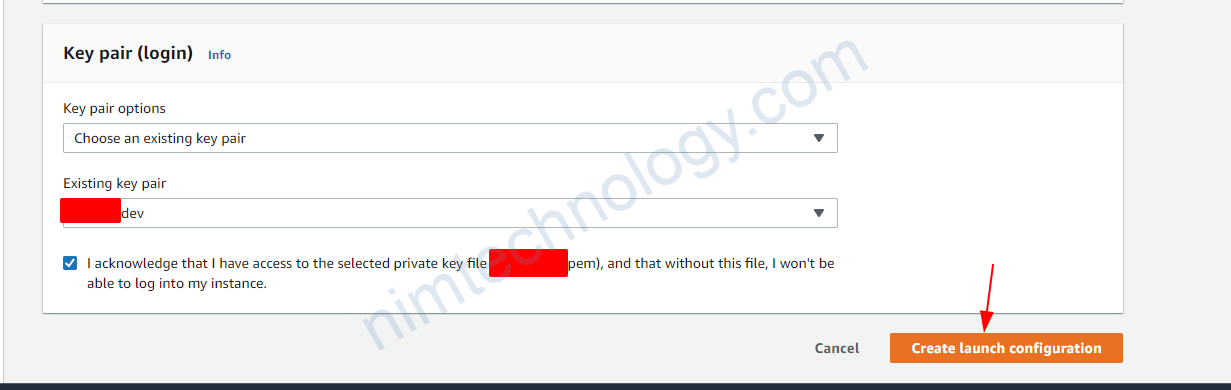
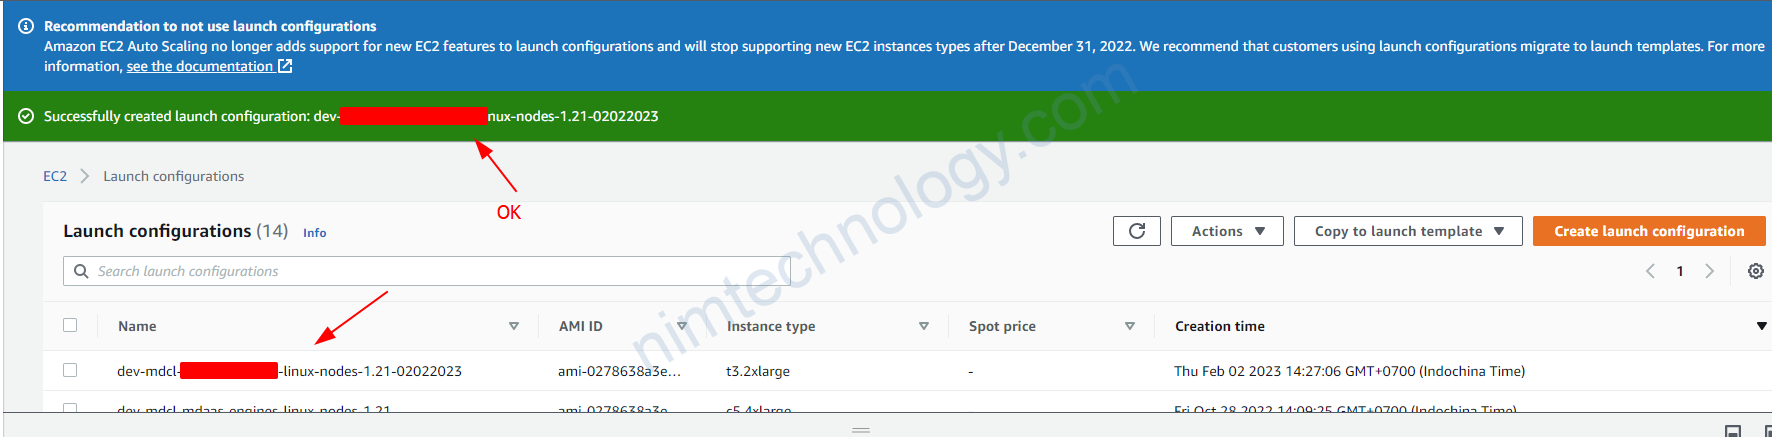
4.4) Create a new launch template, then create an Autoscaling Group based on this.
Trong 1 số trường hợp bạn sẽ cần tạo 1 new launch template từ existing launch template.
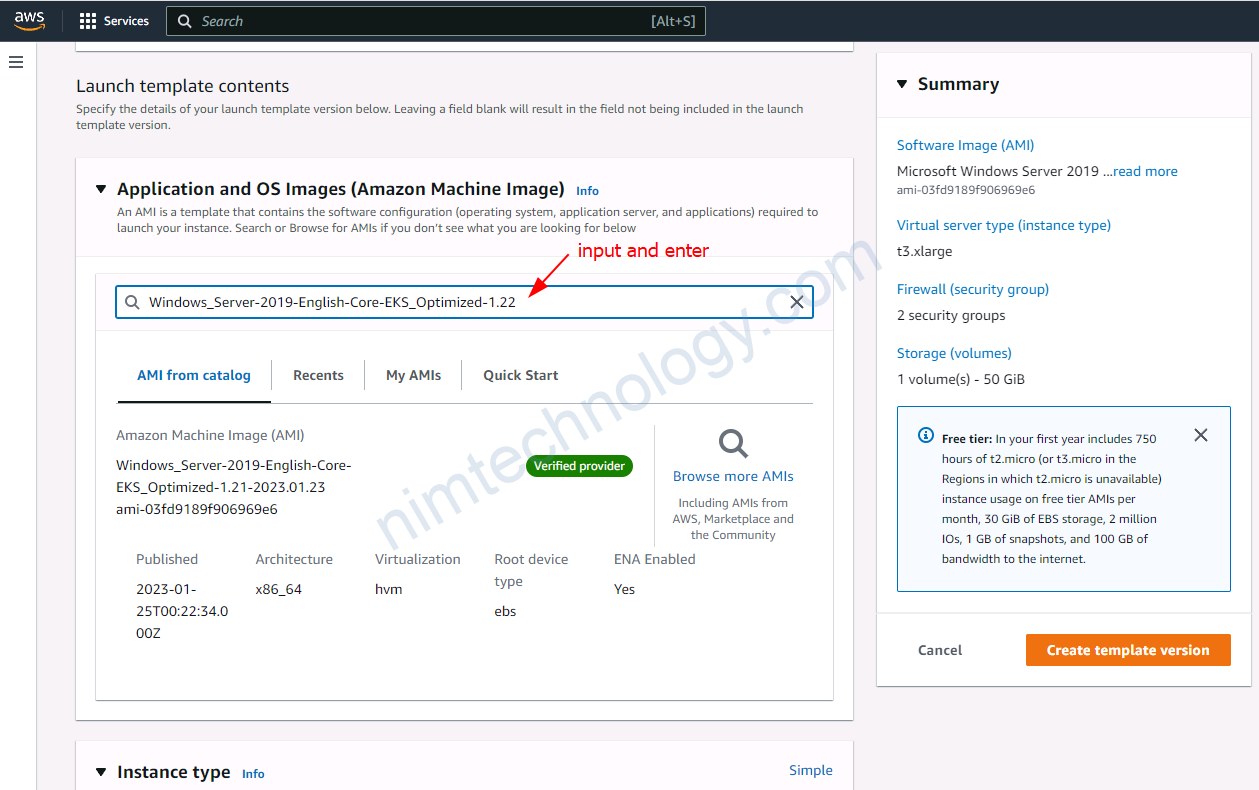
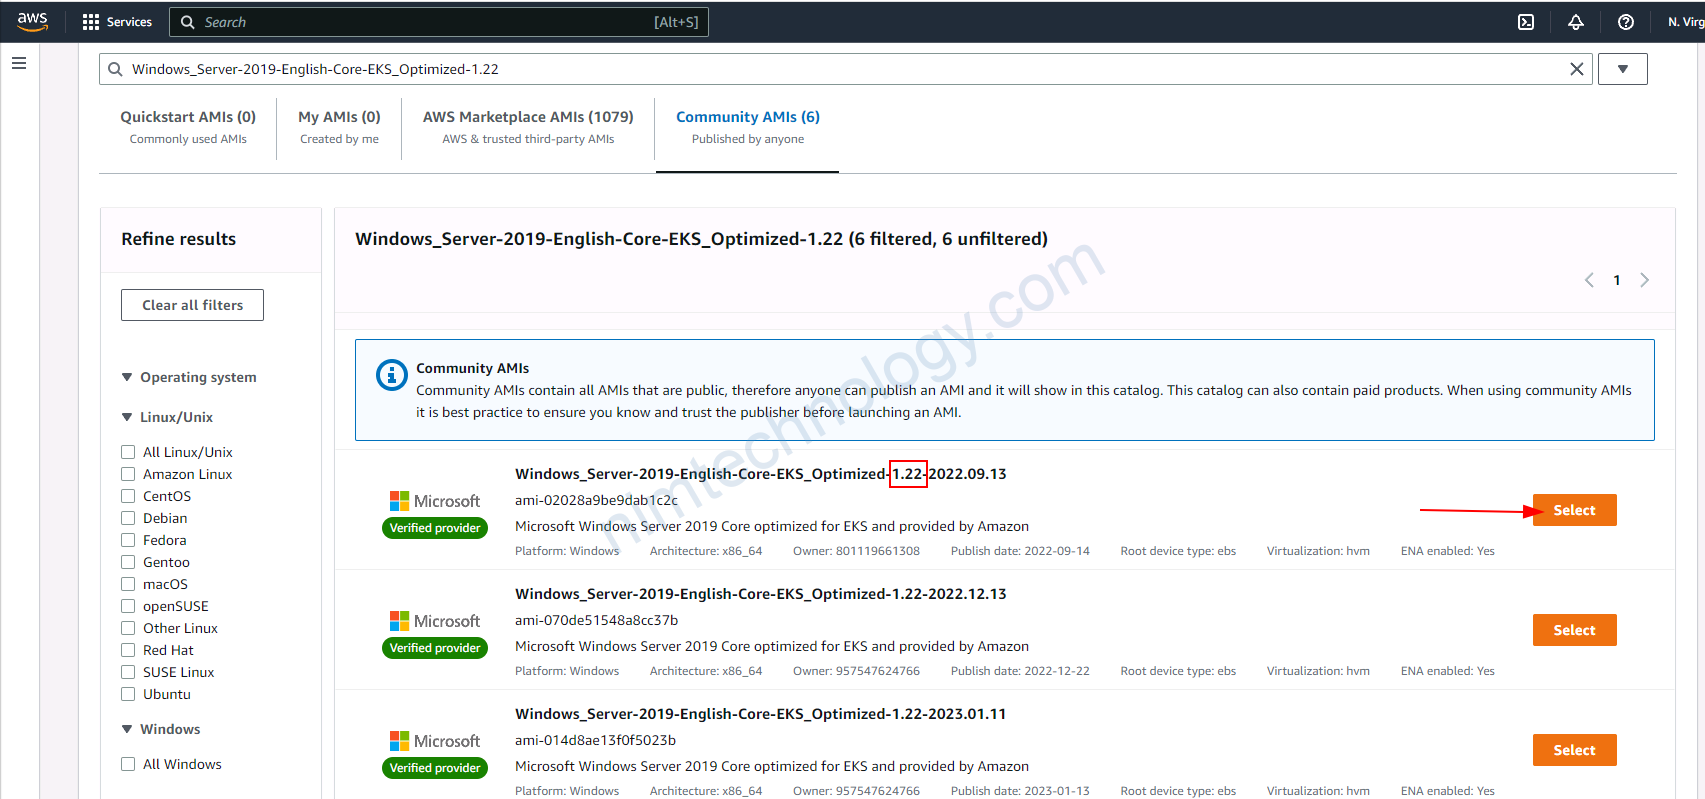
Bạn sẽ cần check lại các phân sau: Launch template name, Application and OS Images (Amazon Machine Image), Instance type
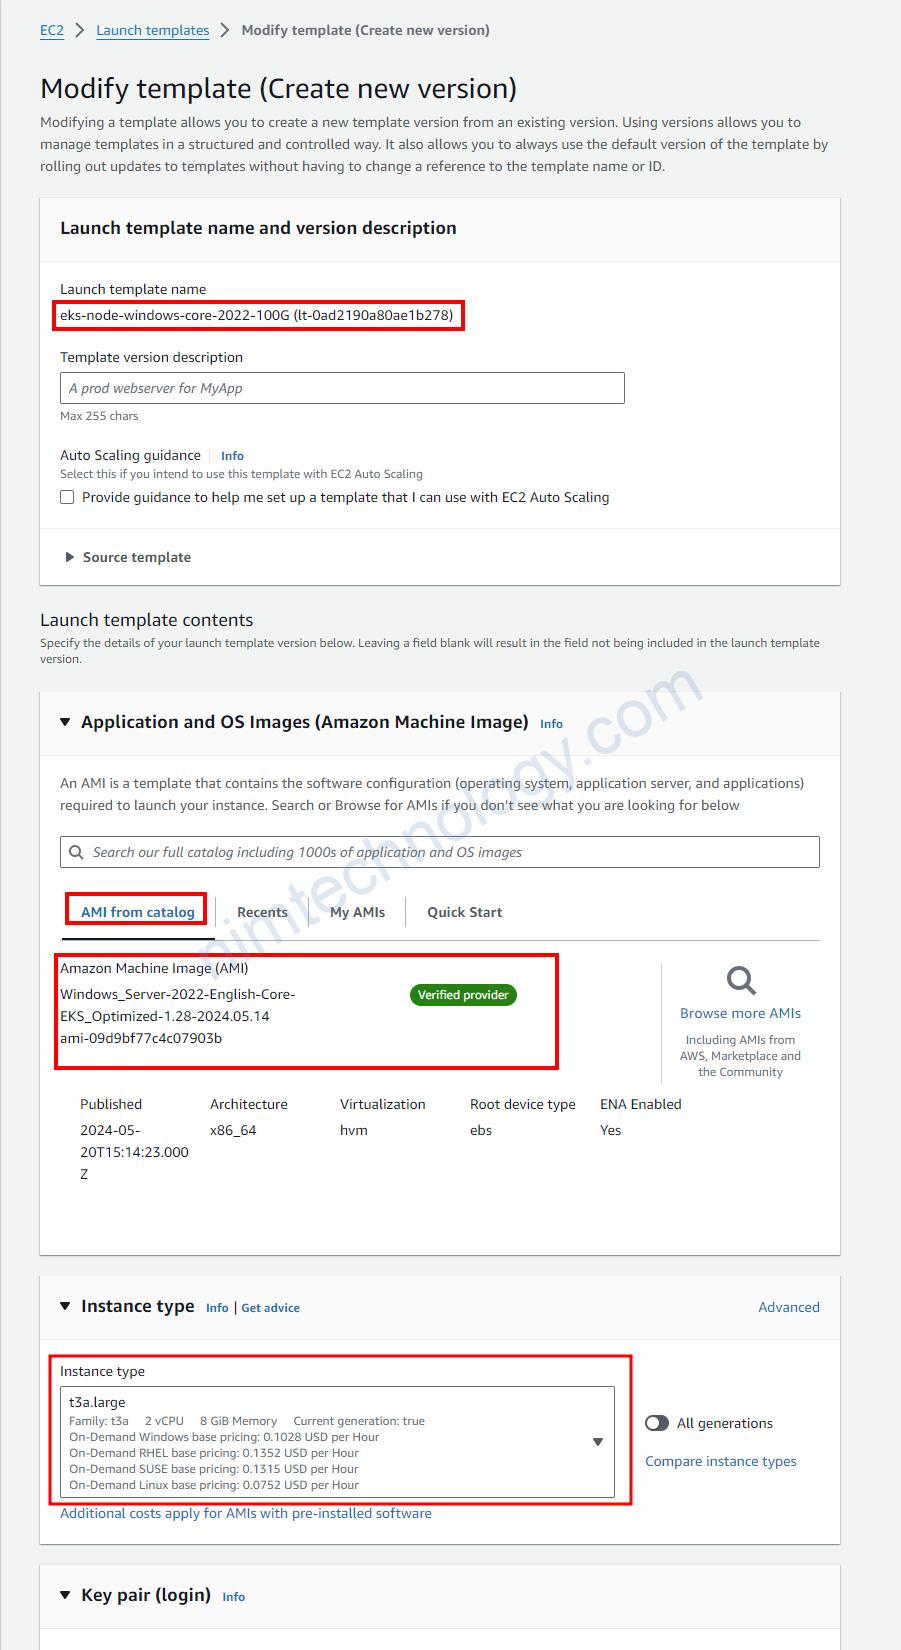
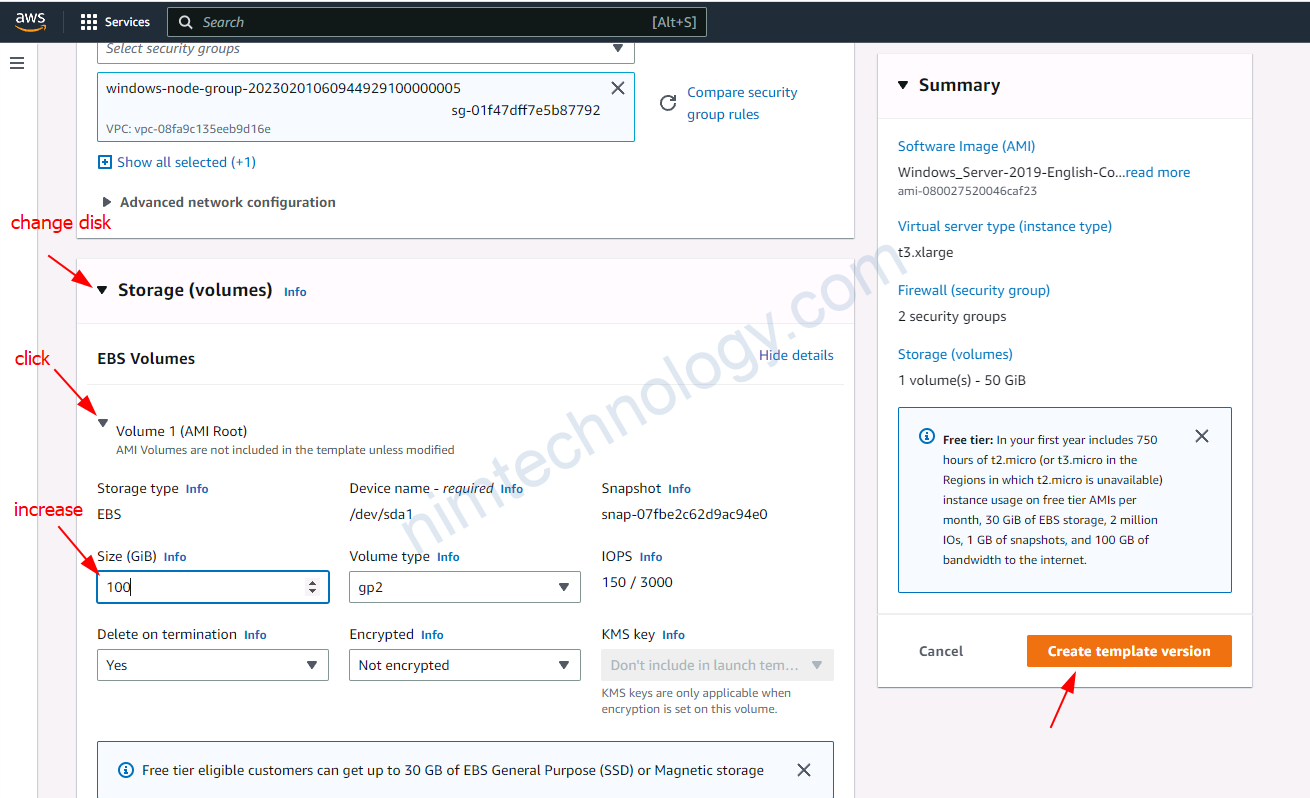
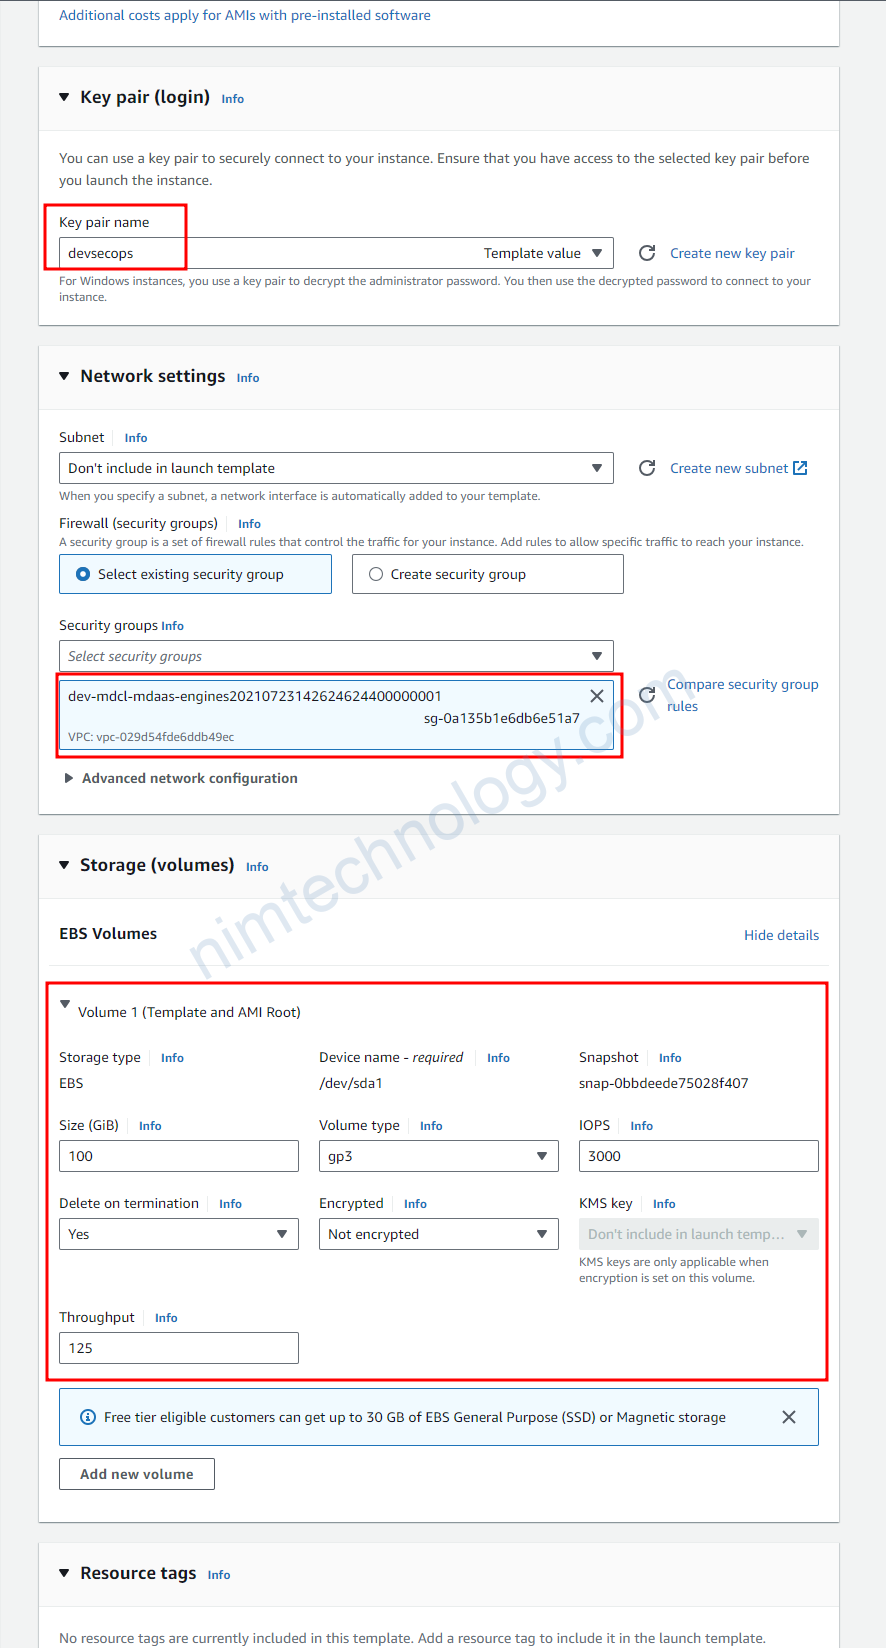
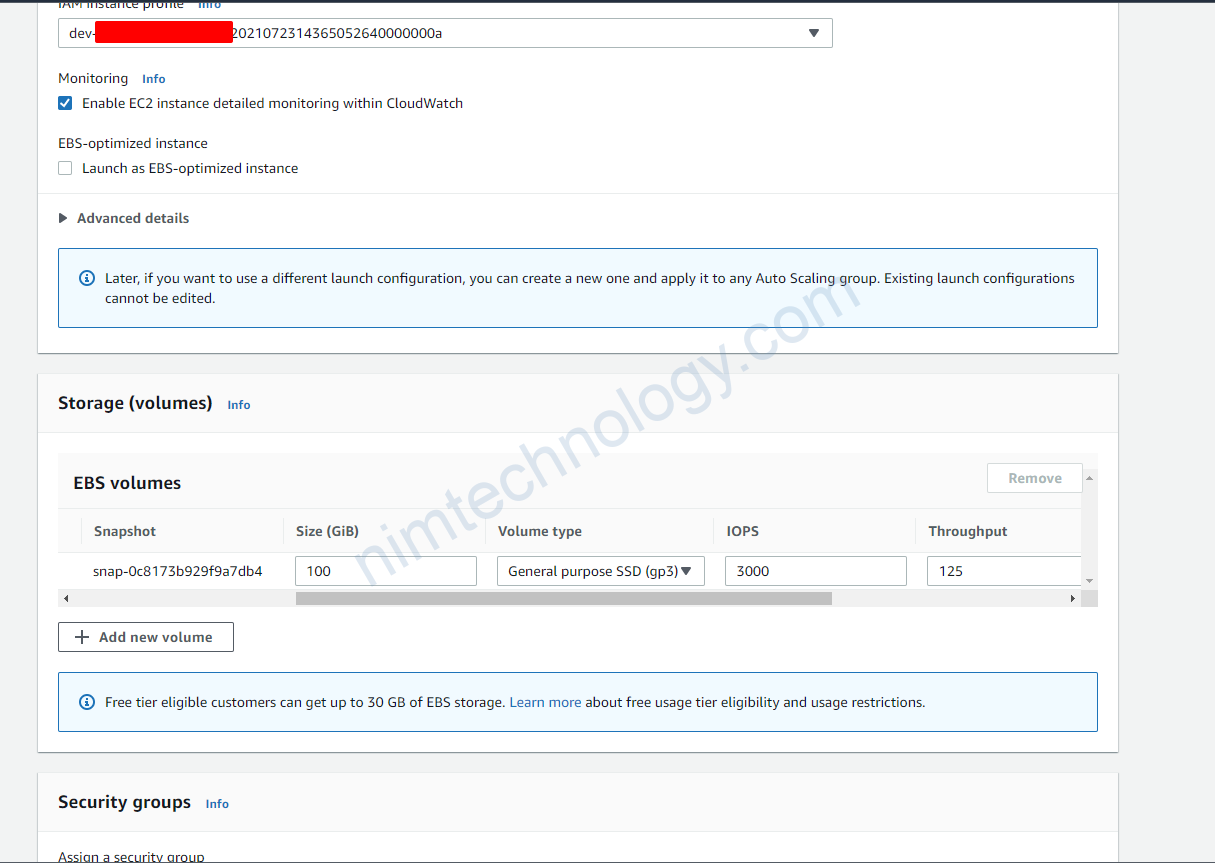
Tiếp đến bạn cần chú ý đến Key pair (login), security of Network settings, lựa chọn type phù hợp cho EBS.
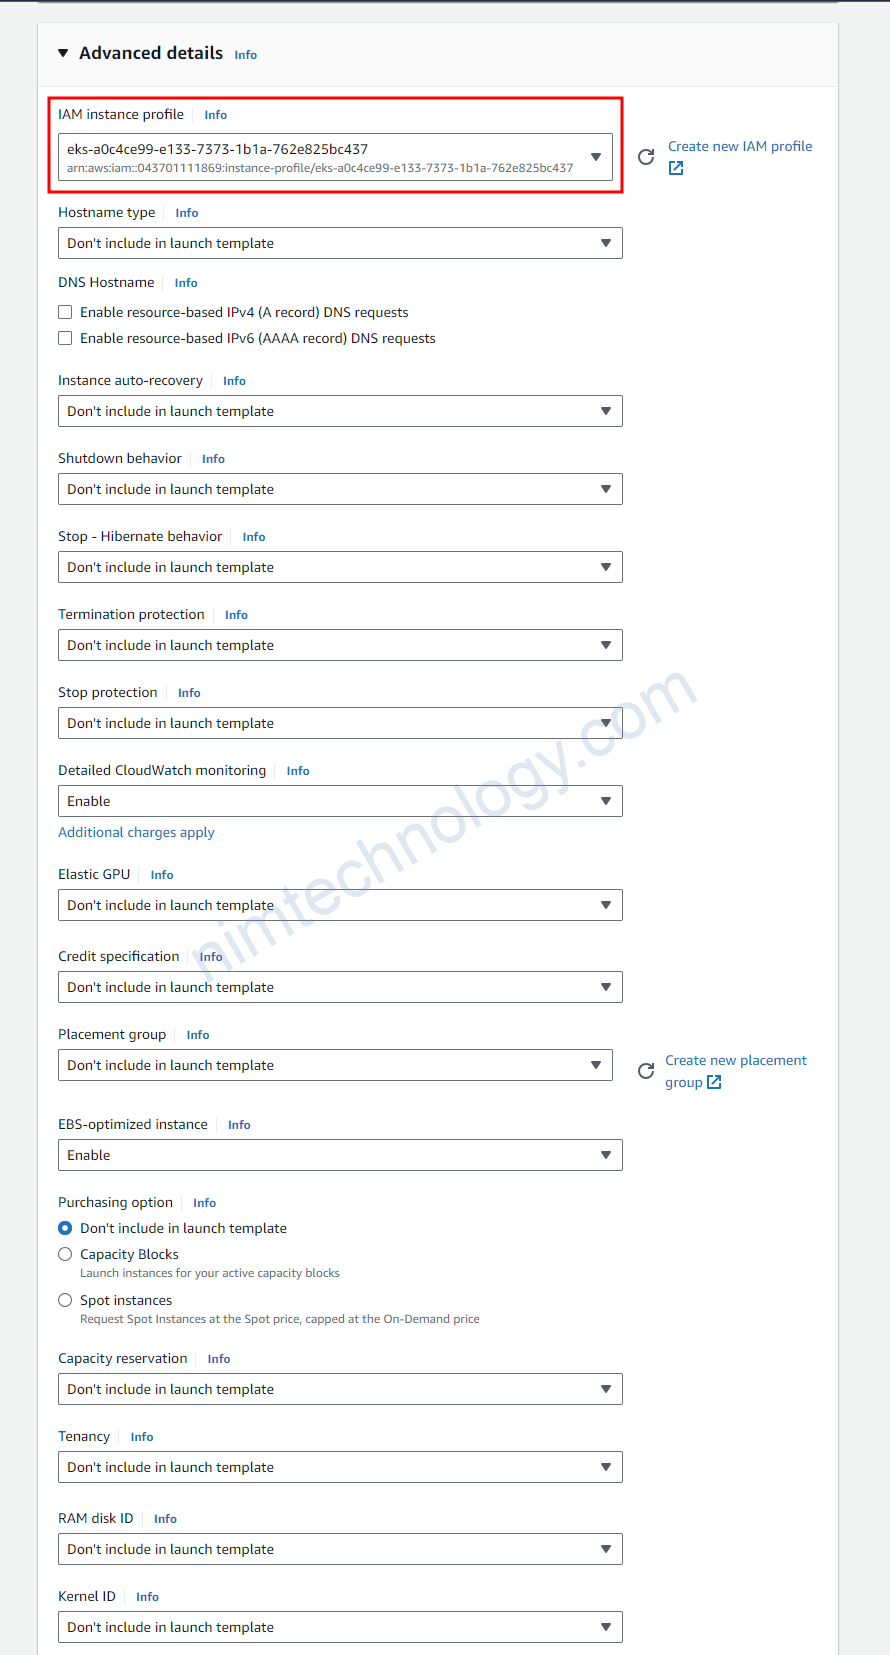
Bạn cần chú ý phần IAM instance profile:
đây là IAM role để node được access vào eks controller.
Sau đó bạn cần create template là được nhé
5) EKS windows terraform module.
Mình cũng đã cung cấp cho các bạn 1 module về eks windows trên aws
https://registry.terraform.io/modules/mrnim94/eks-windows/aws/latest#variablestf-file
Launch configuration

The purpose of the vpc-admission-webhook and vpc-resource-controller
In Amazon EKS, the vpc-admission-webhook and vpc-resource-controller are Kubernetes components that work together to enable the Amazon VPC CNI (Container Network Interface) plugin to provide networking functionality for Windows nodes and pods. They play a crucial role in the integration of EKS Windows nodes with Amazon VPC networking.
Here’s an overview of the purpose of each component:
- vpc-admission-webhook: The vpc-admission-webhook is a Kubernetes admission webhook that intercepts and mutates pod creation requests for Windows nodes. When a new pod is scheduled to run on a Windows node, the webhook adds the necessary VPC resource annotation (such as the
vpc.amazonaws.com/PrivateIPv4Address) to the pod. This annotation indicates the desired IP address for the pod from the associated VPC subnet. By injecting these annotations, the vpc-admission-webhook enables the VPC CNI plugin to configure the networking of Windows pods correctly. - vpc-resource-controller: The vpc-resource-controller is a Kubernetes controller that manages the allocation and deallocation of Amazon VPC resources, such as Elastic Network Interfaces (ENIs) and secondary IP addresses, for Windows nodes and pods. When a Windows pod is created with the appropriate VPC resource annotation (injected by the vpc-admission-webhook), the vpc-resource-controller allocates the necessary VPC resources and assigns them to the pod. When a pod is terminated, the controller deallocates the VPC resources and returns them to the available pool. The vpc-resource-controller is responsible for ensuring that the Windows nodes and pods have the required VPC resources for proper networking.
These two components work together to enable Amazon VPC networking features for Windows nodes in Amazon EKS, allowing for seamless integration with the VPC environment. This integration provides a consistent networking experience for both Linux and Windows workloads in your EKS cluster, facilitating secure and efficient communication between your applications and services.