Readiness
Readiness configuration in Kubernetes is used to determine if a container within a pod is ready to accept traffic or serve requests. It ensures that a container is fully initialized and capable of handling requests before being exposed to any incoming traffic. This helps maintain the overall health and reliability of your application.
readinessProbe:
  httpGet:
    path: /ready
    port: 8080
  initialDelaySeconds: 10
  periodSeconds: 5
Điều quan trong là readiness không restart pod. Nó sẽ nhả error rất nhiều trong event của pod.
Liveness
Liveness configuration is used to ensure that the containers within a pod are running and healthy.
If a container is unresponsive or unhealthy, Kubernetes can automatically restart it
the following 3 methods:
HTTP Get
a. HTTP Get: The probe sends an HTTP GET request to a specified path and port on the container. If the container returns a status code between 200 and 399, it is considered alive.
livenessProbe:
  httpGet:
    path: /healthz
    port: 8080
  initialDelaySeconds: 15
  periodSeconds: 10
  timeoutSeconds: 5
  successThreshold: 1
  failureThreshold: 5
In this example, the livenessProbe field is configured with an httpGet probe. The probe sends an HTTP GET request to the /healthz path on port 8080 of the container.
+ initialDelaySeconds: Khi pod đã start được 15s thì health-check/probe livenessProbe sẽ bắt đầu kiểm tra
+ periodSeconds: health-check sẽ kiểm tra liên tục với interval/every 10s
+ timeoutSeconds: nghĩa là khi health check gửi tín hiện đi thì nó expect là trong 5s sẽ nhận lại kết quả. Nếu quá 5s mà chưa có kết quá thì it will be considered a failure. The default value is 1 second
+ successThreshold: Trước đó nó đã failed, lần tiếp theo check thì nó là success nó căn cứ bào giá trị là bao nhiêu. Nếu successThreshold: 2 thì nó cần 2 lần success liên tiếp thì nó xem sét pod đó là running.
+ failureThreshold: trước đó pod đang running thì lần check tiếp theo là failed thì nó cân cứ vào giá trị. failureThreshold: 5. nếu fail 5 lần liên tiếp thì Kubernetes will take action, such as restarting the container.
TCP Socket
b. TCP Socket: The probe tries to establish a TCP connection to a specified port on the container. If the connection is established successfully, the container is considered alive.
apiVersion: apps/v1
kind: Deployment
metadata:
  name: sample-tcp-app
spec:
  replicas: 1
  selector:
    matchLabels:
      app: sample-tcp-app
  template:
    metadata:
      labels:
        app: sample-tcp-app
    spec:
      containers:
      - name: tcp-app-container
        image: your-tcp-app-image:latest
        ports:
        - containerPort: 8080
        livenessProbe:
          tcpSocket:
            port: 8080
          initialDelaySeconds: 15
          periodSeconds: 10
Exec
c. Exec: The probe executes a command inside the container. If the command returns a 0 exit status, the container is considered alive.
apiVersion: apps/v1
kind: Deployment
metadata:
  name: sample-exec-app
spec:
  replicas: 1
  selector:
    matchLabels:
      app: sample-exec-app
  template:
    metadata:
      labels:
        app: sample-exec-app
    spec:
      containers:
      - name: exec-app-container
        image: your-exec-app-image:latest
        livenessProbe:
          exec:
            command:
            - /bin/sh
            - -c
            - 'touch /tmp/healthy; sleep 30; rm -rf /tmp/healthy; sleep 600'
          initialDelaySeconds: 5
          periodSeconds: 10
Với ví dụ trên thì bạn sẽ thấy container sẽ restart liên tục vì:
There’s a potential issue with the liveness probe in this configuration. The command in the liveness probe creates a file, waits for a bit, and then removes the file, but there’s no actual check for the application’s health. Plus, after the file is deleted, the container will sleep for 600 seconds before the next loop, but the probe interval is only 10 seconds (periodSeconds: 10), which means Kubernetes will likely consider the application to be unhealthy after the file is deleted and before the next cycle of the command. This can result in the container being restarted unnecessarily.
Real example:
Các pods sẽ sử dụng chung 1 persistent volume.
Bài toán đặt ra là mình sẽ liên tục check xem pod có mount được xuống PV hay không.
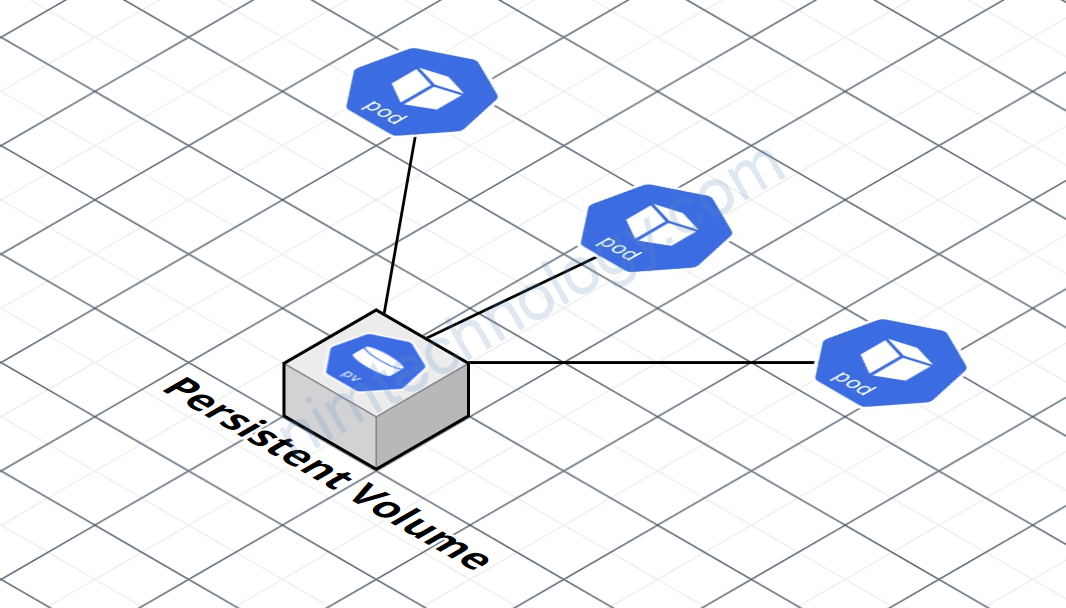
Tạo 1 file tự xuống volume và xóa.
 ####
          livenessProbe:
            exec:
              command:
                - /bin/sh
                - '-c'
                - 'touch /app/downloaded/healthy; sleep 1; rm -rf /app/downloaded/healthy; sleep 1'
            failureThreshold: 3
            initialDelaySeconds: 5
            periodSeconds: 10
            successThreshold: 1
            timeoutSeconds: 5
Dùng command “test -d” để test folder
          livenessProbe:
            exec:
              command:
                - /bin/sh
                - '-c'
                - test -d /app/downloaded || exit 1
            failureThreshold: 3
            initialDelaySeconds: 5
            periodSeconds: 10
            successThreshold: 1
            timeoutSeconds: 5
Startup
Cài này dùng khá là ít
Startup probes in Kubernetes are used to check if a container within a pod has successfully started and is ready to perform its primary functions. It is particularly useful for slow-starting containers or applications that require a significant amount of time for initialization. Startup probes help Kubernetes determine when the container has successfully started, without impacting liveness or readiness probes.
startupProbe:
  httpGet:
    path: /startup
    port: 8080
  initialDelaySeconds: 5
  periodSeconds: 10
  failureThreshold: 30
- It is used to indicate if the application inside the Container has started.
- If a startup probe is provided, all other probes are disabled.
- Once the startup probe has succeeded once, the liveness probe takes over to provide a fast response to container deadlocks.
- In the given example, if the request fails, it will restart the container.
- If not provided the default state is Success.