Nếu các bạn đã sử dụng các hệ thông CI như github action và bitbucket thì bạn sẽ để ý chúng ta sẽ của artifact để lưu các result trả về trong quá trình CI để làm report để download,…
1) Setup Artifact for Argo Workflow.
1.1) Install Minio.
Nếu bạn sài AWS thì có thể sử dụng S3 bài này thì mình hướng dẫn
REPO URL: https://helm.min.io/
CHART: minio:8.0.10
Value files:

>>>>>
fullnameOverride: argo-artifacts
persistence:
  size: 1Gi
Bạn sẽ thấy là mình chỉ set volume cho minio là 1Gi bạn có thể extend thêm nhé.
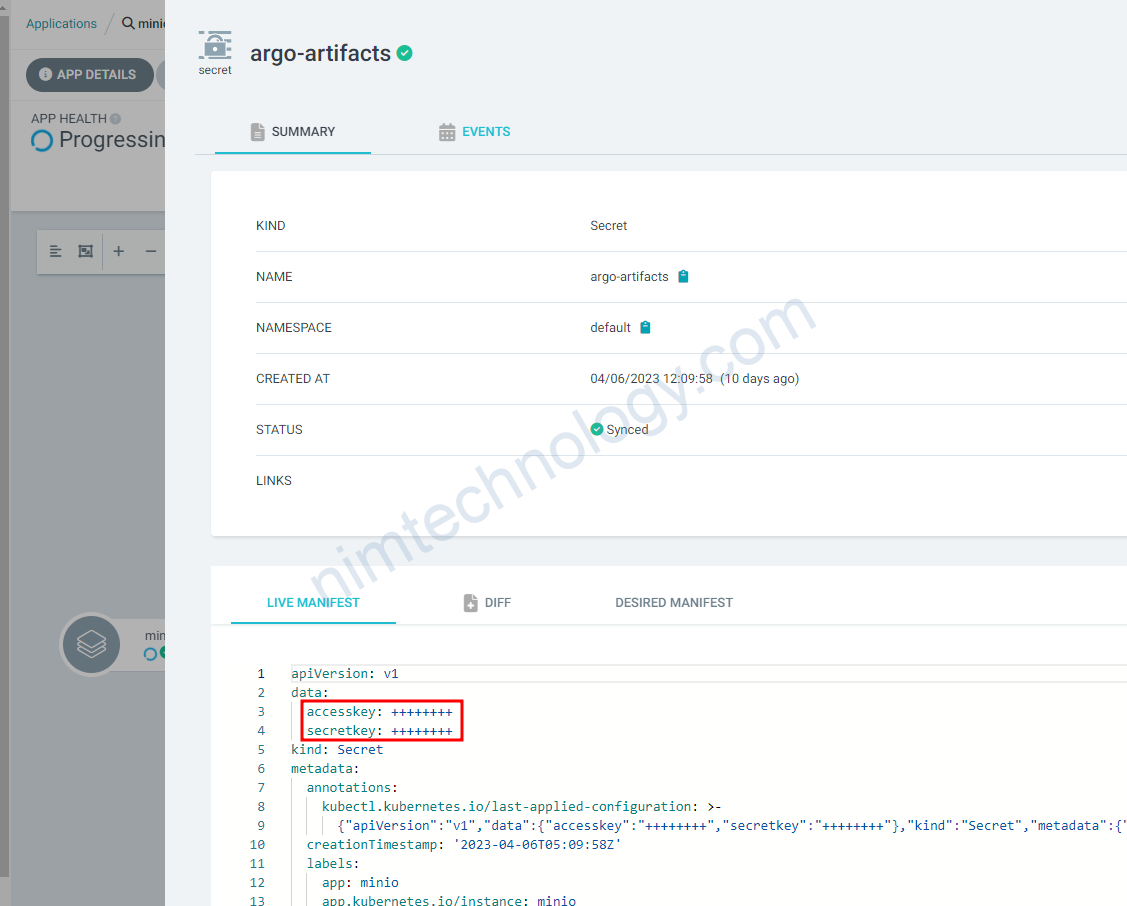
Bạn sẽ thấy nó tự generate access key và secret key bạn có thể sử dụng để access vào minio nhé.

Bạn nhớ vào loging vào minio vào tạo bucket nhé
Ở đây mình tạo bucket tên là argo-workflow
1.2) S3
Bạn có thể dụng config terraform này để create s3:
resource "aws_s3_bucket" "argo-workflow-staging" {
  bucket = "${local.name}"
  force_destroy = true
  lifecycle {
    prevent_destroy = false
  }
  tags = {
    Description = "the artifact for Argo Workflow"
  }
}
2) Set up Argo Workflow with artifact Repository.
Mình xin thú nhận là mình đã sử dụng argocd để deploy helm chart nên cũng quên luôn câu lệnh
REPO URL: https://argoproj.github.io/argo-helm
CHART: argo-workflows:0.24.1
Values:

server:
  extraArgs:
    - --auth-mode=server
  ingress:
    enabled: true
    annotations:
      cert-manager.io/issuer: selfsigned-issuer-argo-workflow
      cert-manager.io/issuer-kind: Issuer
      nginx.ingress.kubernetes.io/auth-signin: https://$host/oauth2/start?rd=$escaped_request_uri
      nginx.ingress.kubernetes.io/auth-url: http://oauth2-proxy.oauth2-proxy.svc.cluster.local/oauth2/auth
      nginx.ingress.kubernetes.io/configuration-snippet: |
        proxy_set_header Origin "";
        proxy_hide_header l5d-remote-ip;
        proxy_hide_header l5d-server-id;
      nginx.ingress.kubernetes.io/proxy-buffer-size: 8k
      nginx.ingress.kubernetes.io/proxy-buffering: "on"
    ingressClassName: "nginx"
    hosts:
      - argo-workflow.nimtechnology.com
    paths:
      - /
    pathType: ImplementationSpecific
    tls:
      - hosts:
          - argo-workflow.nimtechnology.com
        secretName: tls-oauth2-proxy-ingress

useStaticCredentials: true
useDefaultArtifactRepo: true
artifactRepository:
  archiveLogs: true
  s3:
    bucket: argo-workflow
    endpoint: argo-artifacts:9000
    keyFormat: logs/artifacts/{{workflow.name}}/{{pod.name}}
    insecure: true
    accessKeySecret:
      name: argo-artifacts
      key: accesskey
    secretKeySecret:
      name: argo-artifacts
      key: secretkey

controller:
  workflowDefaults:
   spec:
     serviceAccountName: argo-workflow-argo-workflows-workflow-controller
2.1) AWS S3 IRSA
Ở đây mình sẽ chia làm 2 thứ
– Khi argoworkflow chạy thì nó cần save log / artifact file lên s3
– argo-workflows-server sẽ cần access vào s3 để show log and artifact file lên UI.
2.1.1) Provide permission to argoworkflow pipeline can access the S3 through IRSA
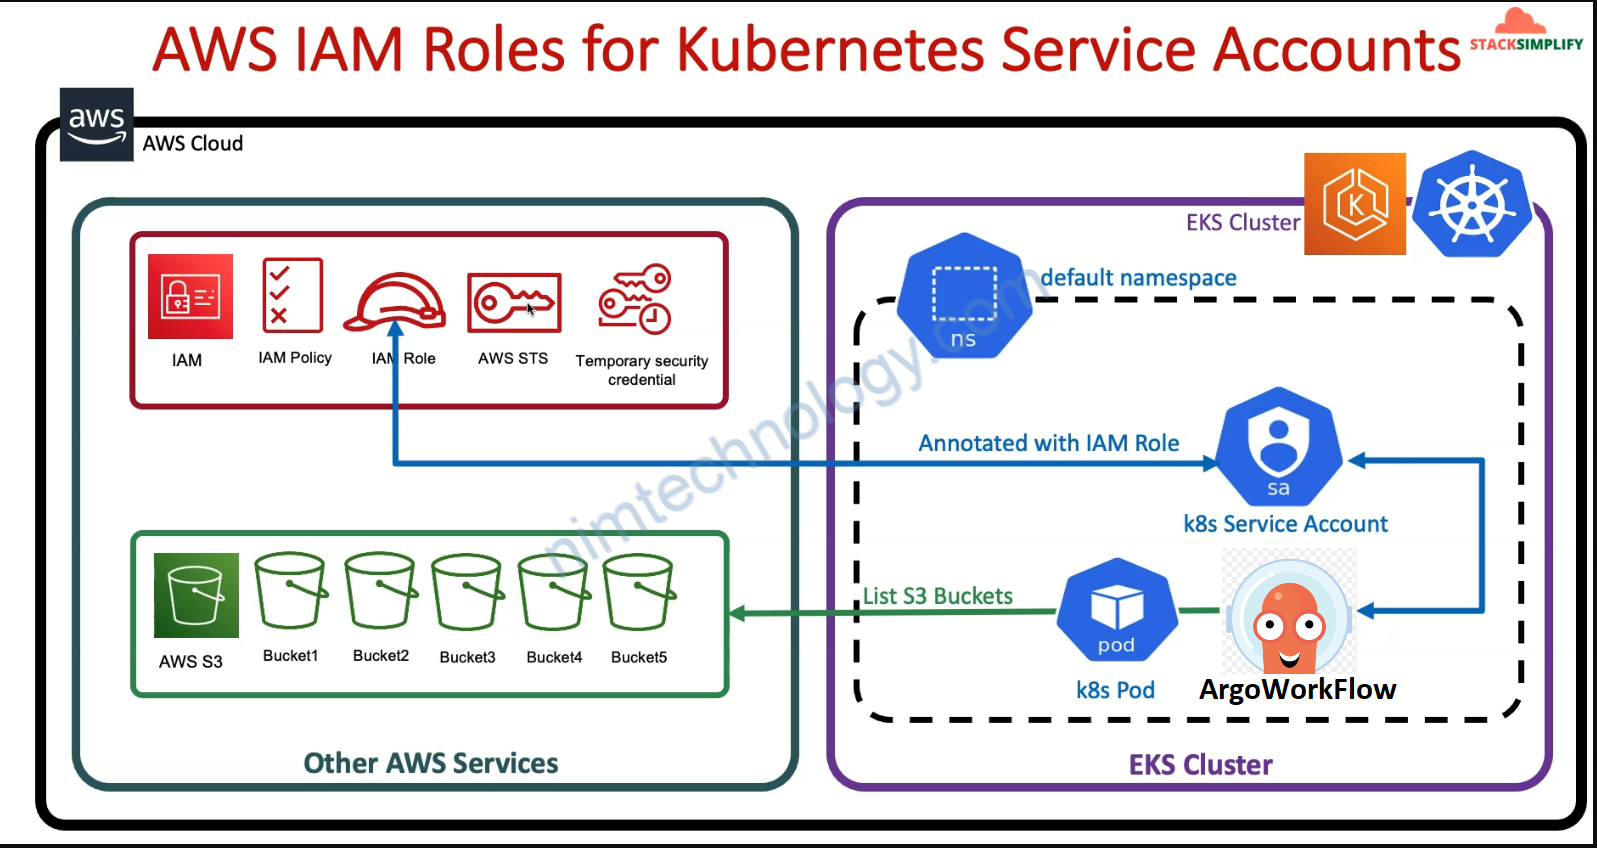
Nhìn hình bạn cũng có thể thay giở này pipeline chúng ta cần access S3 thông qua IRSA
c4-02-irsa-iam-policy-and-role.tf
>>>>>>>>>>>>
>>>>>>

# output "aws_iam_openid_connect_provider_arn" {
#   description = "aws_iam_openid_connect_provider_arn"
#   value = "arn:aws:iam::${element(split(":", "${data.aws_eks_cluster.k8s.arn}"), 4)}:oidc-provider/${element(split("//", "${data.aws_eks_cluster.k8s.identity[0].oidc[0].issuer}"), 1)}"
# }

# Resource: IAM Policy for Cluster Autoscaler
resource "aws_iam_policy" "irsa_iam_policy" {
  name        = "${local.name}-ArgoWorkflowPolicy"
  path        = "/"
  description = "Argo Workflow Policy"

  # Terraform's "jsonencode" function converts a
  # Terraform expression result to valid JSON syntax.
  policy = jsonencode({
    "Version": "2012-10-17",
    "Statement": [
        {
            "Effect": "Allow",
            "Action": [
                "s3:ListBucket",
                "s3:GetBucketLocation"
            ],
            "Resource": "arn:aws:s3:::${local.name}"
        },
        {
            "Effect": "Allow",
            "Action": [
                "s3:GetObject",
                "s3:PutObject",
                "s3:DeleteObject"
            ],
            "Resource": "arn:aws:s3:::${local.name}/*"
        }
    ]
  })
}

#data.terraform_remote_state.eks.outputs.aws_iam_openid_connect_provider_arn
#data.terraform_remote_state.eks.outputs.aws_iam_openid_connect_provider_extract_from_arn

# Resource: Create IAM Role and associate the EBS IAM Policy to it
resource "aws_iam_role" "irsa_iam_role" {
  name = "${local.name}-irsa-iam-role"

  # Terraform's "jsonencode" function converts a Terraform expression result to valid JSON syntax.
  assume_role_policy = jsonencode({
    Version = "2012-10-17"
    Statement = [
      {
        Action = "sts:AssumeRoleWithWebIdentity"
        Effect = "Allow"
        Sid    = ""
        Principal = {
          Federated = "arn:aws:iam::${element(split(":", "${data.aws_eks_cluster.k8s.arn}"), 4)}:oidc-provider/${element(split("//", "${data.aws_eks_cluster.k8s.identity[0].oidc[0].issuer}"), 1)}"
        }
        Condition = {
          StringLike = {
            "${element(split("oidc-provider/", "arn:aws:iam::${element(split(":", "${data.aws_eks_cluster.k8s.arn}"), 4)}:oidc-provider/${element(split("//", "${data.aws_eks_cluster.k8s.identity[0].oidc[0].issuer}"), 1)}"), 1)}:sub": "system:serviceaccount:argo-workflow:argoworkflow-XXX-staging-argo-workflows-*"
          }
        }

      },
    ]
  })

  tags = {
    tag-key = "${local.name}-irsa-iam-role"
  }
}

# Associate IAM Role and Policy
resource "aws_iam_role_policy_attachment" "irsa_iam_role_policy_attach" {
  policy_arn = aws_iam_policy.irsa_iam_policy.arn
  role       = aws_iam_role.irsa_iam_role.name
}

output "irsa_iam_role_arn" {
  description = "IRSA Demo IAM Role ARN"
  value = aws_iam_role.irsa_iam_role.arn
}
Với design hiện tại thì default ArgoWorkflow sẽ sử dụng service account của workflow-controller
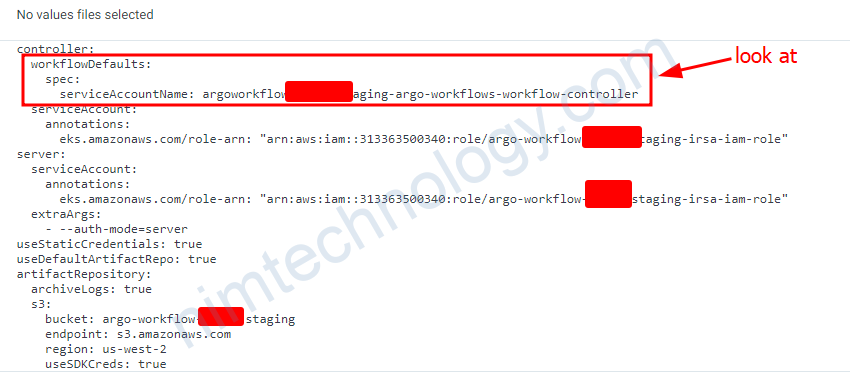
Và lúc này mình cũng cần add annotation role-arn vào service account đó.

2.1.2) argo-workflows-server need to access S3 through IRSA.
Tiếp đến là argo-workflows-server cần access vào S3
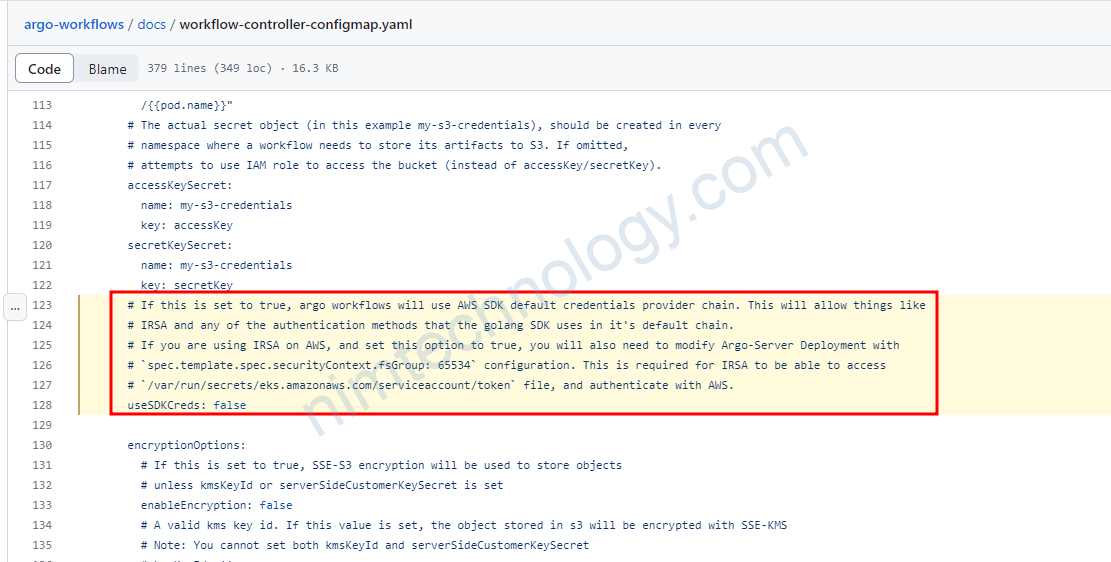
thì argo-workflows-server sẽ sử dụng Service Account để authen với S3 và access vào S3.
Bạn còn cần cấu hình 1 thứ nữa là:
useStaticCredentials: false
Mình có explain config ở đây:
https://nimtechnology.com/2022/01/02/argoworkflows-installing-awgo-workflows-by-the-helm-chart-and-demo-a-few-simple-templates/#11_explain_a_few_configuration
Và đây sẽ config mà bạn cần thao khảo:
apiVersion: argoproj.io/v1alpha1
kind: Application
metadata:
  name: argoworkflow-nimtechnology-staging
  namespace: argocd
spec:
  destination:
    namespace: argo-workflow
    name: 'arn:aws:eks:us-west-2:31336XXXX340:cluster/staging-mdcl-nimtechnology-engines'
  project: meta-structure
  source:
    repoURL: https://argoproj.github.io/argo-helm
    targetRevision: "0.24.1"
    chart: argo-workflows
    helm:
      values: |
        controller:
          workflowDefaults:
            spec:
              serviceAccountName: argoworkflow-nimtechnology-staging-argo-workflows-workflow-controller
          serviceAccount:
            annotations:
              eks.amazonaws.com/role-arn: "arn:aws:iam::31336XXXX340:role/argo-workflow-nimtechnology-staging-irsa-iam-role"
        server:
          serviceAnnotations:
            service.beta.kubernetes.io/aws-load-balancer-internal: 'true'
          serviceType: LoadBalancer
          serviceAccount:
            annotations:
              eks.amazonaws.com/role-arn: "arn:aws:iam::31336XXXX340:role/argo-workflow-nimtechnology-staging-irsa-iam-role"
          extraArgs:
            - --auth-mode=server
        useStaticCredentials: true
        useDefaultArtifactRepo: true
        artifactRepository:
          archiveLogs: true
          s3:
            bucket: argo-workflow-nimtechnology-staging
            endpoint: s3.amazonaws.com
            region: us-west-2
            useSDKCreds: true
Recheck.
Bạn có thể apply template này để sem artifact của bạn có đang hoạt động hay ko?
https://argoproj.github.io/argo-workflows/artifact-visualization/
apiVersion: argoproj.io/v1alpha1
kind: WorkflowTemplate
metadata:
  name: artifacts
  annotations:
    workflows.argoproj.io/description: |
      This example shows how to produce different types of artifact.
spec:
  entrypoint: main
  templates:
    - name: main
      volumes:
        - name: in
          emptyDir: { }
        - name: out
          emptyDir: { }
      inputs:
        artifacts:
          - name: temps
            path: /in/annual.csv
            http:
              url: https://datahub.io/core/global-temp/r/annual.csv
      containerSet:
        volumeMounts:
          - mountPath: /in
            name: in
          - mountPath: /out
            name: out
        containers:
          - name: setup
            image: argoproj/argosay:v2
            command:
              - sh
              - -c
            args:
              - |
                mkdir -p /out/assets
          - name: gnuplot
            image: remuslazar/gnuplot
            dependencies:
              - setup
            args:
              - -e
              - |
                set xlabel 'Year'; set ylabel 'Mean';
                set grid;
                set datafile separator ',';
                set term png size 600,400;
                set output '/out/assets/global-temp.png';
                plot '/in/annual.csv' every 2::0 skip 1 using 2:3 title 'Global Temperature' with lines linewidth 2;
          - name: main
            image: argoproj/argosay:v2
            dependencies:
              - setup
            command:
              - sh
              - -c
            args:
              - |
                cowsay "hello world" > /out/hello.txt

                cat > /out/hello.json <<EOF
                {"hello": {"world": true}}
                EOF

                echo '* {font-family: sans-serif}' > /out/assets/styles.css

                cat > /out/index.html <<EOF
                <html>
                  <head>
                    <link rel='stylesheet' href='assets/styles.css' type='text/css'/>
                  </head>
                  <body>
                    <h1>Global Temperature</h1>
                    <img src='assets/global-temp.png'/>
                  </body>
                </html>
                EOF

                cat > /out/malicious.html <<EOF
                <html>
                  <body>
                    <script>alert(1)</script>
                    <p>This page attempts to run a script that shows an alert, but the Argo Server UI Content-Security-Policy will prevent that.</p>
                    <p>To check, open your Web Console and see that "Blocked script execution ... because the document's frame is sandboxed." (or similar) is printed.</p>
                  </body>
                </html>
                EOF
      outputs:
        artifacts:
          # saving single files
          - name: text-file
            path: /out/hello.txt
            s3:
              key: hello.txt
            archive:
              none: { }
          # JSON files are shown with syntax highlighting.
          - name: json-file
            path: /out/hello.json
            s3:
              key: hello.json
            archive:
              none: { }
          # CSS in not considered a known file type
          - name: css-file
            path: /out/assets/styles.css
            s3:
              key: styles.css
            archive:
              none: { }
          # this artifact tries to run JavaScript
          - name: malicious-file
            path: /out/malicious.html
            s3:
              key: malicious.html
            archive:
              none: { }
          # save a whole directory
          - name: report
            path: /out
            s3:
              key: report/
            archive:
              none: { }
          # this will be a tgz with a single file
          - name: tgz-file
            path: /out/hello.txt
            s3:
              key: file.tgz
          # this will be a tgz with two entries, one dir and one file
          - name: tgz-dir
            path: /out
            s3:
              key: dir.tgz
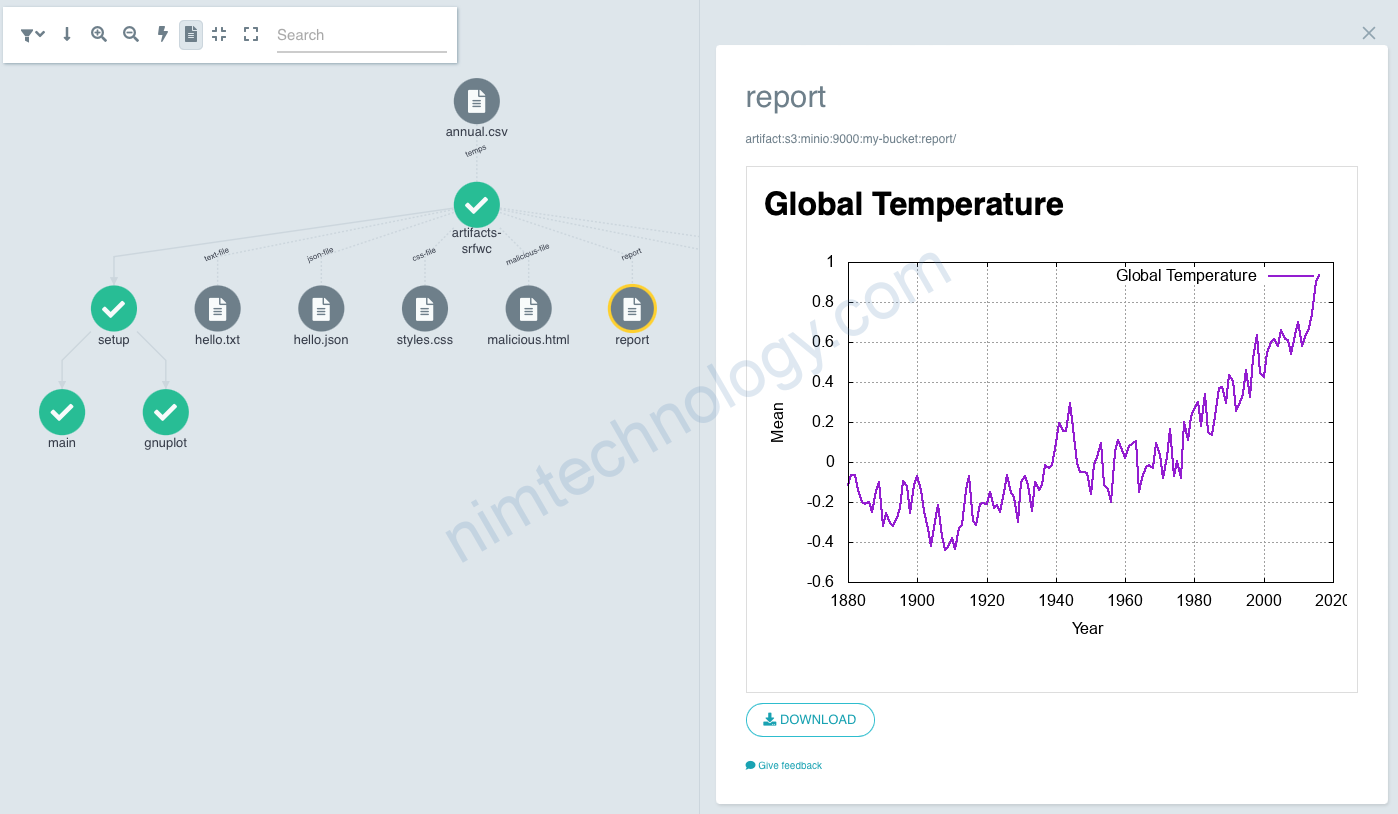
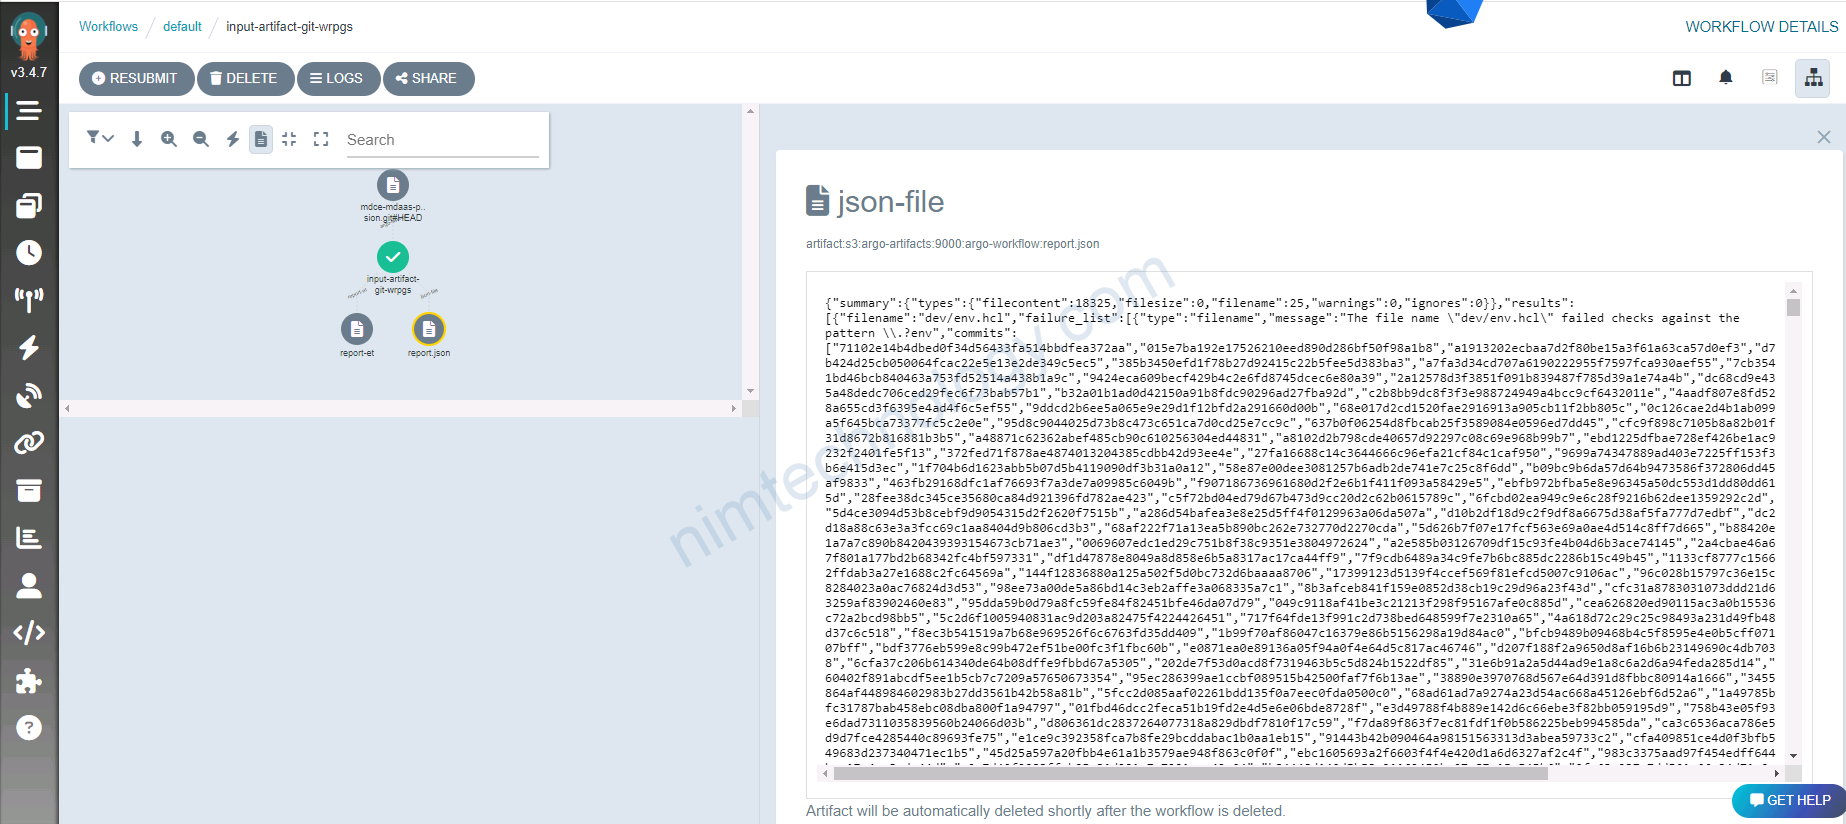
3) Demo Argo Workflow with Artifact.
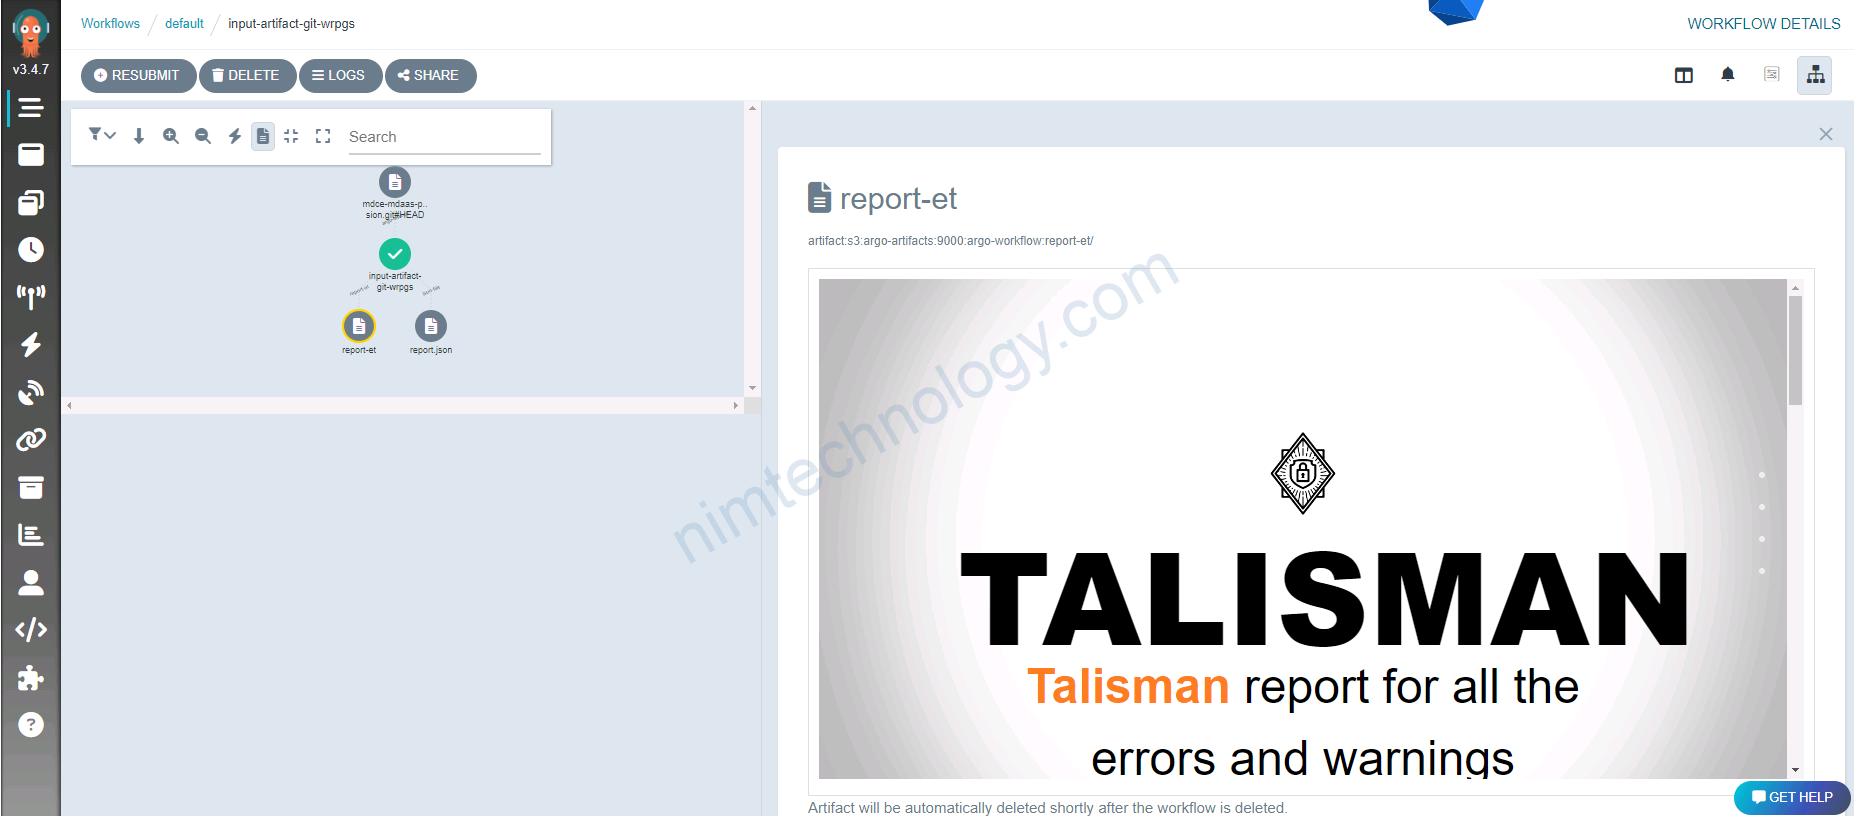
Mình có 1 bài viết về talisman.
Nó dụng để detected sensitive words on your git.
Mình định tự viết 1 workflow scan with talisman.
# This example demonstrates the use of a git repo as a hard-wired input artifact.
# The argo repo is cloned to its target destination at '/src' for the main container to consume.
apiVersion: argoproj.io/v1alpha1
kind: Workflow
metadata:
  generateName: input-artifact-git-
spec:
  entrypoint: git-clone
  templates:
  - name: git-clone
    inputs:
      artifacts:
      - name: argo-source
        path: /mnt/data
        git:
          repo: https://bitbucket.org/nimtechnology/mdce-nim-provision.git
          # revision: "v2.1.1"
          # For private repositories, create a k8s secret containing the git credentials and
          # reference the secret keys in the secret selectors: usernameSecret, passwordSecret,
          # or sshPrivateKeySecret.
          # NOTE: when authenticating via sshPrivateKeySecret, the repo URL should supplied in its
          # SSH format (e.g. git@github.com:argoproj/argo-workflows.git). Similarly, when authenticating via
          # basic auth, the URL should be in its HTTP form (e.g. https://github.com/argoproj/argo-workflows.git)
          usernameSecret:
            name: github-creds
            key: username
          passwordSecret:
            name: github-creds
            key: password
          # sshPrivateKeySecret:
          #   name: github-creds
          #   key: ssh-private-key
          #
          # insecureIgnoreHostKey disables SSH strict host key checking during the git clone
          # NOTE: this is unnecessary for the well-known public SSH keys from the major git
          # providers (github, bitbucket, gitlab, azure) as these keys are already baked into
          # the executor image which performs the clone.
          # insecureIgnoreHostKey: true
          #
          # Shallow clones/fetches can be performed by providing a `depth`.
          # depth: 1
          #
          # Additional ref specs to fetch down prior to checkout can be
          # provided with `fetch`. This may be necessary if `revision` is a
          # non-branch/-tag ref and thus not covered by git's default fetch.
          # See https://git-scm.com/book/en/v2/Git-Internals-The-Refspec for
          # the refspec format.
          # fetch: refs/meta/*
          # fetch: refs/changes/*
          #
          # Single branch mode can be specified by providing a `singleBranch` and `branch` This mode
          # is faster than passing in a revision, as it will only fetch the references to the given branch.
          # singleBranch: true
          # branch: my-branch
    script:
      image: mrnim94/talisman:0.0.4
      command: [sh]
      source: |
        echo "begin to scan"
        ls -la
        talisman --scanWithHtml
        talisman --scan
        ls -la
        echo "sleep 10s"
      workingDir: /mnt/data
    outputs:
      artifacts:
      # save a whole directory
        - name: report-et
          path: /mnt/data/talisman_html_report
          s3:
            key: report-et/
          archive:
            none: { }
      # JSON files are shown with syntax highlighting.
        - name: json-file
          path: /mnt/data/talisman_report/talisman_reports/data/report.json
          s3:
            key: report.json
          archive:
            none: { }
4) Argo workflows Approval Example
4) Transfer the file saved in the artifact of this step to another step.
https://argo-workflows.readthedocs.io/en/latest/walk-through/artifacts/
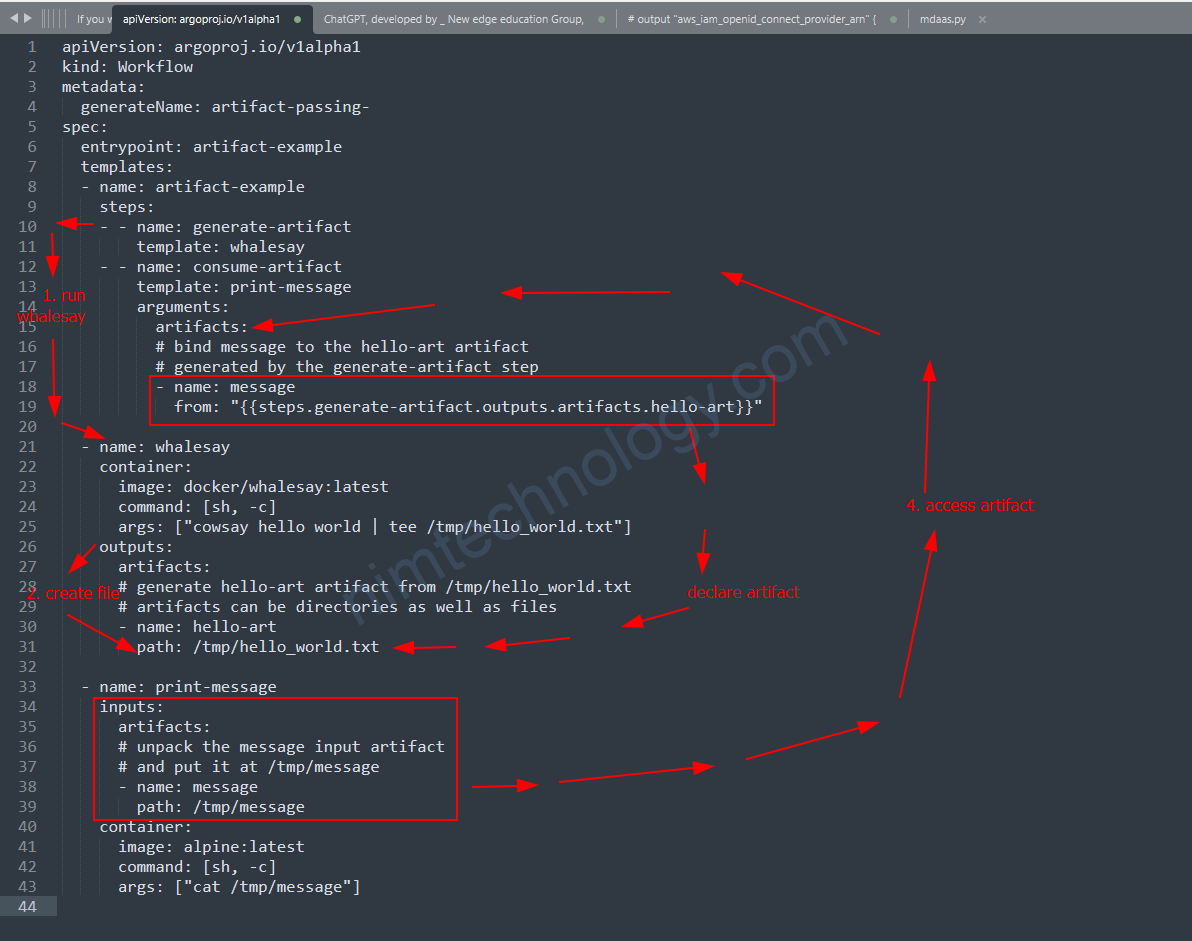
- Step 1: Generate Artifact (
generate-artifact)- This step uses a template named
whalesay. - In this step, a Docker container based on the
docker/whalesayimage runs a command to create a text file. This command usescowsay(a program that generates ASCII pictures of a cow with a message) to write “hello world” into a file named/tmp/hello_world.txt. - After the command runs, the file
/tmp/hello_world.txtis designated as an artifact (a file created during the workflow) namedhello-art.
- This step uses a template named
- Step 2: Consume Artifact (
consume-artifact)- This step uses a template named
print-message. - It takes the artifact generated in the first step (
hello-art) as its input. This input is referred to using a special syntax:{{steps.generate-artifact.outputs.artifacts.hello-art}}, which means “take the output artifact namedhello-artfrom the stepgenerate-artifact“. - The
print-messagestep places the content ofhello-artinto a file located at/tmp/messagein its own container. - Then, it simply prints the content of this file (
/tmp/message) to the screen, using thecatcommand in an Alpine Linux container.
- This step uses a template named
DAG templates use the tasks prefix to refer to another task, for example {{tasks.generate-artifact.outputs.artifacts.hello-art}}.