1) Overview of Argo Event.
“Argo Events is an event-driven workflow automation framework for Kubernetes which helps you trigger K8s objects, Argo Workflows, Serverless workloads, etc. on events from various sources like webhooks, S3, schedules, messaging queues, gcp pubsub, sns, sqs, etc.”
Now let’s introduce the core concepts of the events:
- EventSource
– EventSource defines the configuration for consuming events from an external source. - Sensor
– Sensor defines a set of Events to occur for the action to be started. - EventBus
– EventBus is an internal communication bus for Argo Events. - Trigger
– Triggers are a set of actions that will occur after dependencies are met.
(1) EventSource -> Sensor -> Trigger
(2) EventSource —---
        …           |----> Sensor -> Trigger
    EventSource —---
The EventBus acts as the transport layer of Argo-Events by connecting the event sources and sensors.
2) Install Argo Event on Kubernetes.
Trong bài lab này thì mình install argo-event cùng namespace (default) với argo-workflow.
Nếu bạn cài đặt khác namespace chúng ta sẽ cần điều chỉnh chút nhưng mình sẽ nói sau.
apiVersion: argoproj.io/v1alpha1
kind: Application
metadata:
  name: argo-events
  namespace: argocd
spec:
  destination:
    namespace: default
    server: https://kubernetes.default.svc
  project: default
  source:
    chart: argo-events
    repoURL: https://argoproj.github.io/argo-helm
    targetRevision: 2.4.3
    helm:
        values: |
          controller:
            tolerations:
              - key: purpose
                operator: Equal
                value: 'true'
                effect: NoSchedule

3) Configure with Argo Event.
3.1) Basic Configurations.
3.1.1) Create EventBus
Đầu tiên chúng ta cần tạo 1 event bus:
Argo Events uses the EventBus to communicate between EventSources and Sensors
Refer configuration:
https://github.com/argoproj/argo-events/blob/master/api/event-bus.md#argoproj.io/v1alpha1.NATSBus
apiVersion: argoproj.io/v1alpha1
kind: EventBus
metadata:
  name: default
spec:
  nats:
    native:
      auth: none
      # nodeSelector:
      #     kubernetes.io/os: linux
This creates a native NATS EventBus with no authentication, suitable for basic use cases and internal testing
sau đó mình thấy có 3 pod mới liên quan đến eventbus

3.1.2) Create EventSource
refer to: https://github.com/argoproj/argo-events/blob/master/api/event-source.md
apiVersion: argoproj.io/v1alpha1
kind: EventSource
metadata:
  name: webhook-event-source
  namespace: default
spec:
  # template:
  #   nodeSelector:
  #     kubernetes.io/os: linux
  service:
    ports:
      - port: 12000
        targetPort: 12000
  webhook:
    example:
      endpoint: /webhook
      method: POST
      port: '12000'
      url: ''
Bạn có thể thấy được là mình đang tạo 1 webhook để lắng nghe và đẩy các request sang Sensor.

webhook này open port 12000 và với path /webhook.
Webhook đang chấp nhận method POST.
và bạn cũng có thể tưởng tượng ra 1 curl:
curl -X POST http://<domain>:12000/webhook -d '{}'
3.1.3) Create Sensor.
Từ WorkflowTemplate chúng ta mới có thể tạo Sensor:
apiVersion: argoproj.io/v1alpha1
kind: WorkflowTemplate
metadata:
  name: wftmpl-dag
  namespace: default
spec:
  arguments:
    parameters:
      - name: message
        value: Nimtechnology - Task executed.
  entrypoint: dag-templates
  templates:
    - dag:
        tasks:
          - arguments:
              parameters:
                - name: message_command
                  value: '{{inputs.parameters.message}}'
            name: Task1
            template: task-template
          - arguments:
              parameters:
                - name: message_command
                  value: '{{inputs.parameters.message}}'
            dependencies:
              - Task1
            name: Task2
            template: task-template
          - arguments:
              parameters:
                - name: message_command
                  value: '{{inputs.parameters.message}}'
            dependencies:
              - Task1
            name: Task3
            template: task-template
          - arguments:
              parameters:
                - name: message_command
                  value: '{{inputs.parameters.message}}'
            dependencies:
              - Task2
              - Task3
            name: Task4
            template: task-template
      inputs:
        parameters:
          - name: message
      name: dag-templates
    - inputs:
        parameters:
          - name: message_command
      name: task-template
      script:
        command:
          - python
        image: python:3.8-slim
        source: |
          print("{{inputs.parameters.message_command}}")
3.1.3.1) Sensor will create a workflow based on a workflow template
kind: Sensor
metadata:
  name: wftmpl-dag-sensor
  namespace: default
spec:
  dependencies:
    - name: webhook-dep
      eventName: example
      eventSourceName: webhook-event-source
  template:
    nodeSelector:
      kubernetes.io/os: linux
    serviceAccountName: argo-workflow-argo-workflows-workflow-controller
  triggers:
    - template:
        k8s:
          operation: create
          source:
            resource:
              apiVersion: argoproj.io/v1alpha1
              kind: Workflow
              metadata:
                generateName: wftmpl-dag-instance-
              spec:
                workflowTemplateRef:
                  name: wftmpl-dag
        name: workflow-trigger
chúng ta sẽ giải thích 1 chút:
spec.dependencies: đây là 1 array mà list all EventSources mà nó phụ thuộc. vì EventSource push event vào sensor.
– name: A unique name for this dependency (can be any string, e.g., webhook-dep).
– eventSourceName: Must match your EventSource’s metadata.name (webhook-event-source).
– eventName: Must match the key under webhook in your EventSource (example).
name: workflow-trigger: bạn đặt tên gì cũng được, This assigns a unique name to the trigger template within your Sensor.

Khi bạn gửi 1 lệnh curlcurl -X POST http://webhook-event-source-eventsource-svc.default.svc.cluster.local:12000/webhook -d '{}'
Bạn sẽ thấy là message input đang là mặc định của workflow template.
3.1.3.1) Sensor will submit a workflow template
apiVersion: argoproj.io/v1alpha1
kind: Sensor
metadata:
  name: wftmpl-dag-sensor-input
  namespace: default
spec:
  dependencies:
    - name: webhook-dep
      eventSourceName: webhook-event-source
      eventName: example
  template:
    serviceAccountName: argo-workflow-argo-workflows-workflow-controller
  triggers:
    - template:
        name: webhook-trigger
        argoWorkflow:
          group: argoproj.io
          version: v1alpha1
          resource: workflows
          operation: submit
          source:
            resource:
              apiVersion: argoproj.io/v1alpha1
              kind: Workflow
              metadata:
                generateName: wftmpl-dag-instance-input-
                namespace: default
              spec:
                workflowTemplateRef:
                  name: wftmpl-dag
                arguments:
                  parameters:
                    - name: message
                      value: "Triggered by Argo Events"
          parameters:
            - src:
                dependencyName: webhook-dep
                dataKey: body.message
              dest: spec.arguments.parameters.0.value
curl -X POST http://webhook-event-source-eventsource-svc.default.svc.cluster.local:12000/webhook -H 'Content-Type: application/json' -d '{"message":"input from outsite"}'Tiếp đến là output trong argo workflow:
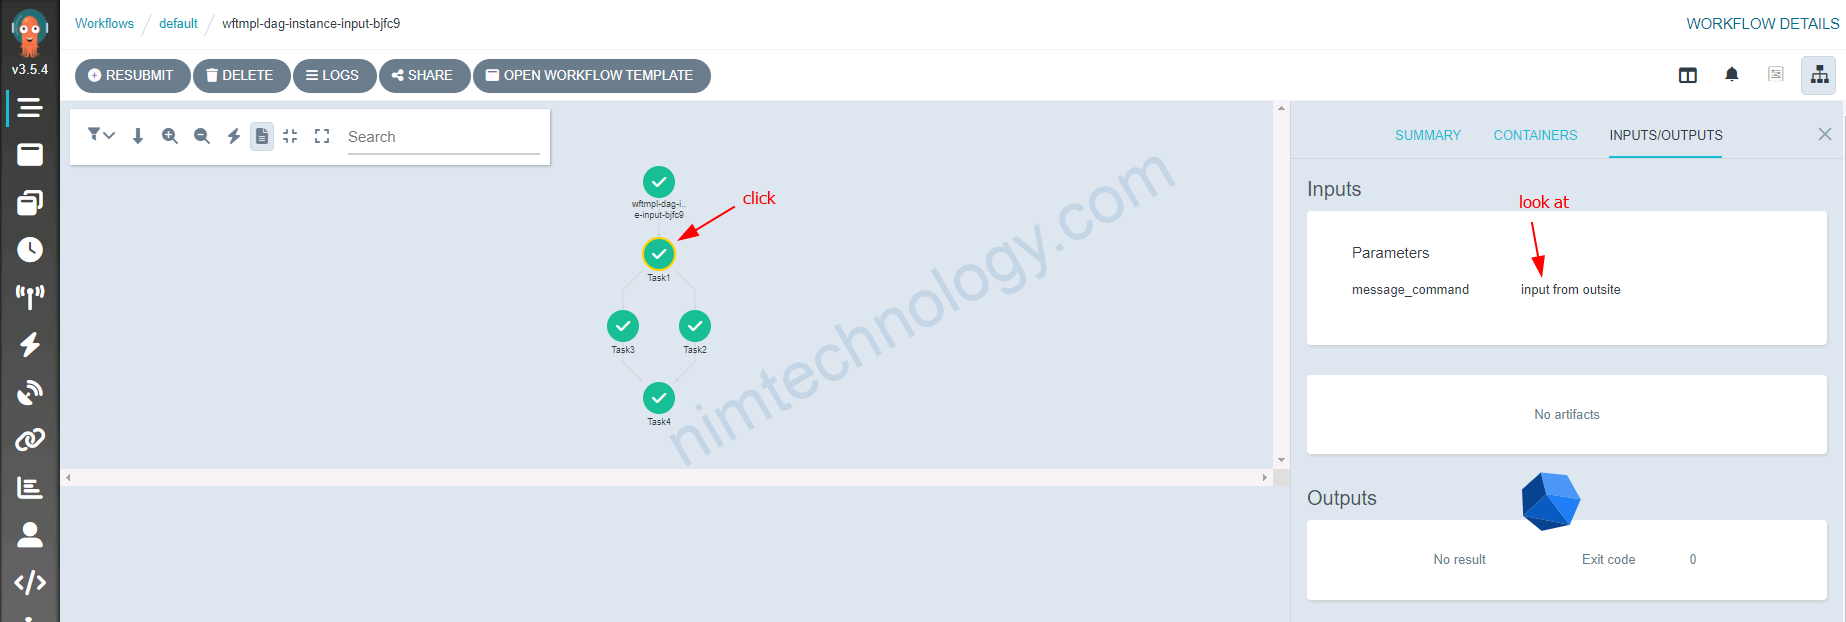
Giải thích 1 chút về cách lấy nhận value:

Đầu tiên bạn khai báo đúng cài dependencyName như trong hình.
Khi bạn curl lên url thì nó sẽ lấy trường message trong body và đây vị trí thứ [0] trong parameter và workflow template sẽ nhận được giá trị.
Advance Configuration with Argo Events.
Protect EventSource by authentication
https://argoproj.github.io/argo-events/eventsources/webhook-authentication/
KHi call vào Webhook EventSource bạn sẽ không cần Authenticate gì cả.
Nếu bạn provide for Public environment thì điều này sẽ rất là dangerous.

Đầu tiên bạn cần create secret trên K8S để nó chứa tocken.
echo -n 'af3qqs321f2ddwf1e2e67dfda3fs' > ./token.txt

kubectl create secret generic my-webhook-token --from-file=my-token=./token.txt
Tiếp theo là bạn cập nhật thêm authentication for EventSource
apiVersion: argoproj.io/v1alpha1
kind: EventSource
metadata:
  name: webhook-event-source
  namespace: default
  resourceVersion: '278784740'
  uid: e2cf76c7-714d-4958-92c1-4c22a4298f1d
spec:
  service:
    ports:
      - port: 12000
        targetPort: 12000
  webhook:
    example:
      authSecret:
        key: my-token
        name: my-webhook-token
      endpoint: /webhook
      method: POST
      port: '12000'
      url: ''
Dựa bào authenSecret nod tìm đến secret “my-webhook-token” vào key “my-token” và lấy value của secret đó.
TOKEN="Bearer af3qqs321f2ddwf1e2e67dfda3fs"

curl -X POST http://webhook-event-source-eventsource-svc.default.svc.cluster.local:12000/webhook -H 'Content-Type: application/json' -H "Authorization: $TOKEN" -d '{"message":"input from outsite and token"}'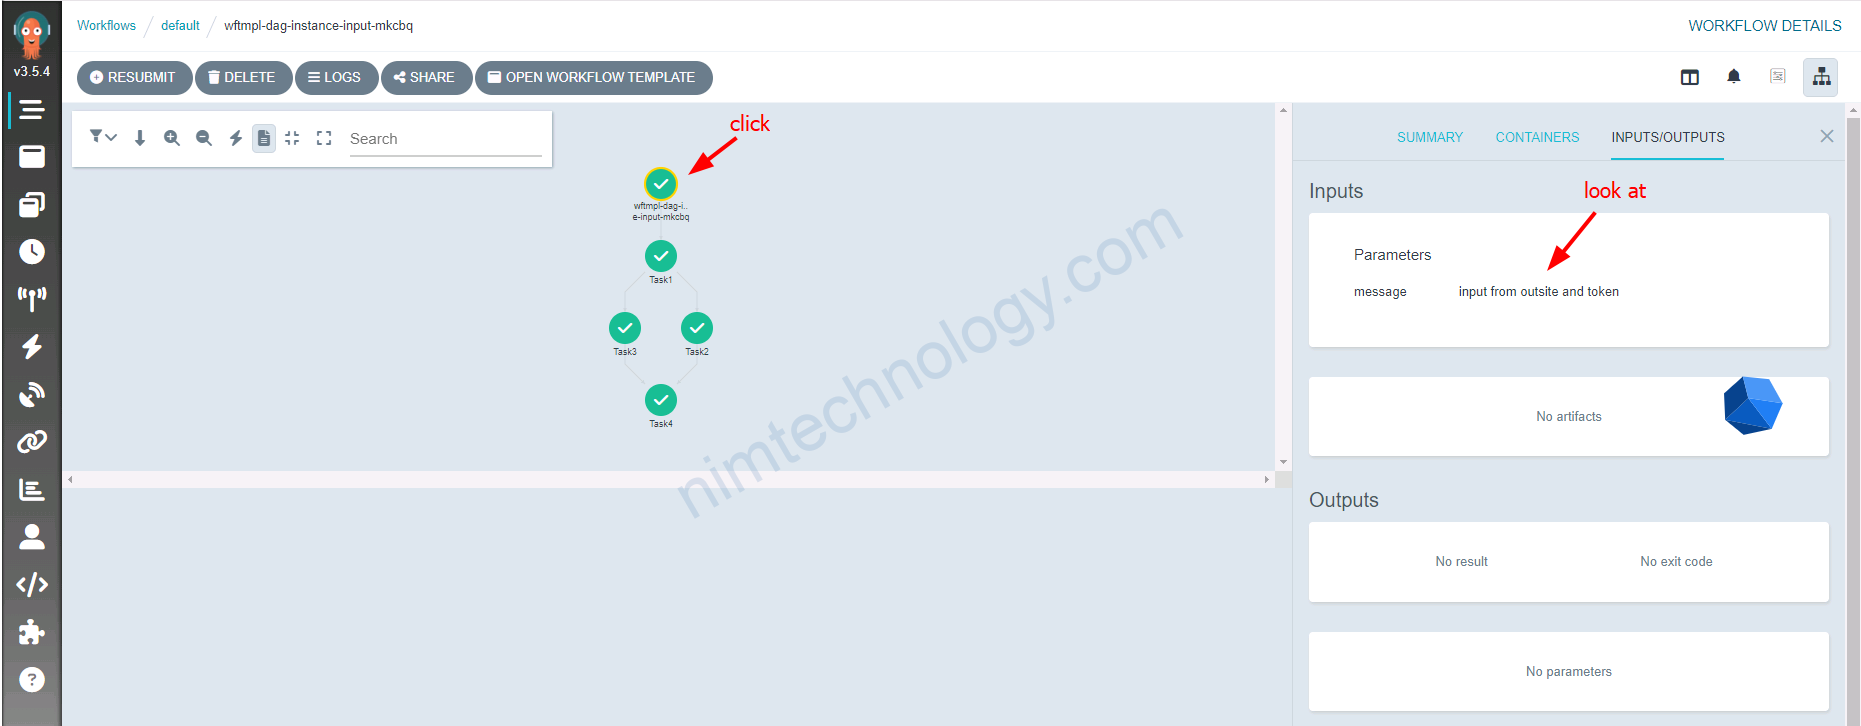
Bạn có thể thấy EventSource sẽ tạo ra 1 Service khi bạn config spec.service

Nếu bạn muốn custome service thì có thể bỏ phần này và tự tạo service link vào deployment mà EventSource tạo ra.
Webhook payload: optional fields & flexibility in Argo Event.

Như anh em có thể thấy nếu anh đã define như thế này trong Sensor.
thí bắt buộc trong request body của mình phải có đủ các key và value.
Nếu bạn cố tính để thiếu: “PINNED_ENGINES”: “”, như request body bên dưới
'{
    "ENGINE_STORAGE_LOCATION": "s3",
    "ENGINE_STABLE_DIRECTORY": "engines-automation-tests",
    "ENGINE_NAME": "ds",
    "PIN_ENGINE_VERSION": "7.5.2-23142",
    "PIN_DATABASE_VERSION": "5.1.5",
    "REQUEST_ID": "213123123123"
}'
nó sẽ báo lỗi là không tìm thấy PINNED_ENGINES.
Giờ chúng ta muốn nó là 1 cài optional và non required thì chúng ta phải làm sao.
Chúng ta sẽ chi tiếp trường hợp nếu giá trị của anh em là String và Object.
Value is string
Cụ thể thì key và value nó sẽ như thế này:
"PIN_ENGINE_VERSION": "7.5.2-23142"Lúc này trong sensor chúng ta sẽ để như sau:
           - src:
                dependencyName: engine-package-test-dep
                dataTemplate: '{{ if .Input.body.PIN_DATABASE_VERSION }}{{.Input.body.PIN_DATABASE_VERSION }}{{ else }} {{ end }}'
              dest: spec.arguments.parameters.4.value
Ở đây có 1 điểm mới là dataTemplate: chúng ta sử dụng Go template đánh giá event đi vào.
.Input.body.PIN_DATABASE_VERSION: Nó sẽ access vào key PIN_DATABASE_VERSION trong parsed Json Body.
{{ if .Input.body.PIN_DATABASE_VERSION }}{{.Input.body.PIN_DATABASE_VERSION }}{{ else }} {{ end }}Nếu lấy được giá trị của .Input.body.PIN_DATABASE_VERSION thì nhận giá trị đó và đây nó vào theo như dòng này dest: spec.arguments.parameters.4.value
Nếu bạn không gửi PIN_DATABASE_VERSION trong request body => cái chỗ đó trống và không có giá trị nên theo như code trên nó đây whitespace vào dest: spec.arguments.parameters.4.value
Lúc này thì PIN_DATABASE_VERSION = ” ” thì trong code của bạn clear mấy whitespace là ok.
và trong Golang thì mình sử dụng cách này:
*pinDatabaseVersion = strings.TrimSpace(*pinDatabaseVersion)Value is Array or Object
Giờ value của bạn sẽ có dạng khác
"PINNED_ENGINES": [
        {
            "ENGINE_ID": "ds",
            "PIN_ENGINE_VERSION": "3.27.2.4-2371",
            "PIN_DATABASE_VERSION": "unknown"
        }
    ]
Lúc này chúng ta nên dùng
            - src:
                dependencyName: engine-package-test-dep
                dataTemplate: '{{- if hasKey .Input.body "PINNED_ENGINES" -}}{{ toJson (index .Input.body "PINNED_ENGINES") }}{{- else -}}[]{{- end -}}'
              dest: spec.arguments.parameters.5.value
- Source event:
dependencyName: engine-package-test-dep: Sử dụng payload sự kiện từ dependency này làm đầu vào cho template.- Template logic (
dataTemplate): - sử dụng Go/Sprig templating để tính toán giá tri(value) mà sẽ được viết vào Workflow parameter.
hasKey .Input.body "PINNED_ENGINES": kiểm tra nếu đầu vào của webhook JSON body có chứa cái keyPINNED_ENGINES.index .Input.body "PINNED_ENGINES": lấy 1 cách an toàn value của key “PINNED_ENGINES” từ parsed JSON map.toJson (...): chuyển nó sang dạng JSON string (e.g., an array of objects becomes'[{"ENGINE_ID":"ds",...}]'). để tránh Go map-like string ([map[...]]) vì pod của bạn không thể parse được dạng đó.else []: nếu cái key này không có, nó sẽ cung cấp JSON empty array string'[]'(non-empty text, so Argo Events won’t reject it as “empty”).{{- ... -}}: The leading/trailing hyphens trim whitespace around the template output.- Destination:
dest: spec.arguments.parameters.5.value: Writes the computed string into the 6th parameter’svalueof the submittedWorkflow.
Resulting behavior
- If the request body has:
"PINNED_ENGINES": [{"ENGINE_ID":"ds","PIN_ENGINE_VERSION":"5.1.5","PIN_DATABASE_VERSION":"7.5.2-23142"}]- Then the Workflow receives:
PINNED_ENGINES='[{"ENGINE_ID":"ds","PIN_ENGINE_VERSION":"5.1.5","PIN_DATABASE_VERSION":"7.5.2-23142"}]'
- If the key is absent:
- The Workflow receives:
PINNED_ENGINES='[]'
Your pod should parse PINNED_ENGINES as JSON.
Có một điều khá quan trong là Sensor không cho phép value là rổng kiểu như này PINNED_ENGINES=''